Part 1: Getting started
Prerequisites
To follow this tutorial, fulfill the following prerequisites:
- Set up a Splunk platform instance.
- Install Splunk Enterprise Security version 6.4.0 or higher.
- Upload the MITRE ATT&CK framework to your deployment. For more information, see MITRE ATT&CK framework.
Download the tutorial dataset
For this tutorial, you can download the open source BOTS dataset and add it to your available Splunk instance.
Why? Because this tutorial uses a specific set of data to ensure consistency in your results and the features that you are learning about. You can upload this tutorial-specific data to any Splunk deployment, which is not part of your work environment. This ensures that the tutorial data does not get mixed up with your production data.
The SOC (BOTS) version 3.0 dataset is distributed by Splunk Inc. with licenses based on Creative Commons CCO. This dataset helps security analysts and detection engineers explore common security issues that organizations face and test new detection methods against realistic data. The dataset is already indexed during packaging to avoid data ingest restrictions.
Splunk Enterprise Security is not included in this open-source release of the BOTS version 3.0 dataset.
The tutorial describes the steps for downloading the dataset and adding it to a Splunk instance.
Upload the tutorial dataset to the Splunk platform
When you add data to your Splunk platform deployment, the data gets processed and transformed into a series of individual events that you can view, search, and analyze.
Follow these steps to add data to the Splunk platform using Splunk Web:
- Log into Splunk Web to access the Home page.
- Select Settings, then select Add Data to access the Add Data page.
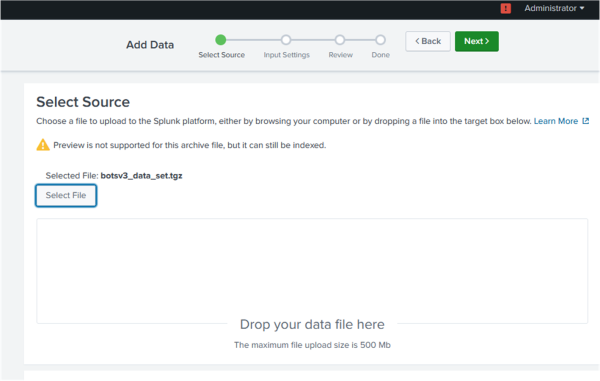
- On the Add Data page, select Upload to add the BOTS data as a botsv3_data_set.tgz file into your Splunk instance.
- Upload data through one of the following methods on this page:
- Drag the file you want to index from your desktop to the Drop your data file here area.
- Select Select File, and then select the botsv3_data_set.tgz file that you want to index as shown in the following image:
Splunk Enterprise then loads the file and processes it.
- After the file loads, select Next.
- Select Review, then select Submit, keeping the default settings.

Verify that the tutorial data gets indexed
Check the data to verify whether the tutorial dataset gets indexed correctly so that you can use risk-based alerting.
Follow these steps to verify whether the BOTS dataset has populated the index correctly:
- Navigate to the Splunk Enterprise Security app.
- Select Search menu, then select Search.
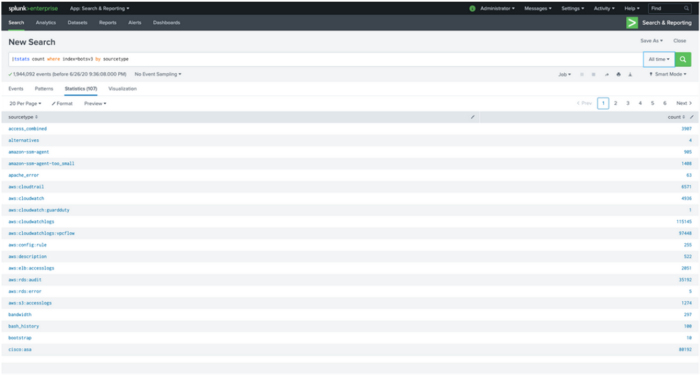
- Enter the following search:
| tstats count where index=botsv3 by sourcetype - Run the search on the All Time time range as shown in the following image. Approximately 107 sourcetypes are displayed for the BOTS dataset.

Verify the MITRE ATT&CK framework gets applied to Splunk Enterprise Security
Applying the MITRE ATT&CK framework to your Splunk Enterprise Security deployment provides context and helps to view security detection coverage. The framework outlines adversarial behaviors specific to Windows, Linux, Mac, cloud-based and mobile environments and helps security personnel better classify attacks, understand adversary behavior, and assess an organization's risk.
Follow these steps to review the MITRE ATT&CK lookup in Splunk Enterprise Security:
- Navigate to the Splunk Enterprise Security app.
- Select Configure, then select Data Enrichment.
- Select Threat Intelligence Management.
- Under Sources, search for mitre_attack.
The mitre_attack scheduled search downloads the data from the MITRE ATT&CK website once a day and converts it into the mitre_attack lookup.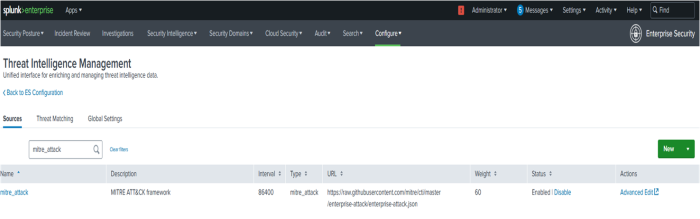

List the fields in the MITRE ATT&CK lookup
Follow these steps to list all the fields in the MITRE ATT&CK lookup:
- Navigate to the Splunk Enterprise Security app.
- Select the Search menu, then select Search.
- Enter the following search:
| inputlookup mitre_attack_lookup | head 1 | transposeThe following screenshot shows a list of all the fields in the MITRE ATT&CK lookup.
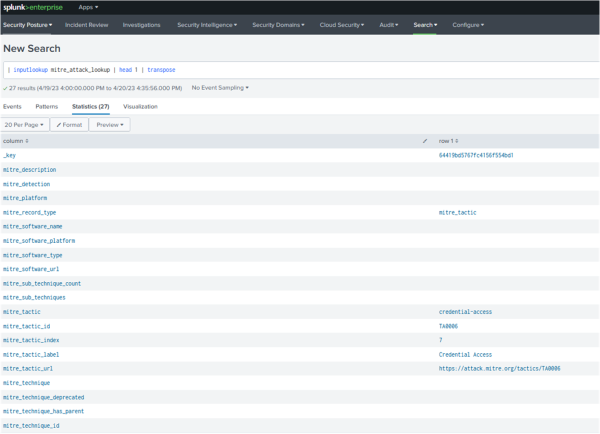
The MITRE ATT&CK lookup enriches the risk events by matching them against various MITRE techniques and tactics.

See also
For more information on uploading data to Splunk Enterprise Security, see How do you want to add data in the Splunk Enterprise Getting Data In manual.
Next step
Now that you have added data to your Splunk platform instance and verified that the MITRE ATT&CK framework is applied, you can raise the risk score of watchlisted users using risk factors. See Part 2: Raise the risk score of watchlisted users using risk factors.
| About the Risk-based Alerting Tutorial | Part 2: Raise the risk score of watchlisted users using risk factors |
This documentation applies to the following versions of Splunk® Enterprise Security: 7.2.0, 7.3.0, 7.3.1, 7.3.2, 7.3.3
Feedback submitted, thanks!