Integrate ITSI with ServiceNow
Integrate IT Service Intelligence (ITSI) with ServiceNow so you can automatically create and update ServiceNow incidents through ITSI episode actions. Episode actions are internal or external actions taken on episodes based on certain activation criteria, or trigger conditions. By integrating with ServiceNow, you can monitor your environment within ITSI and then open corresponding incidents in ServiceNow so users can take appropriate actions with standard workflows.
For an overview of all ticketing integrations available for ITSI, see Overview of episode ticketing integrations in ITSI.
Why integrate ITSI with ServiceNow?
ServiceNow is a platform, not a monitoring tool. Instead, it's a consumer of monitoring tools that needs other platforms feeding events into its system. By integrating ServiceNow with ITSI, you can gather data sources and correlate data within ITSI, and then feed those events into ServiceNow.
Set up the integration
Perform the following steps to set up a basic integration with ServiceNow.
Prerequisites
| Requirement | Description |
|---|---|
| ServiceNow | You must have ServiceNow version Fuji or later. |
| ITSI roles | You must have the itoa_admin or itoa_team_admin role to set up the integration with ServiceNow. |
1. Configure ServiceNow to integrate with the Splunk platform
Before you integrate ITSI with ServiceNow, you must install the Splunk Integration application and assign the x_splu2_splunk_ser.Splunk role on your ServiceNow instance. For instructions, see Configure ServiceNow to integrate with the Splunk platform in the Splunk Add-on for ServiceNow manual.
2. Install and configure the Splunk add-on for ServiceNow
Install the Splunk add-on for ServiceNow on your Splunk instance. The add-on is required to send ITSI episodes to ServiceNow. Download the app from Splunkbase. See Set up the Splunk Add-on for ServiceNow for instructions.
To determine the correct version of the app to install, see ITSI compatibility with other apps and add-ons in the Install and Upgrade Manual.
3. Test the integration
You're now ready to start creating ServiceNow incidents from ITSI.
- Within ITSI, go to Episode Review. If you configured the integration correctly, the option to Create ServiceNow incident appears in the Actions dropdown menu.
- To create an incident, follow the steps in Create a ticket in ServiceNow.
The initial integration is unidirectional, so updates to the ServiceNow ticket aren't reflected in ITSI. To configure a bidirectional integration, see the next section.
Set up a bidirectional integration with ServiceNow
A bidirectional integration exchanges data between your ITSI instance and ServiceNow so that when you make an update to a ServiceNow ticket, the episode information is also updated within ITSI.
The following diagram shows how ITSI uses the Common Information Model (CIM) to update an episode:

1. Install the Common Information Model
ITSI leverages the Ticket Management data model in the Splunk Common Information Model (CIM) to normalize your data, using the same field names and event tags for equivalent events from your external ticketing system. See Ticket Management in The Splunk Common Information Model Add-on Manual.
This normalization enables you to create action rules for fields like priority, severity, and state without having to remember what they're called in ServiceNow. See Overview of the Common Information Model for an introduction to the data models and information about the fields and tags they use.
Install the Common Information Model Add-on (CIM) from Splunkbase. To determine the correct version to install, see ITSI compatibility with other apps and add-ons in the Install and Upgrade Manual.
2. Enable the incident data input
Enable the incident data input in the Splunk Add-on for ServiceNow.
- Within the Splunk Add-on for ServiceNow, go to the Inputs tab.
- Use the filter to search for incident.
- Enable the input in the Status column.
3. Enable the Bidirectional Ticketing correlation search
ITSI ships with a Bidirectional Ticketing correlation search that queries ServiceNow and sends an event to the itsi_tracked_alerts index each time an update is made. The correlation search also maps ServiceNow fields to the CIM fields. For more information, see Ticket management in the Common Information Model Add-on Manual.
The Bidirectional Ticketing correlation search is disabled by default. To enable it, perform the following steps:
- From the ITSI main menu, click Configuration > Correlation Searches.
- Enable the Bidirectional Ticketing correlation search.
4. (Optional) Specify the index to look at for available fields
When you configure action rules in the next step, ITSI pre-populates all possible fields and values from the main index. If your data is going into a different index, you can specify which index ITSI looks at when populating these fields.
- Open or create a local macros.conf file at
$SPLUNK_HOME/etc/apps/SA-ITOA/local/. - Under the
[itsi_event_management_snow_incidents]stanza, specify the index in thedefinitionsetting. For example:
[itsi_event_management_snow_incidents]
args =
definition = index=myspecialindex sourcetype=snow:incident
5. Configure action rules to sync ServiceNow ticket fields
Configure aggregation policy action rules that update fields in the ITSI episode when they change in ServiceNow.
See Supported arguments for incidents for a table of arguments that ServiceNow supports for incident updates.
- From the ITSI main menu, click Configuration then Notable Event Aggregation Policies.
- Open an existing custom notable event aggregation policy that creates episodes you'll send to ServiceNow.
- Select the Action Rules tab.
- Select Add Rule.
- Select the ServiceNow incident associated with the episode has from the If dropdown list. The option only appears if you installed CIM and the Splunk Add-on for ServiceNow.
- Create your aggregation policy so that each change in ServiceNow has an action rule that updates the corresponding episode in ITSI.
For example, if the ServiceNow incident has a state of 2, change the ITSI episode status to In progress.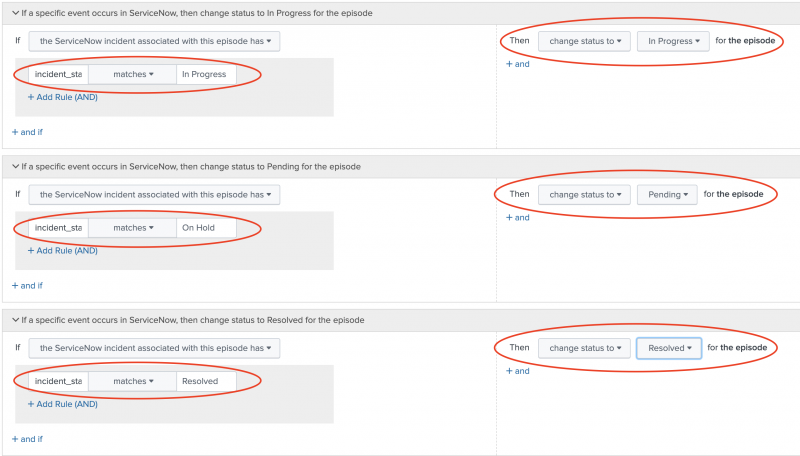
- Repeat these steps for each aggregation policy you want to integrate with ServiceNow.
Note: To use the bidirectional integration, you must create a custom aggregation policy instead of using the default aggregation policy.

Aggregation policies can't update closed episodes. However, action rules can update the Status, Severity and Owner fields of closed episodes for bidirectional events generated by ServiceNow. Action rules also can't make the episode active again, but only updates the fields.
6. Test the integration
Test the integration to make sure you configured the fields correctly.
- Go to Episode Review and link an episode created by the aggregation policy you just configured to an incident in ServiceNow. For instructions, see Link a ticket.
- Go to ServiceNow and update one of the field values for which you created an action rule. For example, change the ticket status from
NewtoIn Progress. - Go back to Episode Review in ITSI and confirm that the corresponding field was updated within the episode. The field might take several minutes to update.
Bulk linking behavior with bidirectional ticketing
After you set up a bidirectional integration, any ServiceNow tickets linked through the Link Ticket action has bidirectional functionality enabled by default. For more information, see Link a ticket.
The following table describes how updates occur with a bidirectional integration:
| Action | Behavior |
|---|---|
| Link multiple episodes to a single ServiceNow incident | The ServiceNow incident link is added to each episode. If you update the ServiceNow incident, the changes apply to each linked episode. If you update multiple episodes, the most recent change takes precedence. For example, if a ServiceNow incident is linked to episodes A and B, and you change A to Resolved and B to In Progress, the incident's final status is In Progress.
|
| Link a single episode to multiple ServiceNow incidents | A link to each ServiceNow incident is added to the episode. If you update the episode, the changes apply to each linked ServiceNow incident. If you update multiple ServiceNow incidents, the most recent change takes precedence. For example, if an episode is linked to ServiceNow tickets A and B, and you change A to Resolved and B to In Progress, the episode's final status is In Progress.
|
Automate the process of creating ServiceNow incidents
Define the following aggregation policy action rules to open a critical ServiceNow incident each time a ITSI episode is created:
- Within ITSI, click Configuration > Notable Event Aggregation Policies.
- Open the aggregation policy you want to integrate with ServiceNow.
- Go to the Action Rules tab.
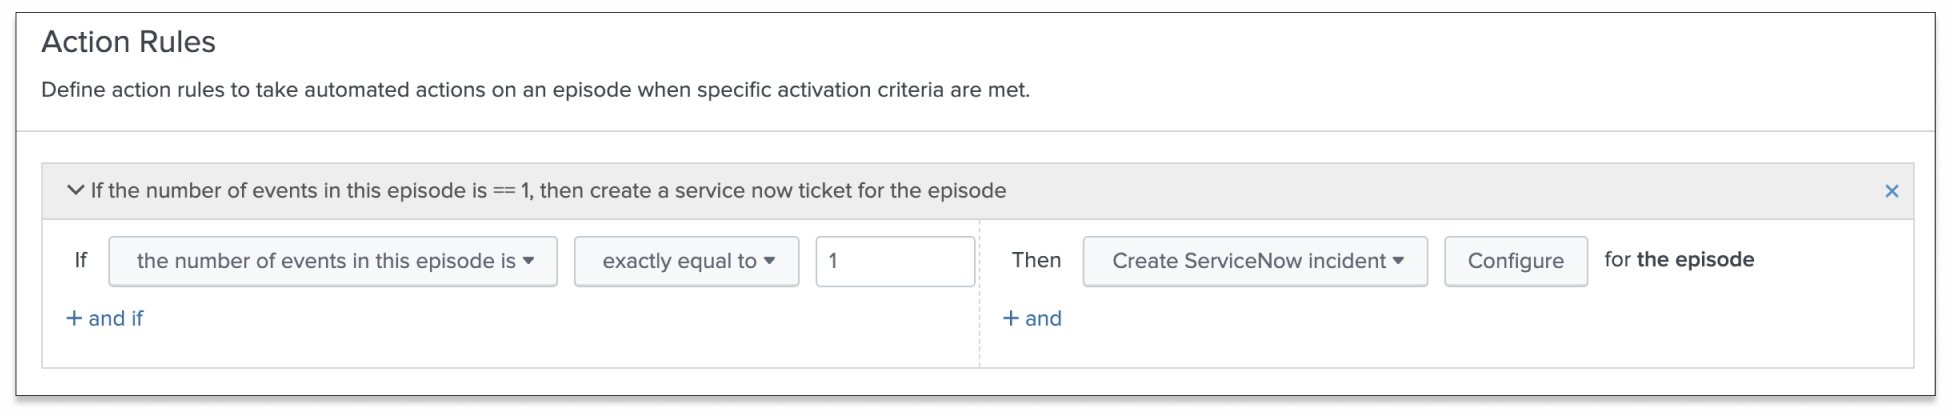
- Click Add Rule and configure one or more trigger conditions to open a ServiceNow incident. For example, the following rule opens an incident each time an episode is created:
- Click Configure and configure all relevant fields. For descriptions and examples of each field, and for instructions on how to pass custom fields, see Use custom alert actions for the Splunk Add-on for ServiceNow in the Splunk Add-on for ServiceNow manual. It's possible to pass custom fields from fields contained in an episode in the format
$result.fieldname$.
Note: You don't need to provide a correlation ID because ITSI takes care of associating the episode with ServiceNow for you. If you provide an ID, it's ignored. - Click Save.

For more information about configuring action rules in an aggregation policy, see Configure episode action rules in ITSI.
Update a ServiceNow incident
To update a previously-created ServiceNow incident, follow the steps in the previous section exactly as if you were creating a new incident, but only fill out the fields in the form that you want to update. For example, if you only want to update the incident's urgency, only fill out the Urgency field and leave the rest blank.
When an action rule to create a ServiceNow incident runs multiple times on the same episode, the existing incident is updated each time. The same thing happens if you unlink a ServiceNow incident and then run the Create ServiceNow incident action a second time. This occurs because the correlation ID used to create the ServiceNow incident is the itsi_group_id of the episode.
| Overview of episode ticketing integrations in ITSI | Integrate ITSI with BMC Remedy |
This documentation applies to the following versions of Splunk® IT Service Intelligence: 4.11.0, 4.11.1, 4.11.2, 4.11.3, 4.11.4, 4.11.5, 4.11.6, 4.12.0 Cloud only, 4.12.1 Cloud only, 4.12.2 Cloud only, 4.13.0, 4.13.1, 4.13.2, 4.13.3, 4.14.0 Cloud only, 4.14.1 Cloud only, 4.14.2 Cloud only
Feedback submitted, thanks!