This documentation does not apply to the most recent version of Splunk® ODBC Driver.
For documentation on the most recent version, go to the latest release.
Enter or change configuration information
To enter or change configuration information, do the following:
From the Start screen (or on the Start menu), type odbc.
- Click whichever of the following items that appears. If more than one appears, click the one that corresponds to the ODBC Driver architecture you installed: Data Sources (ODBC), 32-bit ODBC Data Source Administrator, or 64-bit ODBC Data Source Administrator.
In the ODBC Data Source Administrator window, click the System DSN tab.
Click Splunk ODBC in the list of system data sources.
Click Configure. The Splunk ODBC Connection Options window appears.
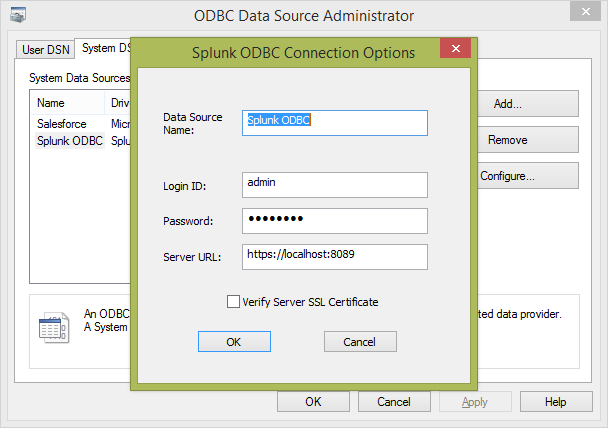
- In this window, you can change any of the options described in "Install the Splunk ODBC Driver", plus the following additional option:
- Verify Server SSL Certificate: This checkbox instructs the Splunk ODBC Driver to ensure the integrity of the Splunk Enterprise server's SSL certificate. Select this checkbox if your server is across a firewall from the computer on which you're running the Splunk ODBC Driver. Follow the instructions in "SSL Certificate Configuration".

Last modified on 29 April, 2016
| Verify installation | Proxy Server Configuration |
This documentation applies to the following versions of Splunk® ODBC Driver: 2.1.0, 2.1.1
Feedback submitted, thanks!