Use the driver with Tableau
You can access Splunk Enterprise data from Tableau Desktop using the Splunk ODBC Driver version 1.0 and later.
- Note: To access Splunk Enterprise data from Tableau, ensure you've installed the version of the Splunk ODBC Driver that corresponds to the architecture version of your Tableau install. That is, install the 32-bit version of the Splunk ODBC Driver if you're running 32-bit Tableau, and install the 64-bit version of the Splunk ODBC Driver if you're running 64-bit Tableau.
Connect Tableau 8.2 and later to Splunk Enterprise data
The Splunk ODBC Driver is not supported on Splunk platform versions 7.x. Upgrading your Splunk platform to 7.x can cause breaking changes to the Splunk ODBC Driver.
To use the Splunk ODBC Driver to get Splunk Enterprise data into Tableau 8.2 and later:
- Open a new workbook in Tableau.
- On the Data menu, click Connect to Data.
- In the Connect to Data pane, scroll to the bottom and click Splunk.
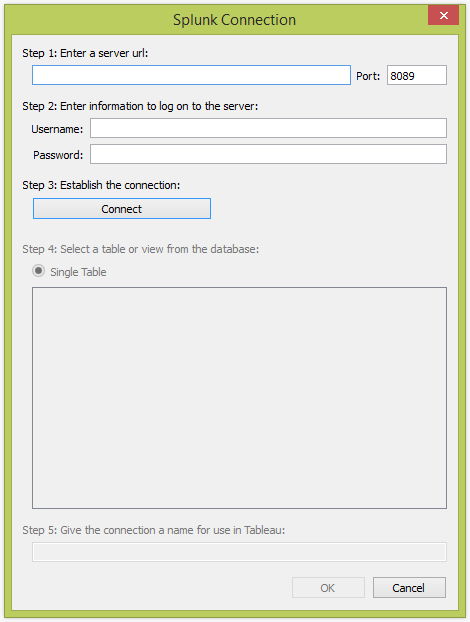
- In the Splunk Connection window, enter a server URL and login credentials, and then click Connect. Be sure to prepend the URL with https://.
- Once Tableau has connected to Splunk, choose a table from the list that appears. (Each table corresponds to a saved search, or report in Splunk Enterprise 6 and later.)
- Give the connection a name, and then click OK.
- In the Data Connection window, choose whether to connect directly to your Splunk data or import all of the returned Splunk Enterprise data:
- Connect live: Tableau returns you to your workbook. This option creates a direct connection to Splunk Enterprise and is dependent on the speed of your Splunk Enterprise server. You can refresh the data at any time.
- Import all data: The Save As window appears. Enter a name for the data extract, and click Save. Tableau extracts all of your data. It returns you to your workbook. For more information, go to http://www.tableausoftware.com/support and search for "Extracting Data". This option lets you work with a snapshot of your Splunk Enterprise data.
- The Import some data option is not supported.

Connect Tableau 8.1 and earlier to Splunk Enterprise data
To use the Splunk ODBC Driver to get Splunk Enterprise data into Tableau 8.1 and earlier, first enable an ODBC connection from Tableau to the Splunk ODBC Driver by copying the Splunk.tdc file from the Splunk ODBC Driver directory into the Tableau datasources directory.
After you install the Splunk ODBC Driver, the Splunk.tdc file is placed at the following path: C:\Program Files\Splunk ODBC Driver\Tableau\. If you're running a 64-bit edition of Windows and you install the 32-bit version of the Splunk ODBC Driver, the driver directory will be located in the Program Files (x86) directory. Copy the Splunk.tdc file to the datasources directory, whose default location is at the following path: C:\Users\username\Documents\My Tableau Repository\Datasources.
For more information, see "Query Isolation Levels" on the Tableau Software Knowledge Base website.
Now you can connect to Splunk Enterprise:
- Open a new workbook in Tableau.
- On the Data menu, click Connect to Data.
- In the Connect to Data pane, scroll to the bottom and, under On a Server, click Other Databases (ODBC).
- In the Generic ODBC Connection window, under Connect Using, select DSN.
- From the popup menu, click Splunk ODBC and click the Connect button.
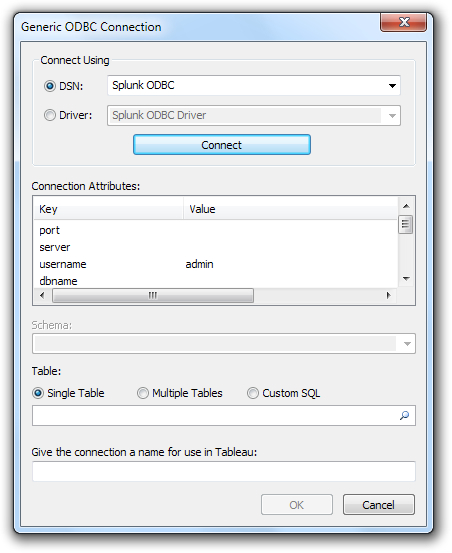
Note: Ignore the fields under Connection Attributes. Also leave the Schema field empty.
- Under Table, select the Single Table option, and then click the magnifying glass icon on the right side of the field to get a list of the tables you can use. As you can see, the available tables map to the reports (saved searches in Splunk Enterprise 5) you have created in Splunk Enterprise.
Note: The Multiple Tables and Custom SQL options are not supported
- Enter a name to give the connection, and click OK.
- In the Data Connection window, choose whether to connect directly to your Splunk Enterprise data or import all of the returned Splunk data:
- Connect live: Tableau returns you to your workbook. This option creates a direct connection to Splunk Enterprise and is dependent on the speed of your Splunk Enterprise server. You can refresh the data at any time.
- Import all data: The Save As window appears. Enter a name for the data extract, and click Save. Tableau extracts all of your data. It returns you to your workbook. For more information, go to http://www.tableausoftware.com/support and search for "Extracting Data". This option lets you work with a snapshot of your Splunk Enterprise data.
- The Import some data option is not supported.

Note: If you don't see any tables listed after connecting—or if you don't see the tables you expected—see Tables aren't visible after connecting in the Troubleshooting section.
In your workbook, you can construct queries. Construct your query using SQL or the Splunk Search Processing Language (SPL), depending on what you chose when you configured the driver. (The default query language is SQL; see "Configuration".) For more information about using Tableau, see "Tableau and ODBC", or press F1 to access the application's built-in help.
Filter support limitations
Using filters in Tableau is equivalent to creating subsearches in Splunk Enterprise. The more subsearches that you create, the more performance drags are possible. Using Tableau to create Splunk Enterprise searches obscures the actual search commands that the Splunk ODBC Driver translates from SQL.
Creating multiple dimension filters using Tableau might have a performance impact, especially when working with a large set of results. There is a limit to how many results will be returned by subsearch and how long a subsearch can take. See About subsearches for more information.
Splunk recommends that, for better performance, you push as much filtering as you can into the report (saved search in Splunk Enterprise 5) itself within Splunk Enterprise rather than implementing extensive filtering in Tableau.
| Use the driver with Microsoft Excel | Use the driver with MicroStrategy |
This documentation applies to the following versions of Splunk® ODBC Driver: 2.1.0, 2.1.1
Feedback submitted, thanks!