You can share a job with other Splunk users, or export the event data to archive or to use with a third-party charting application.
When you share a job, you are sharing the results of a specific run of a search.
There are several ways that you can share a specific job with other Splunk users. You can change the permissions for a search job to share that job with other users. You can also share a job by sending the URL for a search job to a Splunk user.
You can only change permissions or share a link to the current job.
Change job permissions
You can share a job by changing the permissions on that job. By default, all jobs are "Private".
- From the Job menu, select Edit Job Settings to display the Job Settings dialog box.
- Change Read Permissions to Everyone.
- Click Save.

You can quickly share a job with other Splunk users by sending them a link to the job. This is handy when you want another user to see the results returned by the job.
The users that you send the link to should also have permissions to use the app that the job belongs to.
Decide which method you want to use to obtain a job link. You can use the Share icon or the Job menu.
- To use the Share icon:
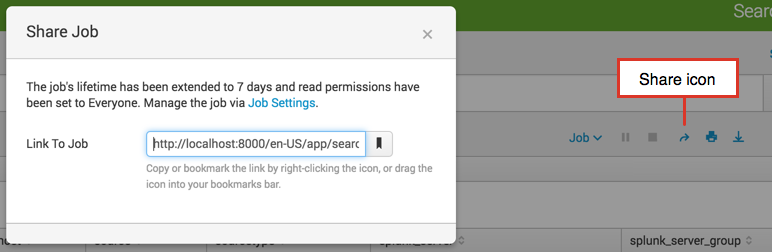
- Click the icon. The Share icon is one of the search action icons.
- In the Link To Job text box, copy the URL and send the link to the users you want to share the job results with.
- The permissions on the job are automatically changed to "Everyone" and the lifetime of the job is automatically extended to "7 days".
- To use the Job menu:
- From the Job menu, select Edit Job Settings to display the Job Settings dialog box.
- Change Read Permissions to Everyone. If the permissions for a job are set to "Private", other users cannot access the job with the link.
- Change Lifetime to 7 days.
- Copy the link and send the link to the users you want to share the job results with.

You can also save the link for your own use. Click and drag the bookmarks icon to the bookmarks bar in your Web browser.
Export job results to a file
You can export your job results in a variety of format such as CSV, JSON, PDF, Raw Events, and XML. You can then archive the file, or use the file with a third-party charting application. The format options depend on the type of job artifact that you are working with.
- If the search generates calculated data that appears on the Statistics tab, you cannot export using the Raw Events format.
- If the search is a saved search, such as a Report, you can export using the PDF format.
The export file is saved in the default download directory for your browser or operating system.
There are several methods that you can use to export search results. A few of these methods include Splunk Web, CLI, SDKs, and REST. Some of the methods are optimized for speed, while others are good for extremely large event sets.
For a complete list of the export methods and links to the specific steps, see Export search results.
| Extending job lifetimes | Manage search jobs |
This documentation applies to the following versions of Splunk® Enterprise: 7.0.0, 7.0.1, 7.0.2, 7.0.3, 7.0.4, 7.0.5, 7.0.6, 7.0.7, 7.0.8, 7.0.9, 7.0.10, 7.0.11, 7.0.13
Feedback submitted, thanks!