Help building searches
The Splunk Search Processing Language (SPL) includes many commands and functions that you can use to build searches. All of the commands and functions are documented in the Search Reference.
When you write a search in Splunk Web, there are several built-in features that help you build and parse searches.
- Search assistant modes
- Syntax highlighting
- Auto-format search syntax
- Numbering search lines
- Shortcuts
This topic discusses using the search assistant. See Help reading searches for information about syntax highlighting, auto-formatting, line numbers, and shortcuts.
Use the search assistant to build searches
When you type a few letters or a term into the search bar, the search assistant shows you terms and searches that match what you typed.

The Matching Terms are based on the terms that are indexed from your data. The Matching Searches are based on your recent searches.
The list continues to update as you type.
To add an item in the list to your search criteria you can click on an item, or use the arrow keys to highlight the item and press Enter.
Search assistant modes
The search assistant has two modes: Compact and Full. The default mode is Compact.
Compact mode
The Compact mode displays a list of matching terms and searches when you type. When you type a pipe ( | ) character, to indicate that you want to use a command, a list of the SPL commands appears. You can type a letter to quickly jump to the section of the list that begins with that letter. For example, if you type the letter s, the list displays all of the commands that begin with the letter s.
When you type a command, a list appears showing Command History and Matching Searches. Initially, the Command History shows some command examples. As you use a command in your searches, the Command History displays your uses of the command instead of the examples.

Below the list is a brief description for the command and an example. The Learn More link opens the Search Reference in a new window and displays documentation about the command.
To access the Learn More link, use your keyboard. Arrow down to the command or attribute name to highlight the name. Press Tab to highlight the '''Learn More''' link and then press Enter to activate the link.
If you type something after the command, the search assistant shows any command arguments or history that match what you type.

The search assistant can also show you the data type that an argument requires. Type the argument in the Search bar. Include the equal ( = ) symbol, if that is part of the argument syntax. In the following example, the search assistant shows that a <string> value is required for the countfield argument.

Full mode
The Full mode displays a list of matching terms and searches when you type, along with a count of how many times a term appears in your indexed data. This count tells you how many search results will be returned if you search on that term. If a term or phrase is not in the list, the term is not in your indexed data.
The Full mode also provides suggestions in the How To Search section on ways that you can retrieve events and use the search commands.

When you type a command in the Search bar, the list of matching terms and searches is replaced with the Command History list.
To add an item in the Command History list to your search criteria click on an item, or use the arrow keys to highlight the item and press Enter.
The search assistant displays a brief description of the command and several examples. There are two links next to the command description: Help and More.
- The Help link opens the Search Reference in a new window, and displays documentation about the command.
- The More link expands the information about the command that is displayed on the screen.

When you select the More link, several new sections appear. The Details section provides a more detailed description of the command. The Syntax section shows the basic syntax for the command. The Related section lists commands that are related to the command that you typed. If the command has complex syntax, click the More link next to the syntax to expand the syntax.

If you type something after the command, the search assistant shows any command arguments or history that match what you type.

The search assistant can show you the data type that an argument requires. Type the argument in the Search bar. Include the equal ( = ) symbol if that is part of the argument syntax. In the following example, the search assistant shows that a <string> value is required for the countfield argument.

Change the search assistant mode
The default search assistant mode is Compact. You can change the search assistant mode or temporarily hide the search assistant while you build your search.
When you change the search assistant mode, the change is only for your user account.
Prerequisite
If the Search bar contains a search that you have not run, run the search before you change the search assistant mode. Otherwise the search is lost when you change modes. Running the search adds the search to the search history, where you can access it after you change the mode.
Steps
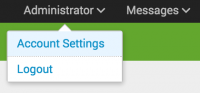
- On the Splunk bar, select [User_account_name] > Account Settings.
- Under the Search section, look for Search assistant and select Compact, Full, or None.
- Click Save.

The None mode turns the search assistant off.
Hide and display the search assistant
By default, the search assistant opens when you type something into the Search bar.
Hide the search assistant by default
Depending on the mode you are using, you can turn off the search assistant or make the search assistant hidden by default.
Compact mode
With the Compact mode, you cannot permanently hide the search assistant. You can only temporarily hide it, or turn it off by changing the search assistant mode to None.
Full mode
With the Full mode, you can set the search assistant to be hidden by default.
- In the search assistant window, select Auto Open. This removes the check mark next to Auto Open.
- When you start a new search, the search assistant is hidden. This setting remains active even when you close Splunk Web. The next time you open Splunk Web, the search assistant is hidden.
Temporarily hide the search assistant
In both the Compact and Full modes, you can temporarily hide the search assistant.
Compact mode
- Press ESC.
Full mode
- At the bottom of the search assistant window, click the collapse arrow to hide the window.

Unhide the search assistant window
If the search assistant window is hidden, you can unhide it.
Compact mode
- Use the keyboard shortcut for your operating system to unhide the window.
- On Linux or Windows, press CTRL+space.
- On Mac, press Control+space.
Full mode
Whether you have the search assistant hidden by default or temporarily hidden, you can unhide the search assistant window at any time.
- Under the Search bar, click the expand arrow to display the search assistant window.
- See Temporarily hide the search assistant for information about the collapse/expand button.
If these steps do not unhide the search assistant window, then either the search assistant is turned off or there is no assistance for what you have typed.
To turn the Search Assistant back on, see Change the search assistant mode.
Change the default search assistant mode for all users
Individual users can change the default search assistant setting for themselves. The default search assistant mode can also be changed globally, for all users.
Prerequisites
- Only users with file system access, such as system administrators, can change the default search assistant mode for all users.
- Review the steps in How to edit a configuration file in the Admin Manual.
Never change or copy the configuration files in the default directory. The files in the default directory must remain intact and in their original location. Make the changes in the local directory.
Steps
- Open the local
user-prefs.conf.spec.infile for the Search app. For example$SPLUNK_HOME/etc/apps/<app_name>/local. - Under the [general] stanza, change the search assistant mode by selecting one of the other mode values. Choose from full, compact, or none. For example,
search_assistant=full. - Restart the Splunk instance.
| Anatomy of a search | Help reading searches |
This documentation applies to the following versions of Splunk® Enterprise: 7.0.0, 7.0.1, 7.0.2, 7.0.3, 7.0.4, 7.0.5, 7.0.6, 7.0.7, 7.0.8, 7.0.9, 7.0.10, 7.0.11, 7.0.13
Feedback submitted, thanks!