Stream Easy Setup
Splunk Stream provides an Easy Setup page that can help you set up and configure data collection on local and/or remote machines.
Set up data collection on local machine
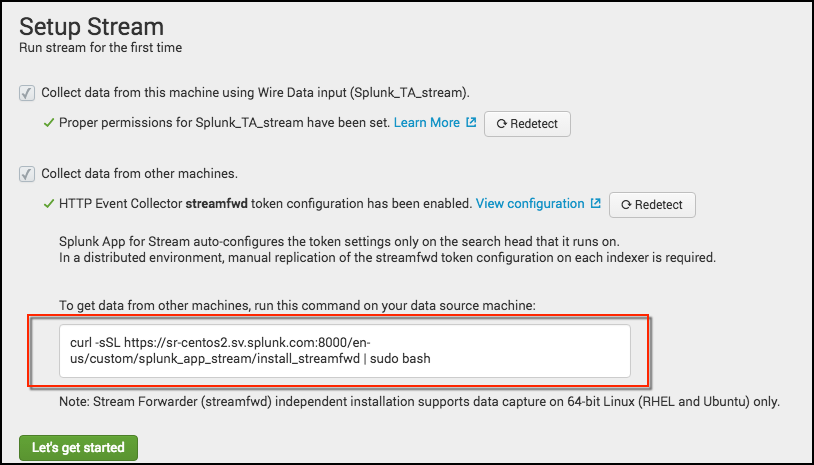
Select the Collect data from this machine using Wire Data input (Splunk_TA_stream) check box.
- If you see "Splunk_TA_stream is not properly configured," click Redetect. In most cases, this sets proper permissions for the the
streamfwdbinary to capture packets on network interfaces. - If you still see "Splunk_TA_stream is not properly configured," follow these Steps to Troubleshoot:
- Click Check Wire Data Input. This opens the Wire Data data input page. Click on streamfwd to check the data input, then click Save to validate the input.
- Click Splunk_TA_stream log file. Examine the search results for errors.
- If you are still unable to configure
Splunk_TA_stream, click the Learn More link. This takes you to documentation that shows how to set proper permissions forSplunk_TA_stream.
Set up data collection on remote machines
Splunk Stream supports independent Stream forwarder installation on compatible Linux machines.
1. Select the Collect data from other machines check box.
- If you see “HTTP Event Collector streamfwd token configuration has been enabled,” then the HTTP Event Collector endpoint is configured to receive data. Proceed to step 2.
- If you see “HTTP Event Collector streamfwd token configuration has been disabled,” click View Configuration. This opens the HTTP Event Collector page. Click Enable for the streamfwd input. The HTTP Event Collector is now enabled for streamfwd data input.
2. Copy and run the curl script on the command line of the Linux machine where you want to install streamfwd.
The script installs Stream Forwarder streamfwd in /opt/streamfwd.
3. Use the sudo service streamfwd start | stop | restart | status command to control the service.
For example:
sudo service streamfwd start
Note: Independent Stream forwarder installation is not required. You can deploy independent Stream forwarder at anytime from the Distributed Forwarder Management page in the splunk_app_stream UI.
For detailed information on Stream forwarder configuration, see: Configure Stream forwarder in this manual.
| Deploy Splunk Stream on Splunk Cloud | Configure Stream forwarder |
This documentation applies to the following versions of Splunk Stream™: 6.5.0, 6.5.1, 6.6.0, 6.6.1, 6.6.2, 7.0.0, 7.0.1, 7.1.0, 7.1.1

 Download manual
Feedback submitted, thanks!