Add sample data
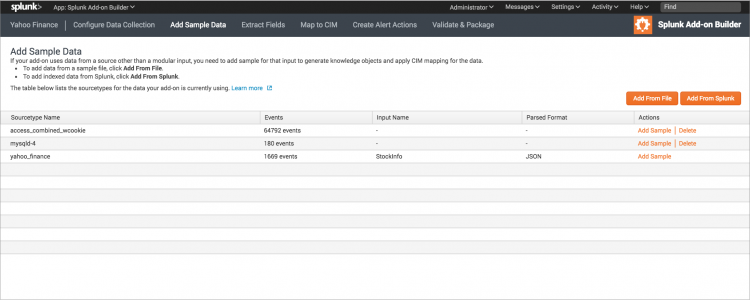
In Add Sample Data, add sample data to your add-on. Any source types you have already defined for your add-on, such as the data inputs you configured from modular inputs in the Configure Data Collection section, are also listed on this page.
Uploading sample data is useful when:
- You have configured a data collection and you want to upload more sample data to create knowledge objects, such as field extractions, and to perform CIM mapping.
- Your add-on relies on native core data inputs for data collection (for example, syslog files or the HTTP Event Collector) and you use the Add-on Builder for creating knowledge objects and perform CIM mapping.
You can add sample data in two ways:
- Upload sample data from one or more files and create a source type for this data input.
- Add data that is already indexed in your Splunk Enterprise instance by selecting an existing source type.
Add sample data from a file
After you've added data inputs in the Configure Data Collection section, the modular inputs you created might not collect data quickly enough. To create knowledge objects right away, you can upload sample data files for your source types, for instance from historical logs.
- Note You cannot upload compressed files.
To upload a sample data file and create a source type for it:
- On your add-on homepage, click Add Sample Data on the Add-on Builder navigation bar.
- On the Add Sample Data page, click Add From File.
- Enter a source type name for this data.
- Click Upload Data, navigate to and select the sample data file, then click Open.
- Adjust indexing settings as needed:
- Expand the Event Breaks section and select an option that indicates how events for the data in this source type should be separated:
- Expand the Timestamp section and select an option that indicates how to generate timestamps for the data.
- Expand the Advanced section to specify additional index-time parameters for parsing data.
- Click Save.
The preview displays the first 1000 events from the first 2MB of data.
   * Auto: Events are auto-detected based on their timestamp location.
   * Every Line: Every line is one event.
   * Regex: Use a regular expression to define a pattern to split events.
Sample events are stored in a dedicated "add_on_builder_index" index.
To upload a sample data file for an existing source type:
- On your add-on homepage, click Add Sample Data on the Add-on Builder navigation bar.
- On the Add Sample Data page, find the source type in the table and click Add Sample.
- Click Upload Data, navigate to and select the sample data file, then click Open.
- Adjust indexing settings as needed:
- Expand the Event Breaks section and select an option that indicates how events for the data in this source type should be separated:
- Expand the Timestamp section and select an option that indicates how to generate timestamps for the data.
- Expand the Advanced section to specify additional index-time parameters for parsing data.
- Click Save.
The preview displays the first 1000 events from the first 2MB of data.
   * Auto: Events are auto-detected based on their timestamp location.
   * Every Line: Every line is one event.
   * Regex: Use a regular expression to define a pattern to split events.
Add indexed data from Splunk Enterprise
To add data that has already been indexed in Splunk Enterprise:
- On your add-on homepage, click Add Sample Data on the Add-on Builder navigation bar.
- On the Add Sample Data page, click Add From Splunk.
- Select the source type of the data to add.
- Click Add.
- Note Any future changes made to the original source type will not be included in your add-on.
Learn more
For more information, see the following Splunk Enterprise documentation:
- For source types, see Configure source types in the Getting Data In manual
- For event breaks, see Configure event line breaking in the Getting Data In manual
- For advanced settings, see props.conf in the Admin Manual
| Create a setup page | Extract fields |
This documentation applies to the following versions of Splunk® Add-on Builder: 2.0.0

 Download manual
Feedback submitted, thanks!