Set up a deployment server and create a server class
This topic discusses how to set up deployment server to distribute the "send to indexer" app you created previously to all of the universal forwarders that you will set up as part of the Splunk App for Windows Infrastructure deployment.
What is deployment server?
The Splunk Enterprise deployment server is a system that distributes apps, configurations, and other assets to other Splunk instances. Deployment server can send assets to other full Splunk Enterprise instances as well as light and universal forwarders.
Deployment server is available on every full Splunk Enterprise instance. To use it, you must activate it.
In this setup you will use the deployment server to distribute the "send to indexer" app to all universal forwarders in the Splunk App for Windows Infrastructure deployment. You accomplish this through the Forwarder Management scheme.
Learn more at "About deployment server and forwarder management."
Why use deployment server?
Deployment server is the fastest way to get apps and configurations deployed to your Splunk universal forwarders. It is the most native way to get your environment up and running. It's also free with Splunk Enterprise.
This procedure uses deployment server to get you familiarized with the concept of using it to distribute apps and configurations quickly and efficiently.
It is not a requirement to use deployment server, however. If you want, you can use an external tool, such as Windows System Center Configuration Manager or chef, puppet, or salt if your deployment runs on *nix servers.
Activate deployment server
To activate deployment server, you must place at least one app into %SPLUNK_HOME%\etc\deployment-apps on the host you want to act as deployment server. In this case, the app is the "send to indexer" app you created earlier, and the host is the indexer you set up initially.
1. On the indexer, use your operating system file management tools to move the "sendtoindexer" folder from the Splunk apps directory to the Splunk deployment apps directory.
- Open a PowerShell window and type the following:
> Move-Item -Path C:\Program Files\Splunk\etc\apps\sendtoindexer -Destination C:\Program Files\Splunk\etc\deployment-apps\sendtoindexer
2. From the same command-line prompt, restart Splunk Enterprise:
> cd C:\Program Files\Splunk\bin
> .\splunk restart
3. Log back into Splunk Enterprise. The indexer has now gained the deployment server capability.
View apps in Forwarder Management
Once you have logged back into Splunk, confirm that deployment server has activated and is aware of the new "send to indexer" app:
1. In the system bar, click Settings > Forwarder Management.
2. Click the Apps tab. You should see the "sendtoindexer" app in the list.
If you don't see the app, review the instructions in "Activate deployment server" and confirm that you have copied the entire "sendtoindexer" folder over to the Splunk deployment apps directory.
Configure a server class for the app
The next step is to define a server class for the "send to indexer" app.
Server classes are logical data structures that tell deployment servers where and what to send to one or more deployment clients. A server class treats a set of deployment clients as a group - any member of a server class receives apps and configurations defined within that class.
In this case, server classes tell deployment server when and where to deploy the "send to indexer" app. In this procedure you will create the server class, then assign the "send to indexer" app to this class. Later, you will add universal forwarder clients to the class.
1. From the Apps tab in Forwarder Management, in the "sendtoindexer" listing under "Actions", click Edit. Splunk Enterprise loads the "Edit app: sendtoindexer" page.
2. Click the gray "+" sign under "Server Classes."
3. In the pop-up that appears, click New Server Class.
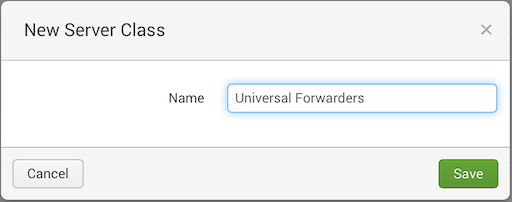
4. In the "New Server Class" dialog box that pops up, enter "Universal Forwarders".
Note: When setting up server classes later on in the setup process, you can enter a unique name for the server class that describes the hosts that belong in the class, and that you will remember.
5. Click Save. Splunk Enterprise saves the class and loads the information page for the server class you just created.
Note: When you first create a server class, the page says you have not added any apps or clients yet. This is okay.
6. Click Add apps. Splunk Enterprise loads the "Edit Apps" page.
7. Locate and click the "sendtoindexer" app in the "Unselected Apps" pane on the left. The app moves to the "Selected Apps" pane on the right.
8. Click Save. Splunk Enterprise saves the configuration and returns you to the server class information page.
What's next?
You have activated deployment server and configured a server class for the "send to indexer" app. Clients that are a member of this class will receive the app automatically when they connect to this deployment server.
The next phase of setup involves installing and configuring these clients.
| Create the "send to indexer" app | Install a universal forwarder on each Windows host |
This documentation applies to the following versions of Splunk® App for Windows Infrastructure (EOL): 1.1.0, 1.1.1, 1.1.2, 1.1.3, 1.2.0, 1.2.1, 1.3.0, 1.4.0

 Download manual
Feedback submitted, thanks!