Install the Splunk App for VMware
Versions 3.3.0 and above of the Splunk App for VMware use the Splunk OVA for VMware to create and deploy the data collection nodes (DCN), and the Splunk Add-on for VMware to manage the scheduler functionality that the Splunk App for VMware uses to collect and analyze virtual machine data. See the image to see how the Splunk App for VMware works with the Splunk OVA for VMware and the Splunk Add-on for VMware.
Follow the instructions below to install the Splunk App for VMware on your Splunk platform environment. For distributed environments, see the Install the Splunk App for VMWare in a search head cluster environment section of the Install the Splunk App for VMware section of the Splunk App for VMWare manual as reference for distributed deployments.
Install Splunk App for VMware on a full Splunk platform instance using the same user account credentials that you used to install your Splunk platform. For instructions on how to install Splunk App for VMware in a clustered indexer environment, see the Splunk platform configuration guide.
- Get the
splunk_app_for_vmware-<version>-<build_number>.tgzandsplunk_add_on_for_vmware-<version>-<build_number>.tgzfiles, put them in$SPLUNK_HOME/etc/appson your Splunk platform host. - Extract the Splunk App for VMware package.
cd /opt/splunk/etc/appstar xvzf splunk_app_for_vmware-*.tgztar xvzf splunk_add_on_for_vmware-*.tgz- Verify that you extracted all of the sub directories in the
$SPLUNK_HOME/etc/appsdirectory. - From
tar xvzf splunk_app_for_vmware-*.tgz: SA-Threshold/…SA-VMW-HierarchyInventory/…SA-VMW-LogEventTask/…SA-VMW-Performance/…splunk_for_vmware/…SA-VMNetAppUtils/…
- From
tar xvzf splunk_add_on_for_vmware-*.tgz: SA-Hydra/…Splunk_TA_vcenter/…Splunk_TA_vmware/…Splunk_TA_esxilogs/…SA-VMWIndex/…TA-VMW-FieldExtractions/…
- (Optional) Remove the
SA-VMW-Licensecheckfolder from the$SPLUNK_HOME\etc\appsfolder if it exists. - Restart Splunk Enterprise.
/opt/splunk/bin/splunk restart
Install the Splunk App for VMware in a search head cluster environment
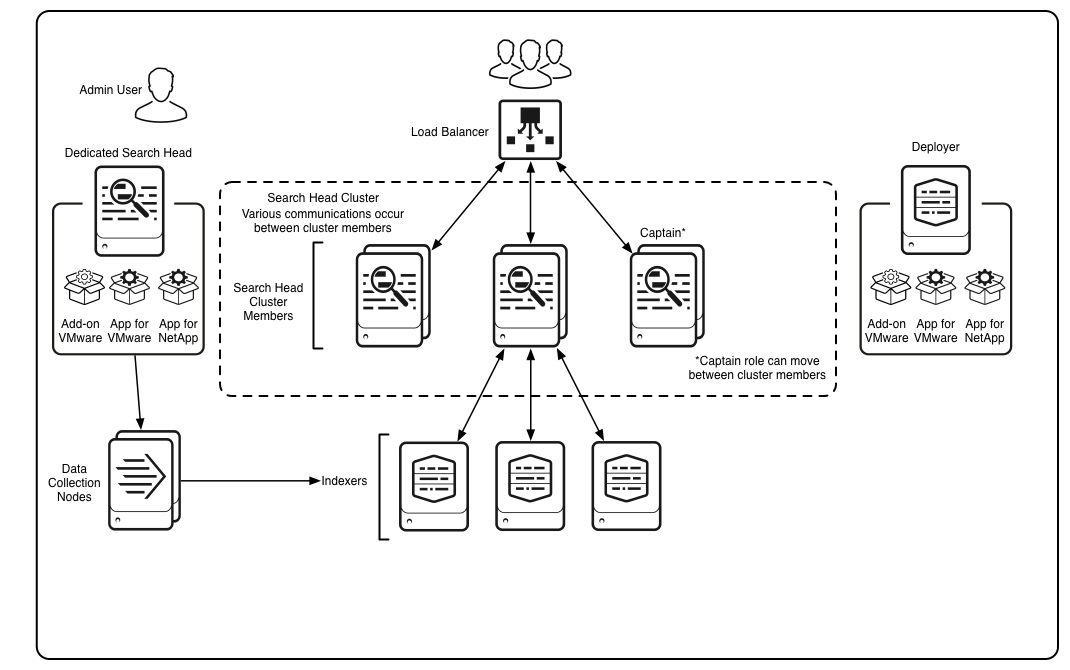
Versions 3.2.0 and above of the Splunk App for VMware support search head cluster (SHC) environments. See the image for guidance on how the Splunk App for VMware is deployed across an SHC environment.
Prerequisites
- For Search Head Clustering, you need a minimum of three instances of Splunk Enterprise to serve as search head cluster members, and one additional instance that serves as a deployer, which you use to distribute apps and updated configurations to the cluster members.
- The data collection node (DCN) scheduler must be deployed on a dedicated search head, and not on any individual search head in the SHC.
- Each search head cluster member should be fresh install of Splunk and not re-purposed splunk instance.
- You migrated your settings from a Search Head Pool to a Search Head cluster. See Migrate from a search head pool to a search head cluster in the "Splunk Enterprise Distributed Search Manual".
- You have a licensed version of Splunk Enterprise installed and running in your environment.
- You have access to the Splunk App for VMware and permission to install it.
- You have configured your deployment's Data Model properties, located in datamodels.conf on your indexers. See Upgrade from tsidx namespaces to data model acceleration to learn more.
- You must use the search head cluster deployer to distribute your configurations across your set of search head cluster members.
Install the Splunk App for VMware in a search head cluster environment
- Take the files
splunk_app_for_vmwareandsplunk_add_on_for_vmwarethat you downloaded from Splunkbase and put in a temporary directory. This avoids overriding critical files. cp splunk_app_for_vmware-<version>-<build_number>.tgz /tmpcp splunk_add_on_for_vmware-<version>-<build_number>.tgz /tmp- Change to the
/tmpdirectory, and extract the app and add-on packages. cd /tmptar xvzf splunk_app_for_vmware-<version>-<build_number>.tgztar xvzf splunk_add_on_for_vmware-<version>-<build_number>.tgz- Copy the unzipped files and move into your deployer's apps folder inside the shcluster folder.
cp -r * $SPLUNK_HOME/etc/shcluster/apps/- Verify that all of the apps and the subdirectories were copied correctly and reside in the
$SPLUNK_HOME/etc/shcluster/appsfolder. Splunk_TA_vmwareSplunk_TA_vcenterSA-VMNetAppUtils/SA-Hydra/SA-Threshold/SA-VMW-HierarchyInventory/SA-VMW-LogEventTask/SA-VMW-Performance/splunk_for_vmware/SA-VMWIndex/TA-VMW-FieldExtractions/
- On your deployer, remove the
Splunk_TA_vmwareand SA-VMWIndex folders from the$SPLUNK_HOME/etc/shcluster/apps/folder and deploy the Splunk App for VMware app onto any member of your SHC. ./splunk apply shcluster-bundle -target <URI>:<management_port> -auth <username>:<password>- Restart Splunk in each of the locations where you installed the app.
Learn More
- For an overview of search head clustering, see Search head clustering architecture in the "Splunk Enterprise Distributed Search Manual".
- See Deploy a search head cluster in the Splunk Enterprise Distributed Search Manual.
- See "Use the deployer to distribute apps and configuration updates" in the Splunk Enterprise Distributed Search Manual.
- See configure a complex deployment for more information on how to configure the Splunk App for VMware in a complex deployment.
| Installation overview | Configure license |
This documentation applies to the following versions of Splunk® App for VMware (EOL): 4.0.4

 Download manual
Feedback submitted, thanks!