Connecting your Splunk Cloud deployment to Search Experience preview
Preview features are provided by Splunk to you "as is" without any warranties, maintenance and support, or service level commitments. Splunk makes this preview feature available in its sole discretion and may discontinue it at any time. Use of preview features is subject to the Splunk General Terms.
To make indexes in your Splunk Cloud Platform deployment visible in the Splunk Cloud Search Experience preview, you must:
- Setup a connection between your deployment and the Search Experience preview.
- Grant permission to your deployment indexes that you want users in the Search Experience preview to access.
This topic guides you through the steps to setup a connection between your deployment and the Search Experience preview. For security reasons, your indexes are visible only to admins in the Search Experience preview. However, you can grant non-admin users permission to see the indexes. After you complete the steps in this topic, see Permission your indexes in Search Experience preview.
The following diagram illustrates the connection and permission actions necessary to connect your Splunk Cloud deployment to the Splunk Cloud Search Experience preview:

Setup steps in your Splunk Cloud Platform deployment
In your Splunk Cloud Platform deployment, you must create a service account role and then create and map a user to the service account role.
Create a Service Account role
- Using your admin credentials, log into your Splunk Cloud Platform deployment.
- Create the role for the service account by cloning the default
user.- Under Settings in the Users and Authentication section, select Roles.
- Find the default
userrole, click Edit, Clone to clone the role.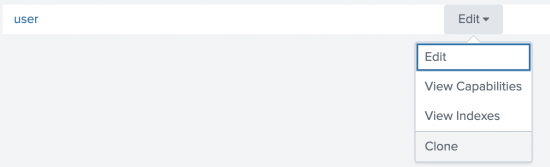
- Specify a name for the new role, such as
scp_user, as shown in the following image: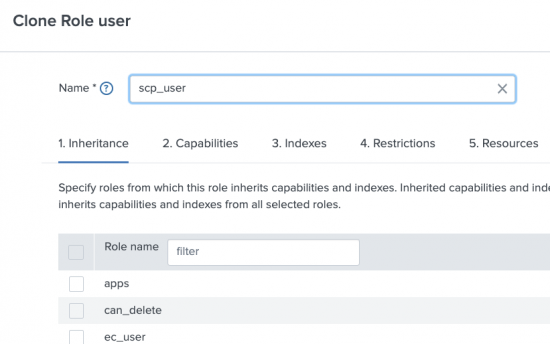
- If you have search head clustering (SHC) on your Splunk Cloud Platform deployment, you must add a capability to the service account role. Click 2. Capabilities and check list_search_head_clustering to add this capability to the role.
- Decide which indexes you want to make available. You can make all of the indexes or specific indexes from your Splunk Cloud Platform deployment available in the Search Experience preview:
- * To make all of the indexes available, skip this step and proceed to the next step to use Resources to change the concurrent search limitations.
- * To make only specific indexes available, complete this step:
- Click 3. Indexes and uncheck the box under Included for All non-internal indexes, as shown in the following image:
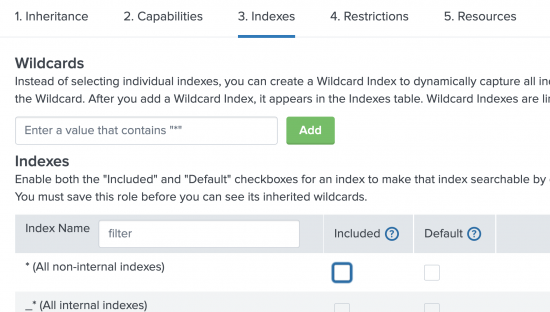
- Select the indexes that you want visible in the Search Experience preview by marking the check boxes in the Included column.
In the following image, the
history,main, andsummaryindexes are selected.
- To avoid concurrent search limitations, click 5. Resources.
- Under Role search job limit, change the Standard search limit to
200. - Under User search job limit, change the Standard search limit to
100.
- Under Role search job limit, change the Standard search limit to
- Click Save.


Create and map a user to the service account role
After you create the service account role, you need to create a user and map that user to the service account role. If you haven't created the service account role, see Create a service account role.
- Under Settings in the Users and Authentication section, select Users.
- Click New User.
- Specify a Name for the user. In this example,
service_acctis used for the name. - Specify and confirm a Password for the user. Make the password something that is easy to remember.
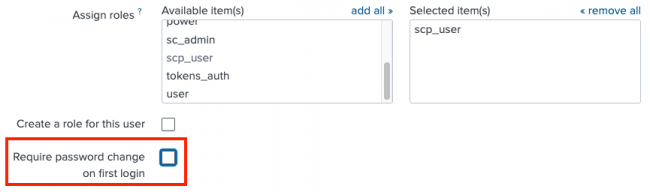
- In the Assign role box, select the role that you created, for example
scp_user. - Remove the default
userrole. The new user settings should look like this: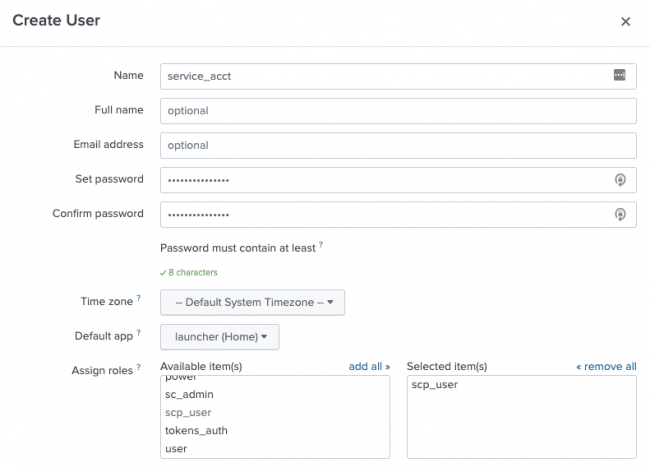
- Uncheck the Require password change on first login box.
- Click Save.
- Make note of the first part of your Splunk Cloud stack URL. You need this information in the next section. In the following image,
scpanalytics.splunkcloud.comis the part of the URL to make note of.
- Confirm the setup by testing the service account credentials. Log in with the credentials that you specified for the user you created.
- On some systems, you might be prompted to reset the password, even though you unchecked that option. If prompted, reset the password.


The setup on your Splunk Cloud deployment side is now complete. Continue with the steps in the next section.
Setup steps in the Search Experience preview
You need to connect from the Search Experience preview to your indexes on you Splunk Cloud Platform deployment.
Connect to your data
- Log into the Search Experience preview as an admin.
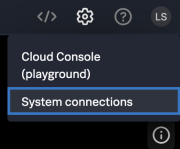
- On the App bar, select the Settings icon and System connections.
- Select the New Platform Connection button.
- In the Connect to your data window, specify the information to connect to your Splunk Cloud Platform deployment. The following image identifies the fields. The table below the image describes the values that you need to specify.
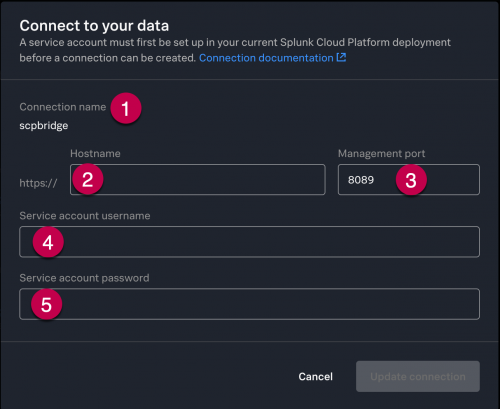
Number Element Description 1 Connection name The name of the connection. The value scpbridge is provided and can't be changed. 2 Hostname The URL for your Splunk Cloud Platform deployment. The https://is assumed. For example, if your URL ishttps://scpanalytics.splunkcloud.comyou would specifyscpanalytics.splunkcloud.com3 Management port The default port number. Most Splunk Cloud Platform deployments use the 8089 port as the default port. If you changed the default port in your deployment, specify that port number. 4 Service account username The name of the user that you created. For example service_acct.5 Service account password The password that you specified when you created the user and mapped the user to the role in the Create and map a user to the service account role section. - Click Create. A message appears to confirm that the setup was successfully completed.

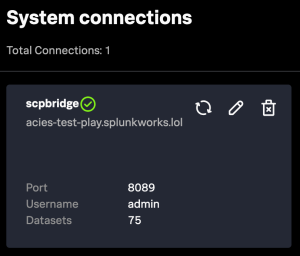
The System connections page shows the connections that you have, including this new connection. Use the icons on the connection card to refresh, edit, or delete the connection.


View and edit the connection
- On the App bar, select the Settings icon and select System connections.
- On the System connections window, you can see the port, username, and number of datasets associated with the connection.
- Use the Edit icon
 to make changes to your connection.
Refresh the connection
When indexes are added to your Splunk Cloud Platform deployment, or if you changed user permissions to any of your indexes, you must refresh the connection.
- On the App bar, select the Settings icon and select System connections.
- On the System connections window, you can see the port, username, and number of datasets associated with the connection.
- Use the Refresh icon
 to refresh the connection.
You have completed the steps to connect your Splunk Cloud Platform deployment to the Search Experience preview.
Next, you need to grant non-admin users permission to access your deployment indexes from within the Search Experience preview. See Permission your indexes in Search Experience preview.
Make more indexes available
After your initial setup, you can make additional indexes available in the Search Experience preview.
In your Splunk Cloud Platform deployment:
- Under Settings in the USERS AND AUTHENTICATION section, select Roles.
- Locate the role you created for the connection, such as
scp_user. - Click 3. Indexes and select the indexes that you want visible in the Search Experience preview.
- Click Save.
In the Search Experience preview:
- On the Home page, click View Connection.
- Click the Refresh icon
 .
. - Click Done.
Limitations
- Knowledge objects
- Currently, indexes are the only knowledge object that you can make available in the Search Experience preview.
- Connections
- You can connect a single Splunk Cloud deployment to one or more Search Experience preview tenants. In the following diagram, these connections are shown from STACK_A to CLOUD_A and CLOUD_B.
- However, you can't connect multiple Splunk Cloud deployments to the same Search Experience preview tenant. In the following diagram, the invalid connections are from STACK_A and STACK_B to CLOUD_A.

See also
Next step
Now that you have completed the connection steps, you need to grant permission to your deployment indexes. See Grant users access to indexes in Search Experience preview.
|
PREVIOUS Sample data |
NEXT Grant users access to indexes in Search Experience preview |
This documentation applies to the following versions of Splunk Cloud Platform™: search2preview
Feedback submitted, thanks!