All DSP releases prior to DSP 1.4.0 use Gravity, a Kubernetes orchestrator, which has been announced end-of-life. We have replaced Gravity with an alternative component in DSP 1.4.0. Therefore, we will no longer provide support for versions of DSP prior to DSP 1.4.0 after July 1, 2023. We advise all of our customers to upgrade to DSP 1.4.0 in order to continue to receive full product support from Splunk.
When building a pipeline in the , you can choose to work in Canvas View or SPL (Search Processing Language) View. Each view provides different features and tools for building a pipeline.
If you prefer to work in a graphical user interface (GUI) and receive more guidance as you work, use the Canvas View. If you prefer to write Search Processing Language 2 (SPL2) statements to configure pipeline functions and define the structure of the pipeline, use the SPL View, which includes the SPL2 Pipeline Builder. For more information on each view, see Create a pipeline using the Canvas View and Create a pipeline using the SPL View.
Canvas View
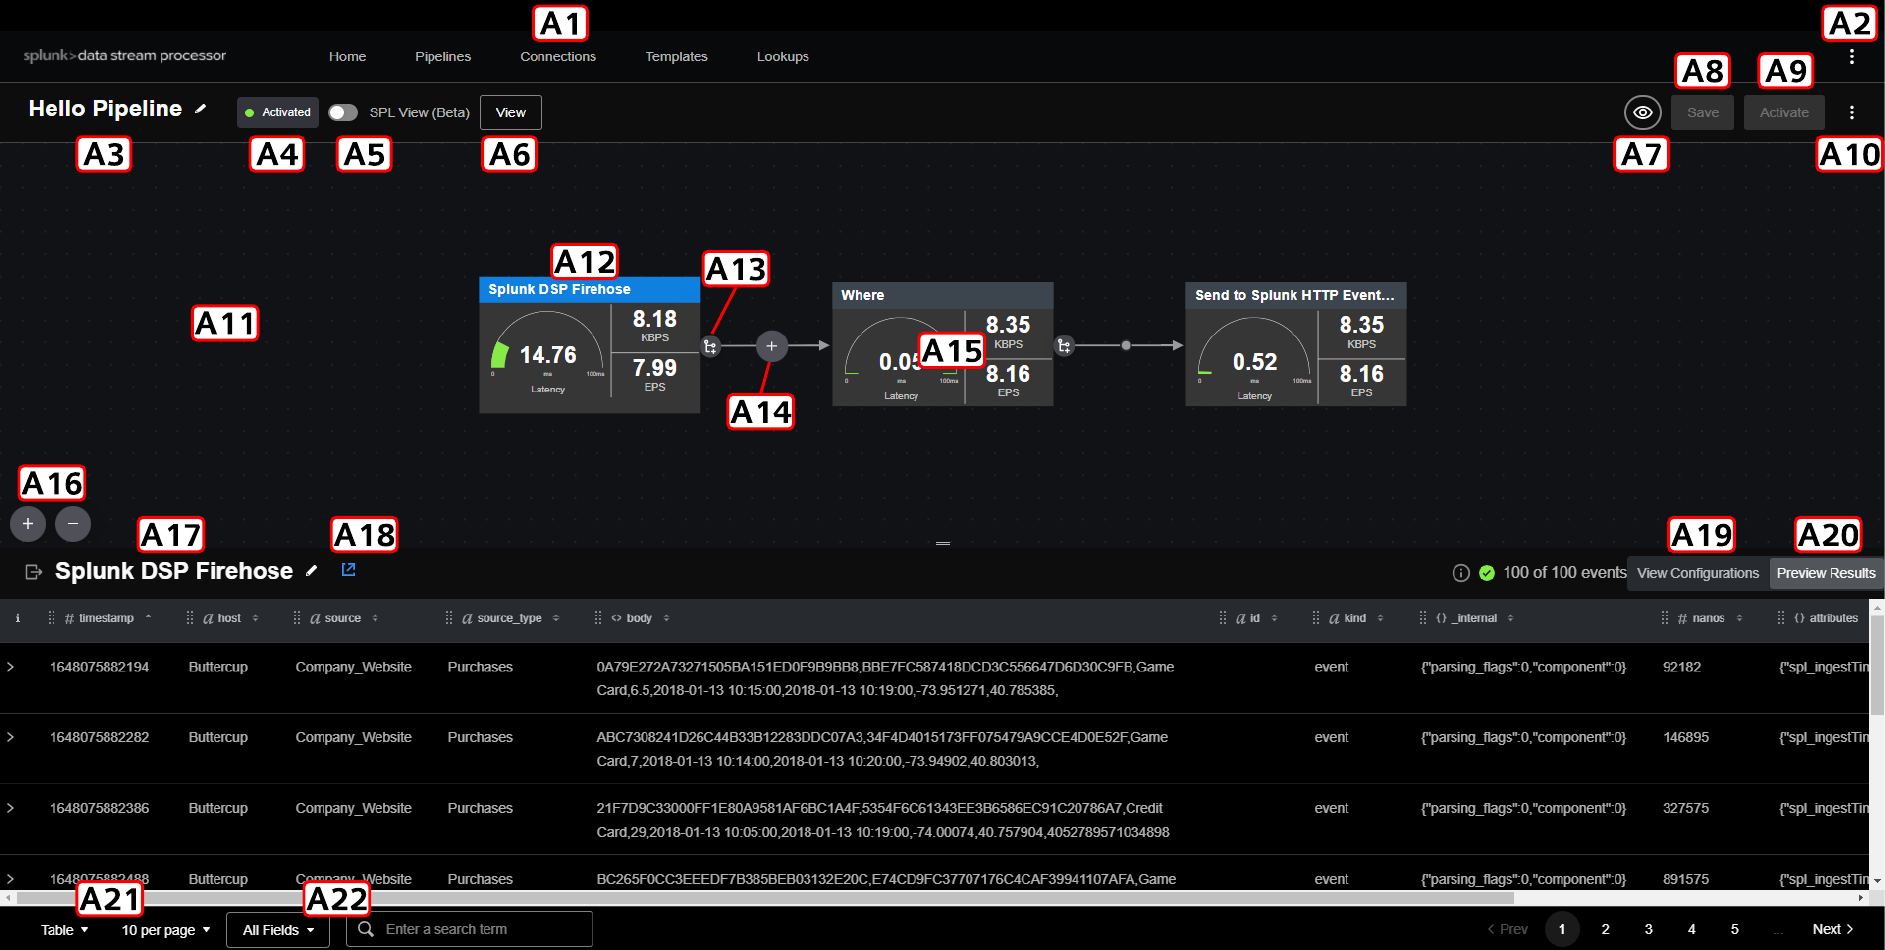
When creating a pipeline in the Canvas View, you click the point in the pipeline where you want to add a function and then select from a list that shows valid functions only. You then configure the function by filling in fields that show all the accepted arguments for that function. The Canvas View automatically supplies default values for any optional arguments that you do not fill in, and also provides streamlined workflows for more advanced pipeline features such as branches and unions.
The following screenshot shows the Canvas View.
| Label | Element | Description |
|---|---|---|
| A1 | DSP UI pages | Navigate to the following DSP pages:
|
| A2 | More options | Access additional options for working with DSP:
|
| A3 | Pipeline name | The name of your pipeline. |
| A4 | Pipeline state | The state of your pipeline. For a list of available states and what they mean, see Interpreting pipeline statuses. |
| A5 | View switch | Toggle between the Canvas View and the SPL View. This feature is in BETA and repeated toggles can lead to unexpected results and even data loss. |
| A6 | View/Edit | View or edit an activated pipeline. Changes are not applied to the activated pipeline until you save and reactivate the pipeline. |
| A7 | Start Preview | Preview the data moving through the selected function in your pipeline. See Test your pipeline configuration. |
| A8 | Save | Save your pipeline. |
| A9 | Activate | Activate your pipeline. |
| A10 | Pipeline options | Access additional options for working with your pipeline:
|
| A11 | Pipeline canvas | The canvas view of your pipeline. |
| A12 | Function | The basic building block of a pipeline. |
| A13 | Connect a processing or a sink function | Create a branch in your pipeline, and add a function to the newly created branch. |
| A14 | Connect a processing function | Add a function to your pipeline. |
| A15 | Function metrics | Live metrics about the function, such as the number of events moving in or out of the function per second. You can use these metrics to quickly scan if your records are making it through your pipeline or to check the performance of your pipeline. |
| A16 | Zoom In/Out | Zoom in or out on the pipeline canvas. |
| A17 | Edit function name | Assign a custom name to the selected function. |
| A18 | View documentation | View the documentation for the selected function in another browser tab. |
| A19 | View Configurations | View or modify the configuration of the selected function. |
| A20 | Preview Results | View a sample of the events that are sent through the selected function. |
| A21 | Display options for preview | Choose how to display the data that's collected during a preview session. You can display each record in a table, list, or raw JSON format, and specify the number of records to show per page. |
| A22 | Search preview results | Search the preview results for records that contain a specified search term. You can adjust the search operation to only return records where a specific field contains the search term. |
SPL View
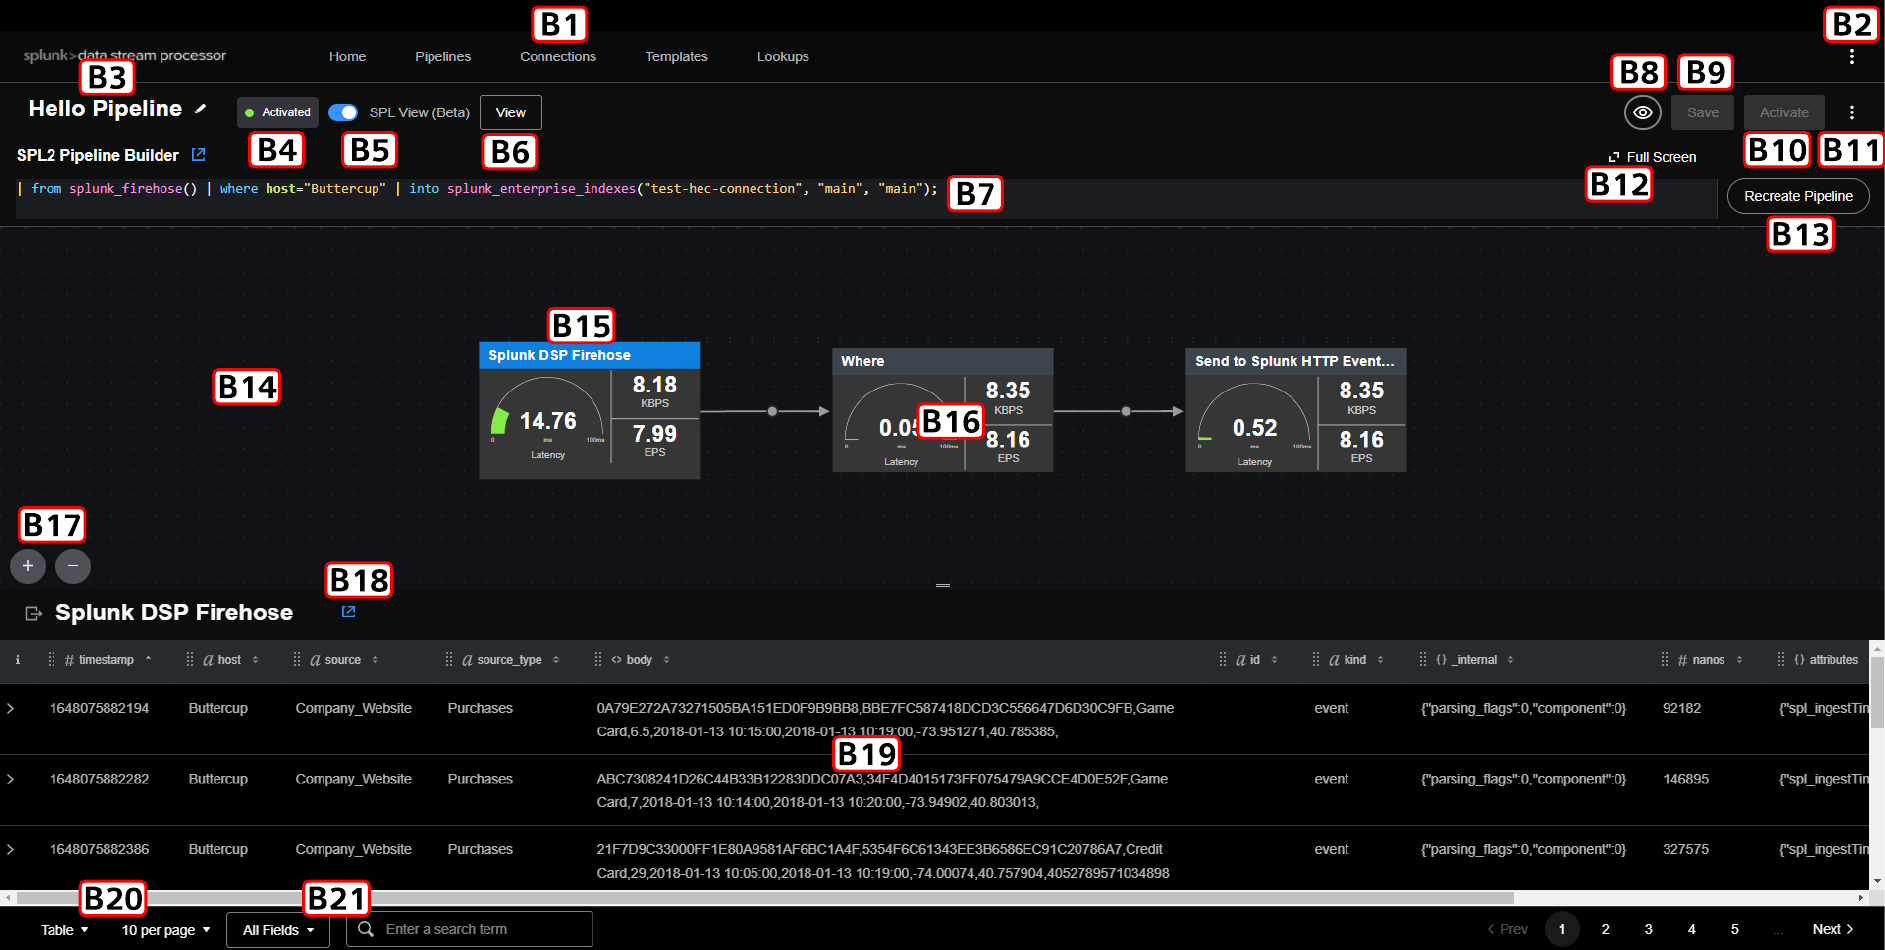
When creating a pipeline in the SPL View, you write statements in SPL2 syntax to add functions and configure them. You can view the SPL2 statement of a pipeline to see an overview of all the arguments that have been specified for all the functions in the pipeline. You also have the option of copying SPL2 statements into text editors or other DSP instances.
The following screenshot shows the SPL View.
| Label | Element | Description |
|---|---|---|
| B1 | DSP UI pages | Navigate to the following DSP pages:
|
| B2 | More options | Access additional options for working with DSP:
|
| B3 | Pipeline name | The name of your pipeline. |
| B4 | Pipeline state | The state of your pipeline. For a list of available states and what they mean, see Interpreting pipeline statuses. |
| B5 | View switch | Toggle between the Canvas View and the SPL View. This feature is in BETA and repeated toggles can lead to unexpected results and even data loss. |
| B6 | View/Edit | View or edit an activated pipeline. Changes are not applied to the activated pipeline until you save and reactivate the pipeline. |
| B7 | SPL2 Pipeline Builder | Enter an SPL2 statement that defines the functions and configurations in your pipeline. |
| B8 | Start Preview | Preview the data moving through the selected function in your pipeline. See Test your pipeline configuration. |
| B9 | Save | Save your pipeline. |
| B10 | Activate | Activate your pipeline. |
| B11 | Pipeline options | Access additional options for working with your pipeline:
|
| B12 | Full Screen | Open a full screen view of the SPL2 Pipeline Builder. |
| B13 | Recreate Pipeline | Build the pipeline defined in your SPL2 statement, and validate the functions to confirm that they are configured correctly. |
| B14 | Pipeline canvas | The canvas view of your pipeline. |
| B15 | Function | The basic building block of a pipeline. |
| B16 | Function metrics | Live metrics about the function, such as the number of events moving in or out of the function per second. You can use these metrics to quickly scan if your records are making it through your pipeline or to check the performance of your pipeline. |
| B17 | Zoom In/Out | Zoom in or out on the pipeline canvas. |
| B18 | View documentation | View the documentation for the selected function in another browser tab. |
| B19 | Preview Results | View a sample of the events that are sent through the selected function. |
| B20 | Display options for preview | Choose how to display the data that's collected during a preview session. You can display each record in a table, list, or raw JSON format, and specify the number of records to show per page. |
| B21 | Search preview results | Search the preview results for records that contain a specified search term. You can adjust the search operation to only return records where a specific field contains the search term. |
| About regular expressions | Create a pipeline using the Canvas View |
This documentation applies to the following versions of Splunk® Data Stream Processor: 1.3.0, 1.3.1, 1.4.0, 1.4.1, 1.4.2, 1.4.3, 1.4.4, 1.4.5, 1.4.6


 Download manual
Feedback submitted, thanks!