Investigate Splunk UBA entities using watchlists
Use watchlists in Splunk UBA to group entities together for additional analysis or investigation. For example, you discover a small group of individuals associated with a high number of flight risk and data exfiltration anomalies. You can group these users together in a watchlist so that further anomalies and threats associated with these users are scored appropriately.
It is important to maintain watchlists to avoid extraneous or irrelevant information. For example, the executive staff may be considered high-risk users as frequent targets of espionage and other malicious behavior, and you can place them on a watchlist to monitor the activity on their accounts more closely. However, changes in the executive staff, such as an employee being promoted to the executive staff or a current executive leaving the company, must be reflected in the watchlists. Users and other entities must be individually and manually added to or removed from watchlists to avoid having outdated information.
Splunk UBA includes several default watchlists aligned with typical use cases and processes in a security operations center. For example, the default watchlists provided by Splunk UBA for anomalies conform to the following scenario:
- An anomaly is investigated.
- If it not a legitimate anomaly, put it on the False Positive watchlist.
- If the anomaly requires further analysis, put it on the Anomaly Watchlist.
- From the Anomaly Watchlist, move certain anomalies to the Important watchlist for immediate action.
- Once an anomaly is evaluated, put it on the Reviewed watchlist.
You can create your own watchlists in Splunk UBA or use any of the included watchlists. You can assign multiple watchlists of the same type to any single entity. For example, a user can be on more than one user watchlists. Adding an entity to a watchlist in Splunk UBA does not affect any scoring except for the Departing Users, High Risk Users, New Users, and Privileged Users watchlists. These user watchlists are considered high risk by default and some threat models use this as a factor in determining the user's score.
Use anomaly action rules to affect the scoring of entities in any watchlist. You can create a rule for anomalies to automatically be added to a watchlist when specific conditions are met. Anomaly action rules can also consume other watchlists such as user watchlists as a condition. For example, you can write an anomaly action rule to add an anomaly to a watchlist when there are malware anomalies involving a user on the High Risk user watchlist.
The following table summarizes the entities that can be placed on a watchlist, how each entity is added to a watchlist, and the default watchlists that are included with Splunk UBA:
| Entity | How to add to watchlist |
|---|---|
| Anomalies | Use one of the following methods to add anomalies to a watchlist:
The following anomaly watchlists are provided by Splunk UBA:
|
| Applications | Add apps one at a time from the Apps Review page. One watchlist named App Watchlist is provided by Splunk UBA. |
| Devices | Add devices one at a time from the Devices Review or Device Details page. One watchlist named Device Watchlist is provided by Splunk UBA. |
| Domains | Add domains to a watchlist by starting with threat details, then viewing any domain page such as Domain Facts, Domain Threats, or Domain Anomalies. One watchlist named Domain Watchlist is provided by Splunk UBA. |
| Threats | Add threats one at a time from the Threats Review or Threat Details page. The following threat watchlists are provided by Splunk UBA:
|
| Users | Add users one at a time from the Users Review or User Details page. The following user watchlists are provided by Splunk UBA:
Splunk UBA considers the watchlists marked by an asterisk (*) as high risk by default. Being in one of these watchlists is a factor for some threat models when generating user scores. |
From the Anomalies Table or Anomalies Dashboard pages, you can filter the anomalies you want to see by specifying any combination of watchlists. For example, you can create a filter to view only anomalies that belong to both a specific anomaly watchlist and also a domain watchlist.
View a summary of the watchlists in Splunk UBA
You can view a summary of the watchlists in your Splunk UBA deployment by selecting Manage > Watchlists.

- Create a new watchlist by selecting the watchlist type, then clicking New Watchlist. For example, to create a new user watchlist, select User Watchlists and click New Watchlist.
- Delete a watchlist by selecting the watchlist you want to delete, then selecting Action > Delete. Splunk UBA's default high-risk user watchlists cannot be deleted.
- Edit the name or description of a watchlist by hovering over the watchlist name, then clicking the edit (
 ) icon.
To view the contents of a watchlist, click on the number of entities shown in the table. In this example, we see the number 2 in the Anomalies column for the Anomaly Watchlist watchlist. Click on the number 2 to view all of the anomalies in the Anomaly Watchlist watchlist.
Add bulk users to a User Watchlist
Perform the following steps to add users in bulk to a User Watchlist:
- Go to the Watchlists summary in your Splunk UBA deployment. Select Manage > Watchlists.
- Select User Watchlists from the types of watchlists.

- Select the upload button for any of the listed User Watchlists to which you want to upload users.

- Upload a CSV file containing Domain and LoginIds of users.
The file must be in CSV format and must only include the Domain and LoginIds field, separated by line breaks. You can learn the steps to generate this file in the next section.
- As the file upload is processed, the following messages can appear:
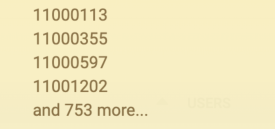
Upload step Message Successful upload of the user information The following N users have been added to a watchlist. Users are not present in the HR data The following N users are not present in HRData. Users do not have events associated with them The following N users do not have events associated with them. The users have been already added to a watchlist The following N users were already a part of watchlist. The maximum number of users listed on the message is 500. If the count of affected users exceeds 500, the message at the end of the list displays and N more as shown in the following example:
Generate and upload a file of users to a User Watchlist
Perform the following steps to generate a filtered group of users that you can add to a new watchlist:
- In Splunk UBA, select Users on the home page, or select Explore > Users.
- Apply filters on the Users Table based on requirements.
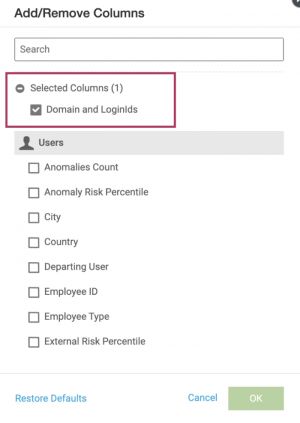
- Once you have a filtered list of users to be added to a watchlist click Add/Remove Columns.

- Unselect all columns and select the Domain and LoginIds column only. Then click OK.
- From the Actions drop-down menu choose Save as CSV.

Example: Use a watchlist to investigate a group of users for suspected data exfiltration
This example reviews the following tasks:
- Creation of a new user watchlist.
- Filter out a group of users who are suspected of moving data outside the company.
- Add identified users to the new watchlist.
- Creation of a new anomaly action rule so that if any additional anomalies are generated against these users, those anomalies are added to an anomaly watchlist for immediate processing.
Create a new user watchlist
Perform the following tasks to create a new user watchlist:
- In Splunk UBA, select Manage > Watchlists.
- In the list of watchlist types, select User Watchlists.
- Click New Watchlist.
- In the New User Watchlist window, enter the watchlist name Data Exfiltration.
- Click OK.
Filter users to add to the new watchlist
Next, filter a group of users to be added to the new watchlist.
- In Splunk UBA, select Users on the home page or select Explore > Users.
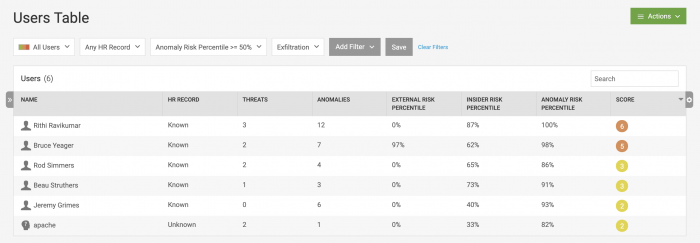
- Select Add Filter, scroll down and select Anomaly Categories, then select Exfiltration.
- You only want to consider users in the top half of the risk percentile. Select Add Filter, scroll down to and select Anomaly Risk Percentile, then configure the value to be
>= 50.
After applying the filters to the users in the system, there are six users who match.
Add each user to the watchlist
Add each user to the Data Exfiltration watchlist.
- Click on the first user in the table.
- On the User Facts page, click Watchlists and select Data Exfiltration to add the user to the Data Exfiltration watchlist.
- Click back in your browser to return to the user table.
- Repeat this procedure until all users are added to the watchlist.
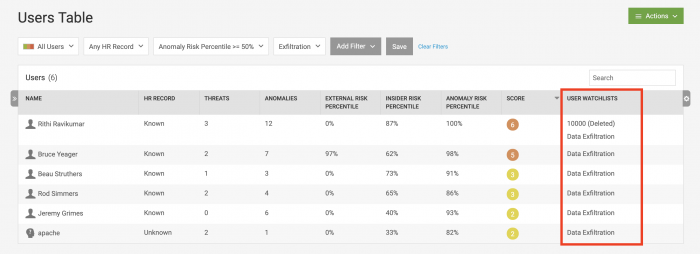
- On the user table, click the small gear icon on the right side of the table. In the Add/Remove Columns window, scroll down and select User Watchlists.
- Click OK.
The user table now shows a Watchlists column, with the names of the watchlists that each user belongs to.
The 10000 (Deleted) notation for the first user means that he was placed on a different watchlist, but the watchlist was deleted.
Create an anomaly action rule involving the users in the user watchlist
Now you can create an anomaly action rule so that when additional exfiltration anomalies are generated against these users, the anomalies are placed into the Important Anomaly Watchlist provided by Splunk UBA for immediate attention.
- In Splunk UBA, click Anomalies from the home page or select Explore > Anomalies.
- Click the anomaly rules icon.
- Click New Anomaly Action Rule.
- On the Rule Action page:
- Select Add Anomalies to Watchlist and select Important from the drop-down list in the Rule Action section.
- Select Apply to Future Anomalies in the Rule Scope section.
- Click Next.
- On the Anomaly Filter page:
- In the Anomalies section, select Anomaly Categories then select Exfiltration.
- In the User section, select User Watchlists, then select Data Exfiltration.
- Click Next.
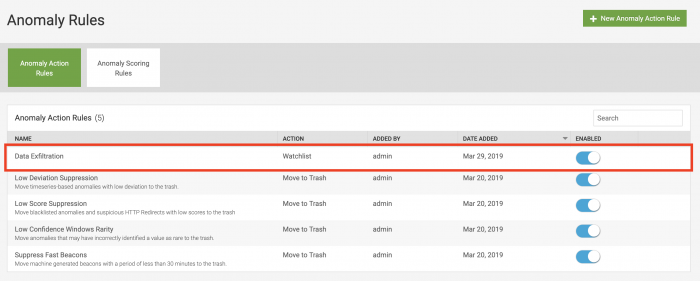
- On the Rule Properties page, specify Data Exfiltration as the rule name.
- Click OK.
The new rule can be see at the top of the Anomaly Rules page.
Example: VirusTotal watchlist
Running the VirusTotal script included with Splunk UBA creates a watchlist containing external IP addresses and domains in Splunk UBA that match VirusTotal.
See, Configure the VirusTotal script to see VirusTotal anomalies in Splunk UBA.
| Create a custom dashboard | Identify data exfiltration by a suspicious user or device |
This documentation applies to the following versions of Splunk® User Behavior Analytics: 5.2.0, 5.2.1, 5.3.0, 5.4.0, 5.4.1, 5.4.1.1, 5.4.2, 5.4.3
 Download manual
Feedback submitted, thanks!