Cluster Numeric Events Classic Assistant workflow
Classic Assistants enable the creation of a machine learning model through a guided user interface. The Cluster Numeric Events Classic Assistant partitions events with multiple numeric fields into groups of events based on the values of those fields. The groupings aren't known in advance, therefore, the learning is unsupervised.
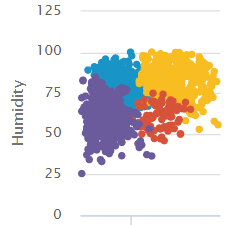
The following visualization illustrates a clustering of humidity data results. This visualization is from the Showcase example for Power Plant Operating Regimes.

Algorithms
The Cluster Numeric Events Classic Assistant uses the following algorithms:
Cluster numeric events
To cluster numeric events, input data, optionally perform preprocessing, then select the algorithm to use for clustering and other parameters as necessary.
Before you begin
- The Predict Numeric Fields Assistant offers the option to preprocess your data. For more information on Assistant-based preprocessing algorithms, see Preprocessing machine data using Assistants.
- The toolkit default selects the K-means algorithm. Use this default if you aren't sure which algorithm is best for you. For further details on any algorithm, see Algorithms in the Machine Learning Toolkit.
Workflow
Follow these steps for the Cluster Numeric Events Classic Assistant.
- From the MLTK navigation bar select Classic > Assistants > Cluster Numeric Events.
- Run a search, including the selection of a date range.
- (Optional) Click + Add a step to add preprocessing steps.
- Select an algorithm from the
Algorithmdrop-down menu. - Specify the
Fields to use for clustering.
If your data has been preprocessed, choose from the preprocessed fields. - For K-means, Birch, and Spectral Clustering, specify the number of clusters to use.
For DBSCAN, specify a value between 0 and 1 for eps (the size of the neighborhood).
Smaller numbers result in more clusters. - Type the name the model in
Save the model asfield.
You must specify a name for the model in order to fit a model on a schedule or schedule an alert.
You cannot save a model if you use the DBSCAN or Spectral Clustering algorithm.
- Click Cluster.
Interpret and validate
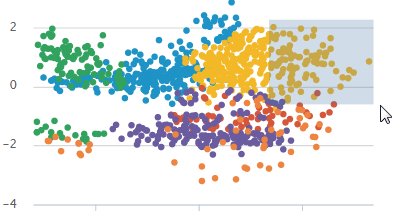
After the numeric events are clustered, review the cluster visualization. The fields included in the visualization are listed on screen. You can add and remove fields, and click Visualize to change the visualization.
You can drag a selection rectangle around some of the points in a plot to see the corresponding points on the other plots.
The visualization displays a maximum of 1000 points, 20 series and 6 fields (1 label and 5 variables).
Deploy clustering
After you interpret and validate the clustering, deploy it.
Within the Classic Assistant framework
- Click the Schedule Training button to the right of Cluster to run the clustering on a schedule.
You can set up a regular interval to deploy clustering, for example, once a week.
You cannot schedule clustering if you use the DBSCAN or Spectral Clustering algorithms.
Outside the Classic Assistant framework
- Click Open in Search to to generate a New Search tab filled out with the search query that was used for the clustering. This new search will open in a new browser tab, away from the Classic Assistant. You can adjust the SPL directly and see results immediately. You can also save the query as a Report, Dashboard Panel or Alert.
- Click Show SPL to generate a new window showing the search query that was used for the clustering. Copy the SPL here to use this same query on a different data set.
- Click Schedule Alert to set up an alert that is triggered when the number of events in a cluster exceeds a threshold you specify.
Alerts cannot be scheduled if you use the DBSCAN or Spectral Clustering algorithms.
Once you navigate away from the Classic Assistant page, you cannot return to it through the Classic or Models tabs. Classic Assistants are great for generating SPL, but may not be ideal for longer-term projects.
For more information about alerts, see Getting started with alerts in the Splunk Enterprise Alerting Manual.
| Forecast Time Series Classic Assistant workflow | Creating, sharing, and deleting models in the Machine Learning Toolkit |
This documentation applies to the following versions of Splunk® Machine Learning Toolkit: 4.4.0, 4.4.1, 4.4.2, 4.5.0, 5.0.0, 5.1.0, 5.2.0, 5.2.1, 5.2.2, 5.3.0, 5.3.1

 Download manual
Feedback submitted, thanks!