Track and maintain dashboard changes with version history
You can maintain the version history of your dashboards to track dashboard editing changes, undo mistakes, work collaboratively with teammates, and try new ideas without permanently impacting the original dashboard.
Version histories are not available in the following Splunk platform environments:
- Search head clusters: Version histories are only supported in environments with a single search head.
- Windows with FIPS mode: Version histories are not available in Windows environments in which FIPS mode is turned on.
Generating versions and comment messages
You generate a version of the dashboard each time you save changes by selecting the Save button. Select Save to record a version without adding a comment.
Create a comment for a version
You can optionally add comments to your versions to provide context for debugging, collaboration, and identifying possible points in history for reverting changes.
The following image shows the Save button and drop-down list for adding a comment to a version.
These steps describe how to create a comment message for a specific version of the dashboard:
- Select the Save drop-down list.
- Select Comment and save. The Add comment and save version modal will appear.
- Add a comment to the Comment text box.
- Select Save.
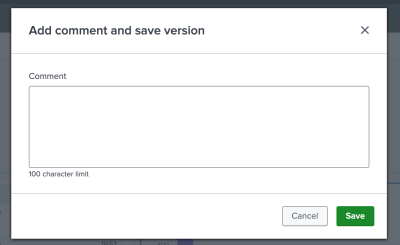
The following image shows the Add comment and save version modal.
View, compare, and revert previous versions
Review previous versions of your dashboard to track progress, identify issues that might create bugs, restore elements from earlier versions, provide transparency for team collaboration, and read comments for context around changes.
These steps describe how to view a dashboard's version history and compare different versions:
- From the dashboard's View mode, navigate to the Actions drop-down list.
- An alternate way to access the View version history option: Navigate to the Dashboards listing page. Find your dashboard title and table row. Navigate to the Actions column associated with your dashboard's row. In the Actions column, select the Edit drop-down list.
- Select View version history. The Compare versions modal will appear.
- You can do the following with the Compare versions modal:
- Filter versions by user name or comment.
- Toggle on or off filtering by comment.
- Select 1 or 2 versions to compare changes.
Compare versions
The version history view only shows the dashboard's JSON definition, not the complete XML. The JSON might not reflect changes in the XML.
To select versions to compare, follow these steps in the Compare version modal:
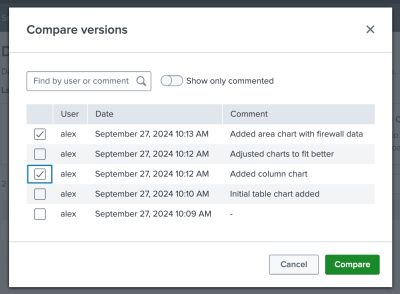
- Select 1 or 2 versions from the first column of boxes. The following image is an example of two different versions selected in the Compare versions modal.

- Select Compare. The Version Compare page will appear. The Version Compare page shows dashboard definition additions in green and deletions in red.
- (Optional) To change the versions you're comparing, select the Change button at the top of the Version Compare page and reselect the versions you want to compare. The following image is an example of where to find the Change button.

- (Optional) At the top of the Version Compare page, if you've selected 2 versions to compare, you can change the View selection to a Unified or Split screen. The following screenshot shows the Unified and Split view buttons.

- Select Cancel to return to the dashboard's View mode.
Revert to a previous version
Revert to a previous dashboard version to undo unwanted changes, restore lost elements, and fix errors. Only users with write permission can revert to an earlier version.
The following steps show how to revert to a previous version from the Version Compare page:
- At the top of the Version Compare page, select the Revert drop-down list. When comparing an older version with the most recent version of the dashboard, the Revert drop-down list only displays the older version as a revert option. Alternatively, if you're comparing 2 older dashboard versions, the drop-down list displays 2 revert options. If you're not comparing 2 versions and are viewing the most recent version, there is no Revert button.
The following screenshot is an example of a Revert drop-down list when comparing an older version with the most recent version of the dashboard.

- Select the previous version from the drop-down list. The Add comment and save version modal will appear.
- Add a comment to the Comment text box.
- Select Save.
Recovering a deleted dashboard's version history
A deleted dashboard keeps its version history. To recover the version history, create a new dashboard with the same ID as the deleted dashboard.
Version history and updating permissions
Updating a dashboard's permissions saves a new version without a comment message or dashboard definition changes. You cannot revert permission changes.
Manage version history with REST API endpoints
To manage the version history of your dashboard using REST API endpoints, see the server/info endpoint description in the Introspection endpoint descriptions in the REST API Reference Manual.
Additionally, see the following Knowledge endpoint descriptions in the REST API Reference Manual:
- data/ui/views/{name}
- data/ui/views/{name}/revision
- data/ui/views/{name}/history
| Create a dashboard using REST API endpoints | Visualization configuration options |
This documentation applies to the following versions of Splunk Cloud Platform™: 9.3.2408 (latest FedRAMP release), 9.3.2411


 Download manual
Feedback submitted, thanks!