Rules Engine: custom outbound webhooks in Splunk On-Call 🔗
Requirements 🔗
This integration is compatible with the following versions of Splunk On-Call:
Full-Stack
All users have the ability to reach out to Splunk On-Call support at any time with questions.
Live Chat: If you are logged into your Splunk On-Call instance, you will have the ability to Live Chat with the Splunk On-Call Support team.
All alerts are processed through the Rules Engine before reaching your timeline in descending order (top to bottom). This means that the order of the rules is very important. From the main Rules Engine page, you can click and drag individual rules to re-order them. By default, any new rules you create will appear at the top of the list.
It is a good general practice to add a detailed description when creating a rule so your fellow admins will understand its purpose.
Select the symbols at the right side of the bar to edit or view a rule.

Options include the ability to turn rules on or off, delete, and preview. Rules are turned on by default.
Preview 🔗
To use the preview window, set your matching condition and then select the edit symbol (three horizontal lines) and select Preview. The preview option opens a small window on the right side of your rules that will display any recent events in your timeline which meet the matching condition you have set.
This allows you to view the content of your alerts without having to switch back to the timeline. One useful trick is to set a very broad matching condition (use an asterisk (*) in the pattern section), then open the preview and find the alert you want to manipulate. Selecting More Info on the alert shows you the full payload. Hover over any field and click to automatically populate the matching condition of your rule to match that selection.
To close the preview window, select the edit symbol again and choose Close Preview.
Scope limiting 🔗
You may encounter situations where wildcard matching is required for a commonly occurring phrase (“down” or “database” for example). Matching on such a common phrase can cause your rule to be unintentionally applied to alerts that you do not wish to alter. This problem can be solved by using a sequence of sequential rules to limit the scope of the wildcard matching condition.
For example, let’s say we want to catch the word “staging” in the entity_id field and convert those alerts to INFO alerts so we don’t create an incident and notify anyone at 3:00 AM for a problem in a staging environment. However, there are some cases where you do want to create an incident for the staging environment, so creating a single rule to match on the phrase “staging” could prevent that from happening. In this case we only want to affect alerts from one particular monitoring tool (New Relic).
First, we need a rule to match on the monitoring tool value.
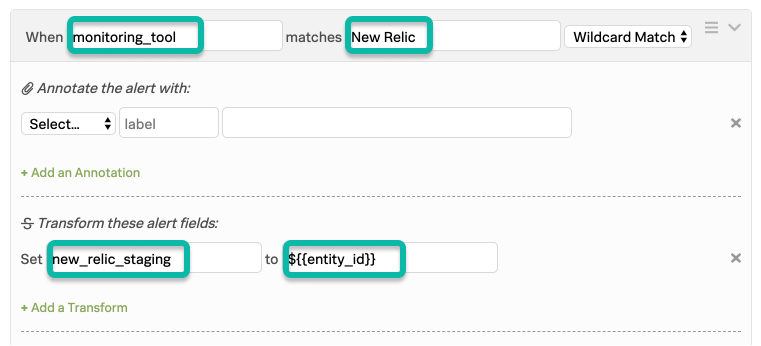
The matching condition for this rule catches all alerts from New Relic. It then uses a transformation action to declare a new field (new_relic_staging) and uses variable expansion to import the value of the entity_id field into that new field. This means that all alerts from New Relic now have a new field that is unique to New Relic only. The subsequent rule will now use wildcard matching on that new field.
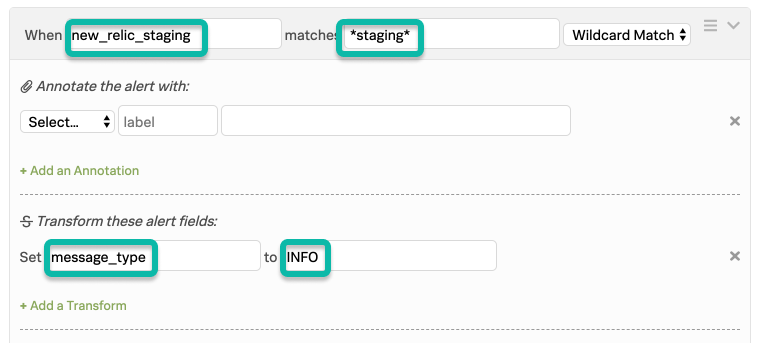
This second rule, which must be positioned below the first, matches on the new field created by the first rule, using wildcard matching to catch the phrase “staging”, and then takes the appropriate action. This limits the scope of the wildcard matching rule to only alerts from New Relic.
Stop flag 🔗
At the bottom of any rule setup window, there is an option to stop processing after the rule has been applied.

Every alert sent to Splunk On-Call, runs through the list of rules from top to bottom before reaching the timeline. This check box allows you to stop an alert from continuing to process through subsequent rules. This has performance advantages (speeds up processing of the alert) and allows you to prevent subsequent rules from overwriting the current rule after it has acted upon the alert.