Configure threat lists
Notable events are produced by the Splunk App for Enterprise Security when traffic to threat-listed sites is detected. Three elements are required for this capability function properly: network traffic data, a correlation search, and a threat list. Traffic from firewall and IDS/IPS systems is matched to threat lists by correlation searches related to each type of network threat. Many threat lists require regular refresh from external sources.
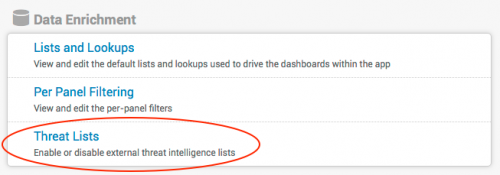
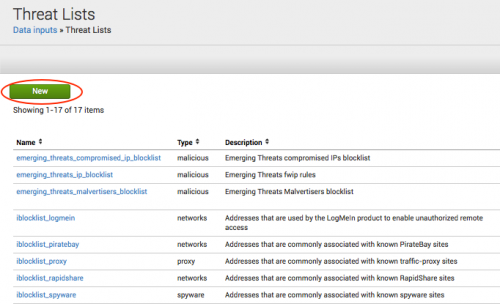
Click Threat Lists under Data Enrichment on the Configure dashboard.
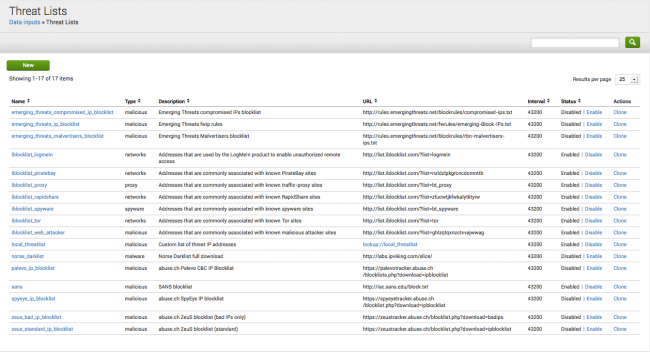
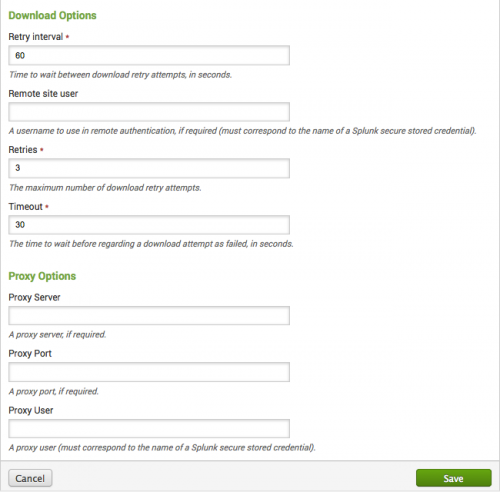
Use the Threat Lists dashboard and the Threat List Settings editor to configure a proxy server for a threat list, to edit an existing threat list, add a new threat list, or change threat list update information.
Threat lists are enabled by default, but won't work until the proxy information is configured for that threat list. When configured, the threat list downloads new information as it is available. If you disable a threat list, it is prevented from downloading any new information. Previously downloaded threat list entries are left in place and will continue to cause notable events to be produced unless the related correlation search is also disabled.
On the dashboard you can click disable next to the threat list name to disable a threat list. Click enable next to a threat list name to enable it again. You can also click clone to copy an existing threat list as a template for another threat list.
Threat list settings
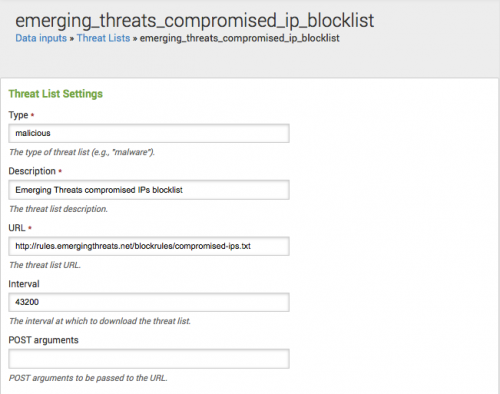
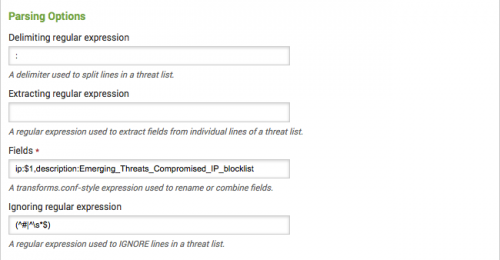
Use Threat Lists to configure the settings for your threat list. Go to Configure > Threat Lists. Click the name of a threat list to view its current settings. The Threat List Settings editor displays the information for the threat list.
Proxy server set up
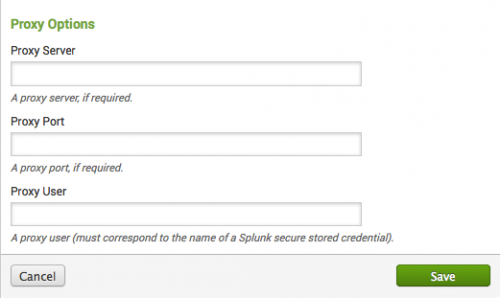
Threat lists are enabled by default. You do not have to use a proxy. In a proxy environment, a threat list will not work until you provide proxy server information for it. If your network requires a proxy, you need to specify the proxy information.
To add proxy server information:
1. Go to Configure > Data Enrichment > Threat Lists and click the threat list name.
2. In the Threat List Settings editor, go to the proxy server options section.
3. Enter the server name, port, and user name for your proxy server.
4. Click Save when you are done.
If you do not need a proxy server and wish to remove previously entered configuration, enter blank values into the form fields and click "Save".
All threat lists that are a part of the Splunk App for Enterprise Security are affected by the proxy information entered here.
Add proxy credentials
Use the Threat List Settings editor to add proxy credentials to your Splunk installation. Since a proxy credential may be used for other purposes within the app, it cannot be deleted using the Threat List Settings editor.
- If you modify only the password associated with a username, the Threat List Settings editor will update the existing credential.
- If you modify the username or the username and password in combination, the Threat List Settings editor creates a new credential with the new username.
- If you clear both the username and password in the Threat List Settings editor, the threat list download process will no longer use the proxy credential, but the credential will still exist on the system.
If you are sure that a credential is no longer in use, refer to "DELETE storage passwords" in the REST API Reference, part of the Splunk Enterprise documentation. This manual describes the method Splunk provides to manage securely stored credentials.
Edit a threat list
Use the Threat List Settings editor to modify information about an existing threat list.
To edit a threat list:
1. Go to Configure > Data Enrichment > Threat Lists and click the name of the threat list you want to edit.
2. In the Threat List Settings editor, make changes to the fields describing the threat list.
3. Click Save when you are done.
Note: You need to be an administrator to make these changes.
Enable non-administrators to edit a threat list
As an administrator, make these changes so that non-admin users can edit threat lists.
To allow non-admin users to edit threat lists:
1. Edit metadata/local.meta in both SA-ThreatIntelligence and SplunkEnterpriseSecuritySuite to assign the roles for both of the endpoints "inputs" and "transforms". In the example below, the "power" role is assigned the capabilities necessary to edit threat lists:
[lookups]
access = read : [ * ], write : [ admin,power ]

[transforms]
access = read : [ * ], write : [ admin,power ]
Make the appropriate changes for your deployment in both the inputs and transforms stanzas and save your files.
2. Restart Splunk.
3. Assign the selected role the edit_scripted capability in Settings > Users and Authentication > Roles from Splunk Home.
Add a new threat list
Use the Threat List Settings editor to add a new threat list to your deployment.
To add a new threat list:
1. Go to Configure > Data Enrichment > Threat Lists.
2. Click New to open the Threat List Settings editor.
3. Enter all the information about your new threat list.
4. Click Save when you are done.
Add a static threat list
You can also add new, regularly updated threat lists. The threat list is a CSV file with the expected format of is ip,description,is_type.
The ip field must be an IPv4 range, even if a single address is intended. Valid examples include:
  * 192.168.1.1-192.168.1.1
  * 192.168.2.0-192.168.2.255
The description field is a free form textual description for this range; it can be the same for all entries in a threat list or it can be unique for each entry. A valid example might be "RFC1918 address".
The is_type field is used to identify this threat list, and should not actually be titled "is_type". For instance, to construct an RFC1918 threat list, the field would be named "is_rfc1918" and each row in the threat list would state "true" for this field.
A completed example:
ip,description,is_rfc1918
192.168.1.1-192.168.1.1,RFC 1918,true
192.168.2.0-192.168.2.255,RFC 1918,true
Place the CSV file in the $SPLUNK_HOME/etc/apps/SA-ThreatIntelligence/lookups directory on the Enterprise Security search head, in order to use it with a correlation search. Each threat list has a corresponding correlation search. See "Create a correlation search for a threat list" in this manual to create the new correlation search.
Some lists, such as the Bogons list, do not need to be regularly updated from an external URL. Create a static list as a CSV file in the format shown.
Note: You can also get additional threat lists from I-BlockList (http://www.iblocklist.com/lists.php).
Create a correlation search for a threat list
When you create a new threat list, you must also create a new correlation search for the threat list. If your new threat list was named "ip_rfc1918.csv", the search string for your new correlation search would look like this:
1. Go to Configure > Correlation Searches > New.
2. Enter the search information in the New Correlation Search editor.
3. Paste the search string for your threat list into the Search field of the new correlation search.
4. Save the search.
Decrease threat list frequency
To decrease the frequency of scheduled updates for a threat list, go to Configure > Data Enrichment > Threat Lists. Click on the threat list to edit it. In the "Retry interval" field, increase the time range between updates to decrease the frequency of the updates.
Warning: Do not increase the frequency of the updates (by shortening the time range). You will be blocked from downloading by the threat list vendor.
| Configure the Advanced Filter | Configure data protection |
This documentation applies to the following versions of Splunk® Enterprise Security: 3.0, 3.0.1
 Download manual
Feedback submitted, thanks!