Configure the Advanced Filter
Some dashboards in the Splunk App for Enterprise Security include the Advanced Filter to enable per-panel filtering. The Advanced Filter (or "per-panel filtering") enables you to filter items out of dashboard views that are deemed unimportant or a non-issue. This makes it easier to find those events that require investigation, because non-issues are filtered out over time.
Configure user roles for Advanced Filter
The Advanced Filter (per-panel filtering) must be configured for use by user roles other than admin. The Advanced Filter icon will not be visible to other user roles until the filter is configured.
To configure a user role for access to the Advanced Filter:
1. Go to Settings > Access Controls > Roles.
2. Select which user role to modify (for example, ess_analyst or ess_user). Click on the role to open the editor.
3. In the "Capabilities" section, click "edit_per_panel_filters" to add this capability to the role.
4. Click Save.
Edit local.meta file to add permission changes
When you add permissions to a user role, you also need to manually edit the local.meta in the app where the per-panel filtering lookup file is located (DA-ESS-NetworkProtection).
To add permission to edit the Advanced Filter to the ess_analyst role:
1. Edit the $SPLUNK_HOME/etc/apps/DA-ESS-NetworkProtection/metadata/local.meta file.
2. Add the new permissions for ess_analyst role to the [lookups] line in the local.meta file:
## To allow additional roles to edit lookups, specify the roles below. Note that allowing others to edit lookups
## is necessary for some modules such as the threat list editor, per-panel-filtering module and the lookup editor.
## Note that the local.meta needs to be modified in the app where the lookup file resides.
access = read : [ * ], write : [ admin,ess_analyst ]
3. Save the file.
4. Go to Apps > Manage Apps > Enterprise Security > Setup. Click Save.
5. Restart Splunk to incorporate the changes.
This user role can now view the Advanced Filter icon and use per-panel filtering with the dashboards.
Advanced Filter on dashboards
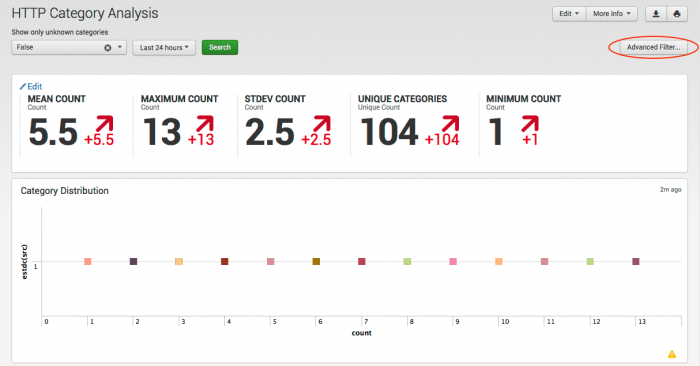
If the user has permission, the Advanced Filter button for per-panel filtering appears on dashboards used for analysis. For example, the Advanced Filter is shown on the HTTP Category Analysis dashboard.
To use the Advanced Filter:
1. Click the radio button next to events on the dashboard you want to filter.
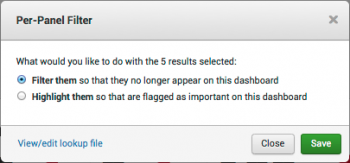
2. Click Advanced Filter... to display options for events that can be filtered in this panel.
3. Select the radio button to filter or highlight events on this dashboard.
4. Click Save when you are done.
To edit events you have previously filtered:
1. Click "View/edit lookup file" to open the lookup file editor.
2. Make changes to the filtered items for this dashboard. See "Advanced Filter" for information about the editor.
3. Click Save when you are done.
The Advanced Filter lookup file can remove events from the dashboard view ("whitelist" them) or add events to your "blacklist" as known threats. To use the Advanced Filter to whitelist events and blacklist events, see "Advanced Filter" in the Splunk App for Enterprise Security User Manual.
| Configure lists and lookups | Configure threat lists |
This documentation applies to the following versions of Splunk® Enterprise Security: 3.0, 3.0.1


 Download manual
Feedback submitted, thanks!