Install the app manually
This section describes the steps to manually install the Splunk App for Enterprise Security. To install the app using the Enterprise Security Install app, see "Install the Splunk App for Enterprise Security".
Before installing the app, be sure that you have satisfied the install prerequisites for both Splunk and the Splunk App for Enterprise Security.
Follow these steps to install the Splunk App for Enterprise Security manually.
Note: If your Splunk instance is currently running, ensure that it is stopped completely prior to proceeding with the install.
Step 1. Download the app and unzip the files
Download the Enterprise Security Installer App (splunk_app_installer_es-3.0.0-xxxxxx.spl) by going to the download link for Splunk App for Enterprise Security 3.0 on Splunk Apps. Open the archive file to retrieve the Splunk App for Enterprise Security contents inside it.
You can un-archive the file using the Unix tar command or using an archive utility that handles .tar file types. The .spl file will extract to the Enterprise Security install App folder SplunkEnterpriseSecuritySuiteInstaller.
The actual Enterprise Security App contents are contained under:
SplunkEnterpriseSecuritySuiteInstaller/default/src/splunk_app_es-3.0.x-xxxxxx.zip
Unzip these Splunk App for Enterprise Security files into a local temporary directory (<temp-dir>).
Step 2. Install the app(s)
Apps are the domain add-ons, supporting add-ons, other add-ons, and the other parts of the Splunk App for Enterprise Security solution.
A deployment app is a set of deployment content (including configuration files) deployed as a unit to clients of a server class. A deployment app might consist of just a single configuration file, or it can consist of many files.
Copy files to install
Copy files from the <temp-dir> into your $SPLUNK_HOME/ directories. In the <temp-dir>, find the following sub-directories and copy them as indicated:
- Copy the SplunkEnterpriseSecuritySuite, DA-ESS-*, SA-* and selected add-ons from
<temp-dir>/etc/appsinto$SPLUNK_HOME/etc/apps.
- For deployment-apps: You can either copy over the entire contents of
<temp-dir>/etc/deployment-appsto$SPLUNK_HOME/etc/deployment-apps, or select only the deployment apps you will be using in your environment.
After installing, the deployment apps can be found at $SPLUNK_HOME/etc/apps/SplunkEnterpriseSecurityInstaller/src/etc/.
Note: When using Mac OS X, be sure to copy the contents, not the folders themselves. Dropping a folder into these directories in Mac OS X will overwrite the Splunk contents already there.
For guidance on installing and configuring deployment apps, see "Splunk deployment server" in this manual and "About the deployment server" in the core Splunk product documentation.
Step 3. Start Splunk
When you have completed copying the contents of <temp-dir>/etc/apps and <temp-dir>/etc/deployment-apps, start your configured version of Splunk.
$SPLUNK_HOME/bin/splunk start
Open a web browser, navigate to Splunk Web (https://localhost:8000 ), and log in. The first time you log in, the user name will be admin and the password will be changeme.
Note: The Splunk App for Enterprise Security automatically enables SSL, so you need to change the protocol in your web browser to "https" (for example, https://localhost:8000 ).
Step 4. Set up the app
1. Navigate to Apps > Enterprise Security.
2. Click Enterprise Security. Verify the settings on the Splunk App for Enterprise Security Setup page.
See "Plan your deployment" in this manual and "Hardware capacity planning for your Splunk deployment" in the core Splunk product documentation for more information about capacity planning.
3. Click Save. You must restart Splunk for the configuration changes to be applied.
4. After Splunk restarts, log in and click Enterprise Security.
Step 5. Add data
Now that the Splunk App for Enterprise Security is installed, you have choices about how to get your initial data in:
- You can use data from pre-configured add-ons (for example TA-bluecoat). See "Plan your data inputs" in this manual for more information on using pre-configured add-ons supplied by Splunk.
- You can also create your own custom add-ons to capture specific data in your environment. See the Data Source Integration Manual for information on building your own add-on.
See "Plan your data inputs" in this manual for more information.
Step 6. Configure the app
To configure the app, click Configure in the menu bar from anywhere in the app.
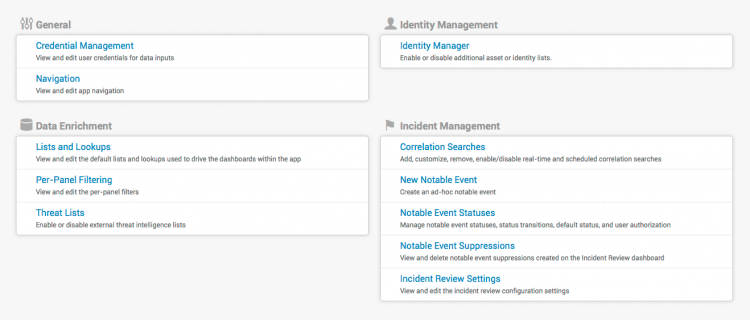
There are four general areas of configuration settings - General, Data Enrichment, Identity Management and Incident Management. See "Steps to configure" in this manual to begin setting up the Splunk App for Enterprise Security for your environment.
| Install the Splunk App for Enterprise Security | Install add-ons |
This documentation applies to the following versions of Splunk® Enterprise Security: 3.0

 Download manual
Feedback submitted, thanks!