[時間範囲セレクター]で時間範囲を選択する 🔗
時間範囲セレクターはSplunk Observability Cloud経由で使用されます。
チャートやダッシュボードでは、チャートの デフォルトの時間範囲 を指定できます。デフォルトでは、Splunk Observability Cloudは表示するデータの特性に基づいて、チャートやデータビューに最適な時間範囲を選択します。ただし、時間範囲セレクターを使用すると、ダッシュボード内のすべてのチャートの デフォルトをオーバーライド することができます。
ミュートルール設定において、時間範囲セレクターは、ミュートルールを起動するための時間ウィンドウを示します。
時間範囲セレクターは、相対時間範囲と絶対時間範囲の両方をサポートしています。
相対時間範囲を指定する 🔗
メニューから提示された時間範囲を選択するか、希望する相対時間範囲を入力することで、相対時間範囲を指定することができます。詳細については、以下のセクションを参照してください。
相対時間範囲を入力する 🔗
メニューに希望の相対時間範囲がない場合は、時間範囲選択フィールドに入力してください。有効な時間単位は、m(分)、h(時)、d(日)、w(週)です。
現在までの相対的な時間ウィンドウのデータを表示するには、時間単位の前にマイナス(-)を時間範囲セレクターに入力します。例えば、過去5分間の測定値を表示する場合は、-5m と入力します。
現在から未来までの時間範囲を設定するには、時間範囲セレクターに、プラス(+)で始まる時間単位を入力します。例えば、今後6時間の時間ウィンドウを設定したい場合は、+6h と入力します。
また、現在より前の時間や、未来の時間までの相対的な時間ウィンドウを設定することもできます。
例えば、1分前から3分前までのメトリクスを見たい場合は、時間範囲セレクターを選択し、-3m to -1m と入力します。
例えば、ミュートルールの今後の時間ウィンドウを明日から2日後の間に設定したい場合、時間範囲セレクターを選択し、+1d to +2d と入力します。
注釈
早い時点を先に入力する必要があります。例えば、-1m to -3m と入力しても機能しません。
「時間範囲」セレクターには、最近使用したカスタム時間範囲が「最近」の見出しの下に表示されます。
絶対時間範囲を指定する 🔗
開始時刻と終了時刻が定義された絶対時間ウィンドウを設定するには、時間範囲セレクターを選択し、Custom を選択します。カスタム時間範囲セレクターが表示されます。希望する時間範囲の開始日時と終了日時を選択し、Apply を選択すると、その時間範囲のデータのみが表示されます。
タイムスタンプと時間範囲の選択の両方について、タイムゾーンの略語は、ユーザーのブラウザのロケールに基づいています。ロケールを超えてチームメンバーとタイムスタンプを共有する場合は、タイムゾーンの略語に対する混乱を避けるように注意してください。言語によって略語の意味が曖昧になる可能性があります。例えば、CSTはアメリカ英語ではUTC -6:00ですが、オーストラリア英語ではUTC +9:30です。ISOでUTCオフセットを使うのが望ましい方法です。推奨される絶対時間のフォーマットには以下のものがあります:
18 Sep 10:18~19 Sep 10:18
同日の場合:10:18~10:20
ISO範囲をコピーしt場合、2023-10-15T04:19:00.000-07:00~2023-10-16T16:19:00.000-07:00
カスタム時間範囲の選択 🔗
また、開始時間と終了時間が定義された相対時間ウィンドウまたは絶対時間ウィンドウのデータを表示することもできます。「時間範囲」セレクターを選択し、メニューから Custom を選択します。カスタムの「時間範囲」セレクターが表示されます。希望する時間範囲の開始日時と終了日時を選択し、Apply を選択します。
時間範囲をパンする 🔗
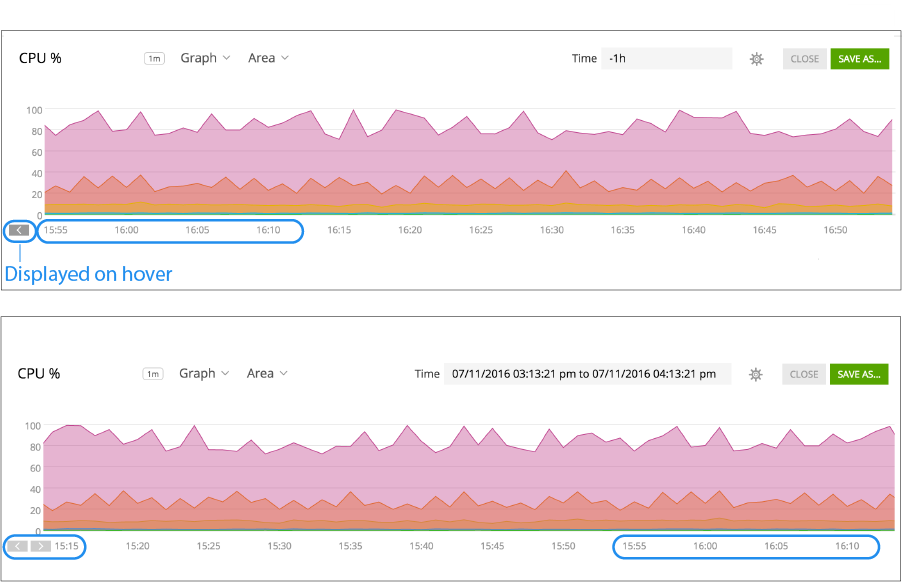
ダッシュボードやチャートビルダーでチャートを表示する際、左下隅にカーソルを置くと、パンコントロールが表示されます。初期状態では、時間を遡るコントロールしか表示されません。一度時間を遡ると、前後にパンするコントロールが表示されます。
これらのコントロールのいずれかを選択すると、時間範囲が絶対時間範囲に変更され、コントロールを選択するたびに2/3刻みで変更されます。例えば、後方にパンすると、パンしたチャートの最後の3分の1が元のチャートの最初の3分の1に重なります。
以下の図では、現在時刻は午後4時55分 (16時55分)頃で、チャートには15時55分から始まる過去1時間 のデータが表示されています。一度パンバックすると、15:55の40分前である15:15頃から始まる時間範囲が表示されます。