Splunk RUM データに対するアラート 🔗
Splunk RUM は、Infrastructure Monitoring プラットフォームを活用してディテクターとアラートを作成します。Splunk RUM のメトリクスにアラートを発するディテクターを設定することで、アプリケーションに関連するアラートを監視し、タイムリーに対処できるようになります。
Splunk RUM におけるアラートの仕組み 🔗
Splunk RUM for Browser では、アラートはアプリケーション全体の集約メトリクスに対してトリガーされます。ページレベルのメトリクスに対してアラートを作成したい場合は、まずメトリクスのカスタムイベントを作成し、次にカスタムイベントのアラートを作成します。詳細については、カスタム イベントの作成 を参照してください。アラートとディテクターを初めて使用する場合は、Splunk Observability Cloud のアラートとディテクターの概要 を参照してください。
インテグレーション 🔗
Splunk RUM からアラートを受信するには、以下の方法とインテグレーションを使用できます:
メール通知
Jira
PagerDuty
ServiceNow
Slack
VictorOps
XMatters
また、ランブックへのリンクなど、組織内のトラブルシューティング情報へのリンクをメッセージに追加することもできます。
データの保持 🔗
アラートは、インフラモニタリングのメトリクスに基づいてトリガーされます。メトリクスは 13 か月間保存されます。詳しくは、Splunk Observability Cloud のデータ保持 を参照してください。
アラート可能なメトリクスのタイプ 🔗
以下のタイプのメトリクスに対してアラートを作成できます。すべての Splunk RUM メトリクスの包括的なリストについては、以下を参照してください:
ウェブバイタルについて詳しくは、Google開発者向けドキュメントの https://web.dev/vitals/ を参照してください。
カテゴリ |
メトリクス |
|---|---|
ウェブバイタル |
|
カスタムイベント |
|
ページメトリクス |
|
エンドポイントメトリクス |
|
アラート設定例 🔗
以下は、アラートの設定方法の例です。アラートのスコープをページまたはURLレベル、またはアプリレベルのいずれかに設定します。以下のユースケースでは、Buttercup Industries(架空のeコマース会社)の例を取り上げています。
アラートトリガー条件 🔗
RUMのアラート条件は、ノイズを減らし、データに関する明確で実用的な洞察を提供するように設計されています。ニーズに合わせてアラートの感度を設定することができます。より小さな変化に対してより敏感なアラートが必要な場合は、パーセンテージを下げることができます。例えば、感度を10%に設定した場合、指定した時間枠内のデータの10%のみが設定したしきい値を超えたときにアラートが表示されます。
ページレベルのメトリクス 🔗
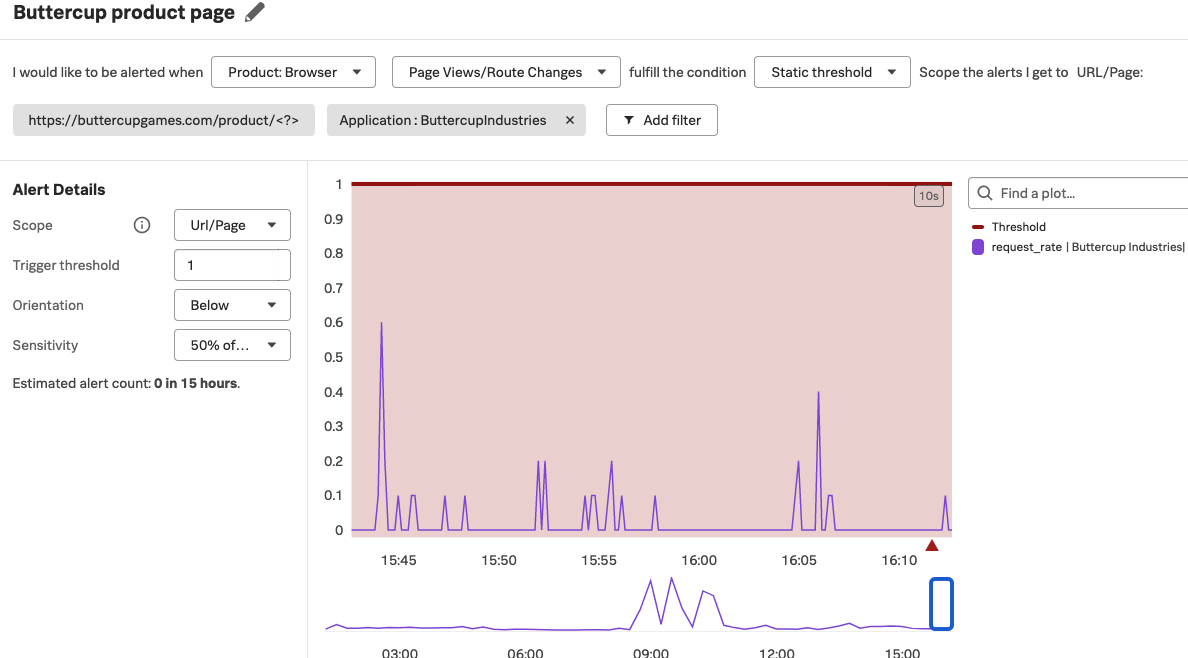
ページレベルのメトリクスを作成するには、まず、監視したいページにマッピングするカスタムルールを作成します。カスタムルールの作成方法については、Splunk RUM で URL グループ化のカスタムルールを作成する を参照してください。たとえば、オンラインストアButtercup Gamesの製品タイプでグループ化したいので、パターン https://buttercupgames.com/product/<?> を使用するとします。ディテクターを作成する際、リストからルールを選択してカスタムルールを適用します。次の画像は、カスタムパターン https://buttercupgames.com/product/<?> のページレベルディテクターです。

アプリレベルのメトリクス 🔗
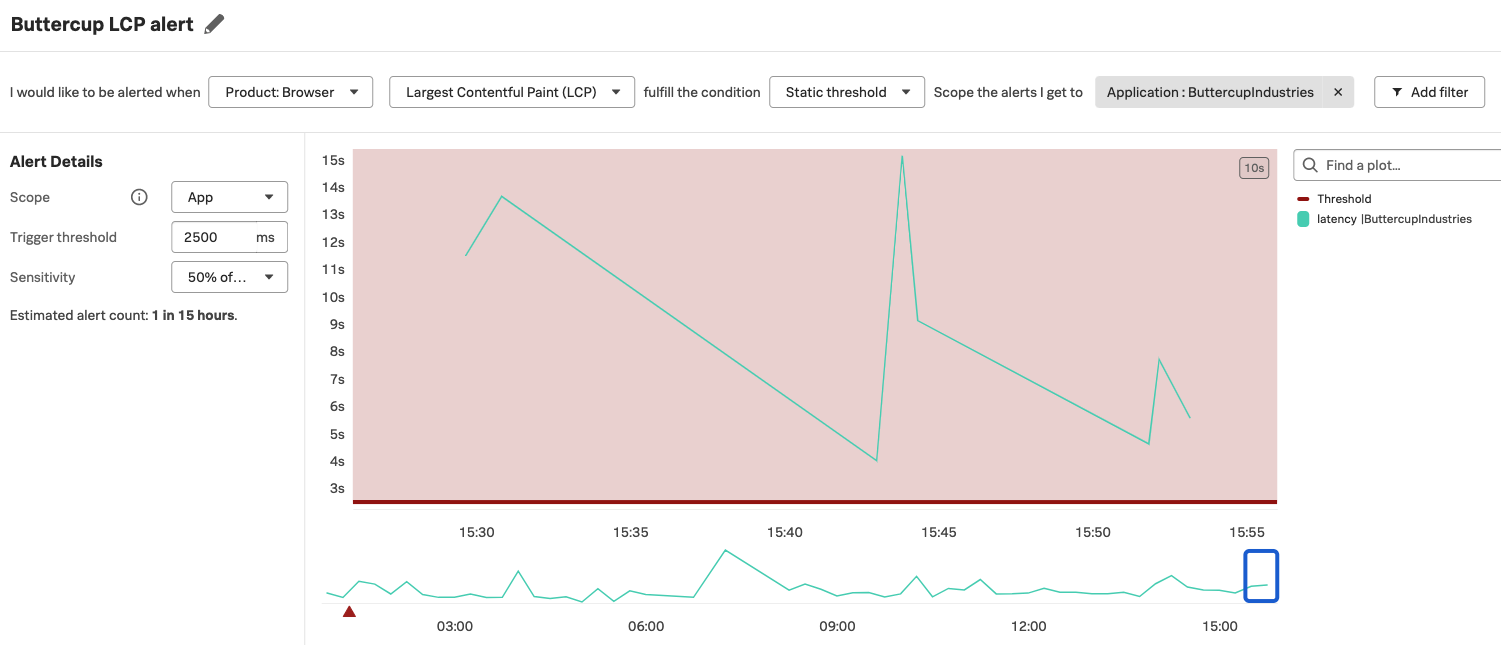
ウェブバイタルには、良好なパフォーマンスを示す標準的な範囲があります。例えば、最大コンテンツペイント (LCP) メトリクスが2.5秒を超えると、アプリケーションのユーザーエクスペリエンスが低下する可能性があります。Splunk RUM を使えば、集計された LCP が2.5秒を超えたときに通知するアラートを作成し、チームに Slack 通知を送信したり、遅い LCP を改善するためのステップを記載したランブックにリンクしたりすることができます。

URLレベルのメトリクス 🔗
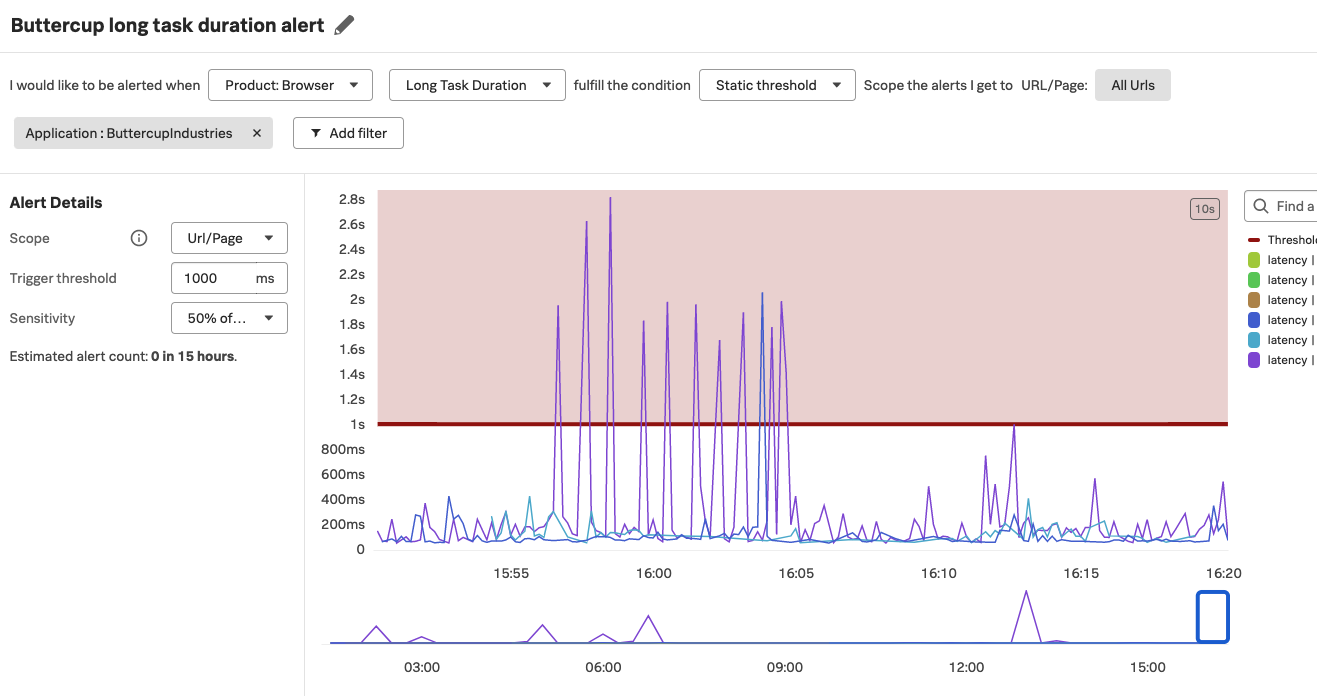
次の画像は、5分間のウィンドウ内のデータポイントの50%が1000ミリ秒より長い場合にトリガーされる、長いタスク時間の URL レベルのメトリクスの構成例を示しています。

ディテクターを作成する 🔗
ディテクターは、RUMの概要ページまたはTag Spotlightから作成できます。
RUMでディテクターを作成するには、以下のステップに従ってください:
Splunk RUM で、関心のあるメトリクスを選択して Tag Spotlight を開きます。
新規ディテクターを作成する を選択します。
ディテクターを設定します:
ディテクターに名前をつけます。
関心のあるメトリクスとデータのタイプを選択します。
アラートの静的しきい値を設定します。
アラートの範囲を選択します。
アラートの重大度を選択します。
カスタムルールを適用するには、」Scope the alerts I get to URL/Page」 のリストからルールを選択します。
チームがコミュニケーションに使用しているツールと統合し、ランブックへのリンクを追加することで、アラートを他の人と共有できます。
有効化 を選択します。
RUMアラートのダッシュボードを作成する 🔗
ダッシュボードは、ウェブとモバイルの両方のメトリクスに対して作成できます。Splunk RUM で利用可能なメトリクスの一覧は、次を参照してください:
RUMアラートとディテクターのチャートとダッシュボードを作成するには、以下を参照してください:
Link detectors to charts in Alerts, detectors, and SLO.
Dashboards in Splunk Observability Cloud in Dashboards and charts.
ディテクターとアラートを表示する 🔗
説明については、こちらを参照してください: