Splunk On-Callのチームまたは個人カレンダーをエクスポートします。 🔗
以下の簡単な手順で、Splunk On-Callチームまたは個人カレンダーをお気に入りのカレンダーアプリにエクスポートできます。
Splunk On-Callから 🔗
チームカレンダーをエクスポートする 🔗
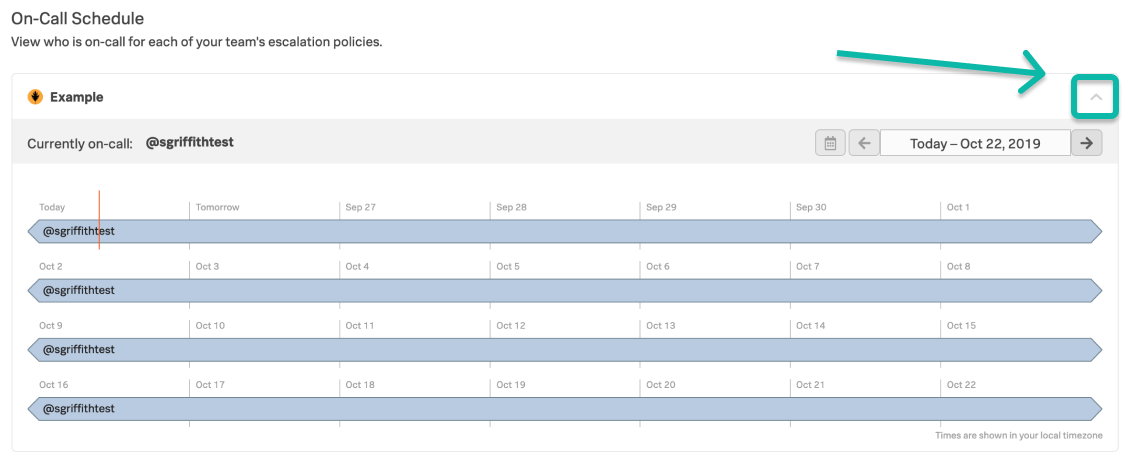
チームのカレンダーを表示するには、Teams を選択し、青くハイライトされたチームを選択して、On-Call Schedule を選択します。次に、チーム名の右側にある展開ボタンを選択し、カレンダービューを開きます。

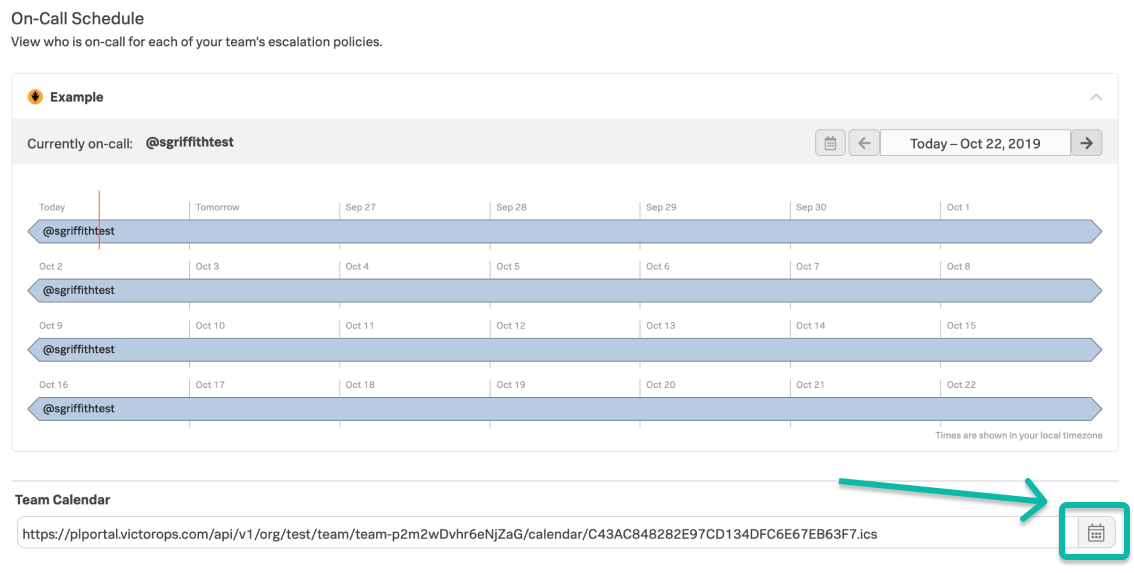
各チームのカレンダーの下に、チームカレンダーリンクが表示されます。URLを自動的にコピーするには、Copy to clipboard ボタンを選択します。
個人カレンダー 🔗
個人カレンダーを取得するには
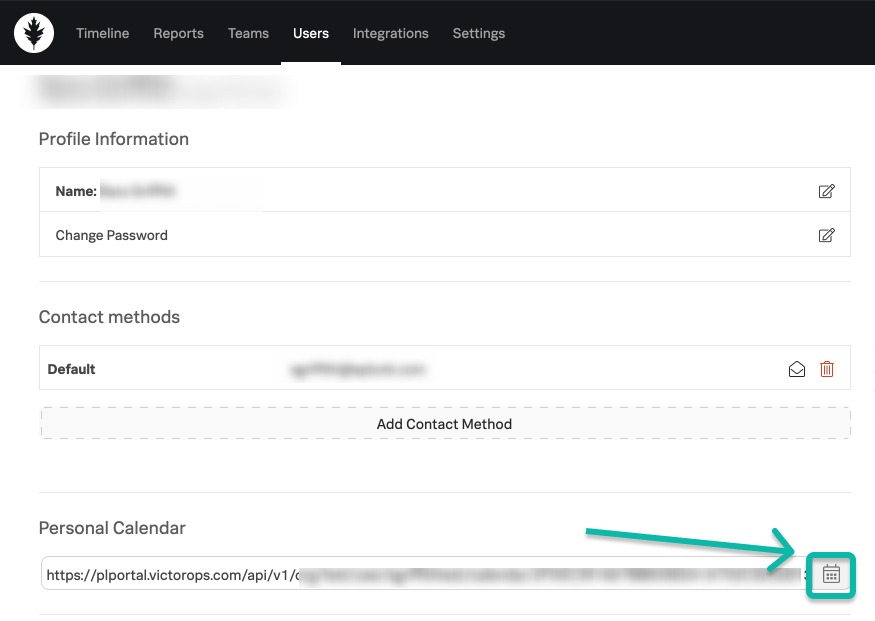
グローバル管理者上部のナビゲーションバーから を選択し、ユーザー名を選択します。Personal Calendar の下に生成されたリンクが表示されます。URLをコピーするには、Copy Token ボタンを選択します。
非管理ユーザー:右上の名前を選択し、Profile を選択します。Personal Calendar の下にリンクが生成されます。URLをコピーするには、Copy Token ボタンを選択します。
カレンダー 🔗
.icsから既存のカレンダーにインポートされたイベントは、そのカレンダーの一部となり、個別に削除する必要があります。このため、ファイルを独自のカレンダーにインポートすることをお勧めします。そうすれば、必要な場合は、全体を削除または無効化できます。
Googleカレンダー 🔗
注釈
Splunk On-CallカレンダーとGoogleに関する重要な注意事項:Splunk On-Callでスケジュールやエスカレーションポリシーを変更すると、その変更は即座にシステム内の.icsカレンダーファイルに書き込まれ、即座にカレンダーツールで利用可能です。しかし、このプロセスは*プル*のみの操作であり、Googleカレンダーは提供されたURLでカレンダーの最新バージョンを取得するために、積極的にSplunk On-Callにアクセスする必要があります。Googleカレンダーは、この処理を不定期に、そして一見ランダムな間隔で実行する傾向があります。更新レートはGoogleユーザーが設定することはできません(または知ることもできません)。このため、Splunk On-Callでスケジュールを変更した後、最大で20~30時間Googleに反映されないことがあります。強制的に更新する必要がある場合は、このトピックの次のセクションの Googleカレンダーの更新を強制する を参照してください。
Splunk On-CallカレンダーをGoogleにインポートする 🔗
左メニューのカレンダーリストの一番上で、Add a coworkers calendar の隣にある Add (+)記号を選択し、From URL を選択します。
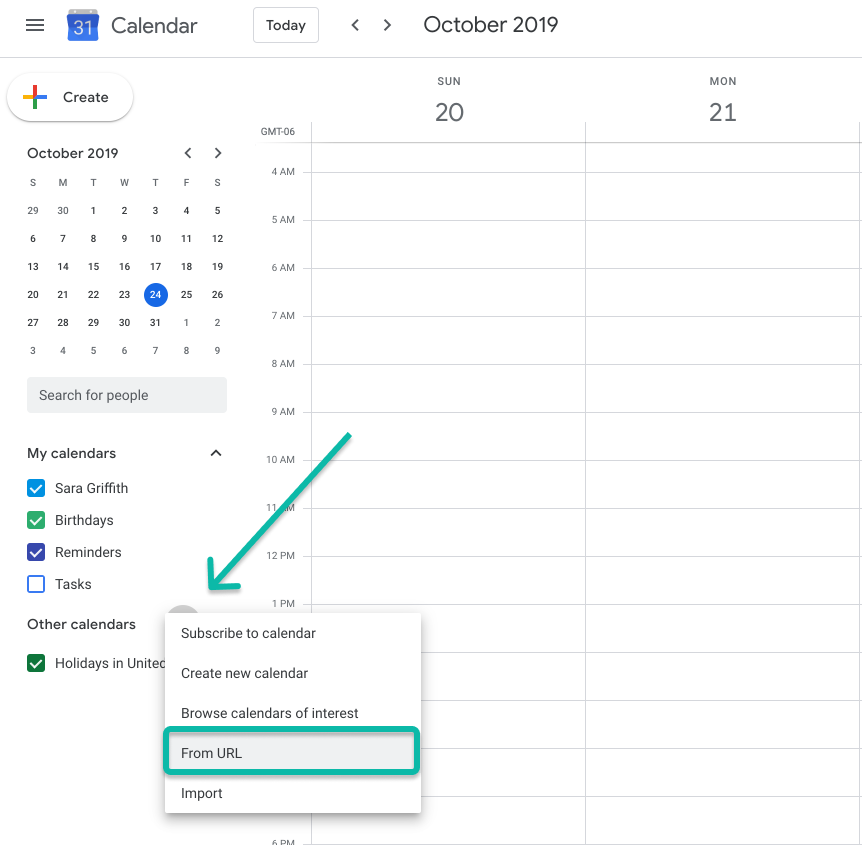
Splunk On-Callからコピーしたチームまたは個人カレンダーのURLを貼り付け、Add Calendar を選択します。
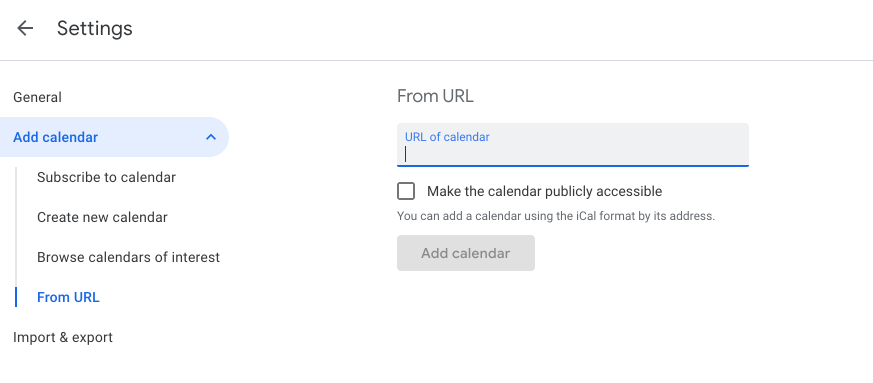
左側メニューの「その他のカレンダー」セクションに、新しく追加されたカレンダーが表示されるはずです。
Googleカレンダーの更新を強制する 🔗
Googleでは、インポートしたカレンダーの更新レートをユーザーがコントロールすることはできません。そのため、変更をすぐに反映させたい場合は、以下の回避策で強制的に更新する必要があるかもしれません。
Googleカレンダーで、Splunk On-Callカレンダーを検索し、その他のアイコン( ⋯ )を選択して Settings を検索します。
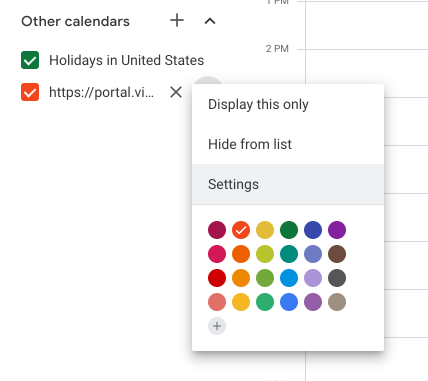
カレンダー設定ページの下部から unsubscribe を選択します。

上記の指示に従ってURLでカレンダーを追加します。ただし、Splunk On-Callが提供するカレンダーの.ics URLの末尾に以下のクエリ文字列を追加します。
?nocache
その結果、URLはこの例のように表示されるはずです:
https://portal.victorops.com/api/v1/org/<your-organization-name>/team/<your-team-name>/calendar/24B13BBABXXXXXXXXXXXXXXX1E203D11.ics?nocache
これにより、GoogleはそのURLにアクセスし、キャッシュされたバージョンを読み込む代わりに、最新の変更を含む最新バージョンの.icsファイルを取得します。ただし、この操作は一度しか行われず、その後新しいURL(nocacheステートメントを含む)がキャッシュされることに注意してください。この操作を2回目に実行するには、nocache文に?nocache1』?nocache2』?nocache3などのように数値をインクリメントする必要があります。
Outlookカレンダーに登録する 🔗
Outlookでカレンダーに登録するには:
Outlookのナビゲーションバーで、App Launcherアイコンを選択し、Calendar を選択します。
ナビゲーションバーの下で、 下矢印を選択します。 を選択します。

From internet を選択し、Link to the calendar フィールドにカレンダーのURLを入力します。
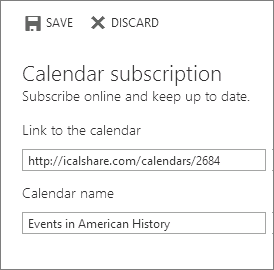
Calendar name フィールドで、リンクされたカレンダーの名前を入力します。
Save を選択します。
iCalカレンダーに登録する 🔗
iCalカレンダーに登録するには:
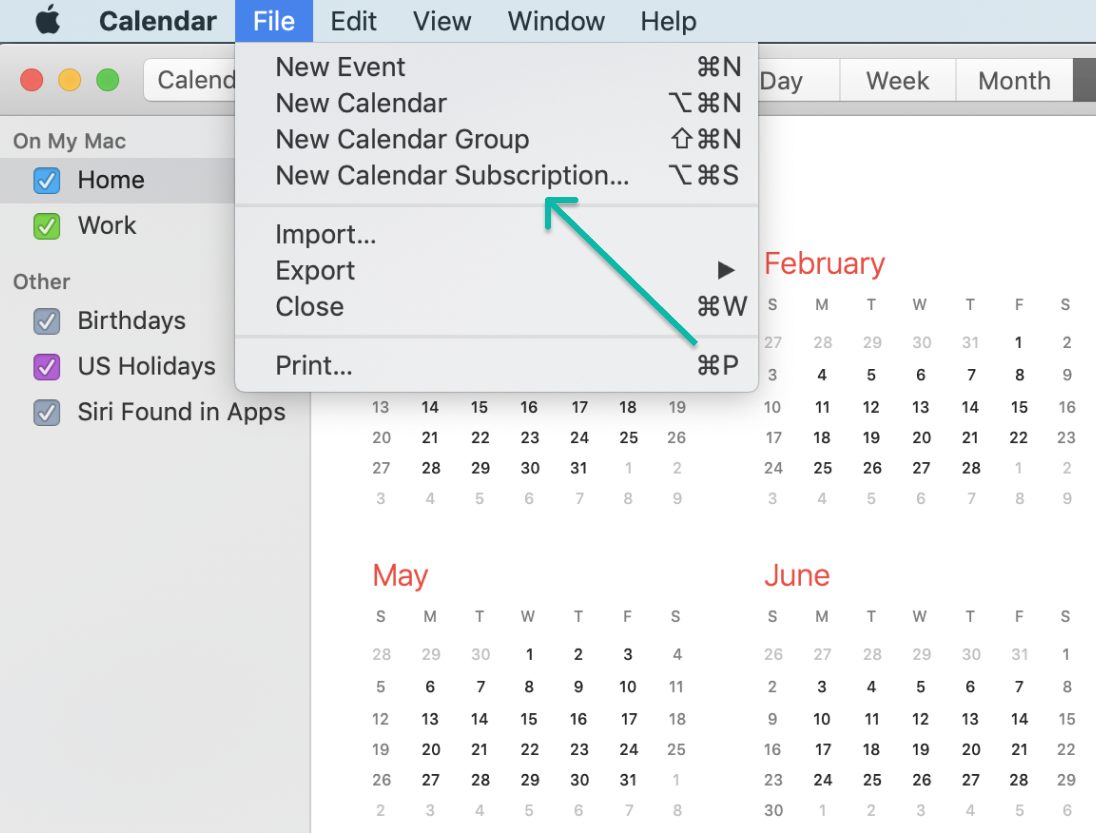
File を選択し、次に New Calendar Subscription を選択します。
Splunk On-Callから特定のチームまたは個人カレンダーのWebアドレスを入力し、Subscribe を選択します。
「名前」フィールドにカレンダーの名前を入力し、隣接するポップアップメニューを選択して色を選択します。
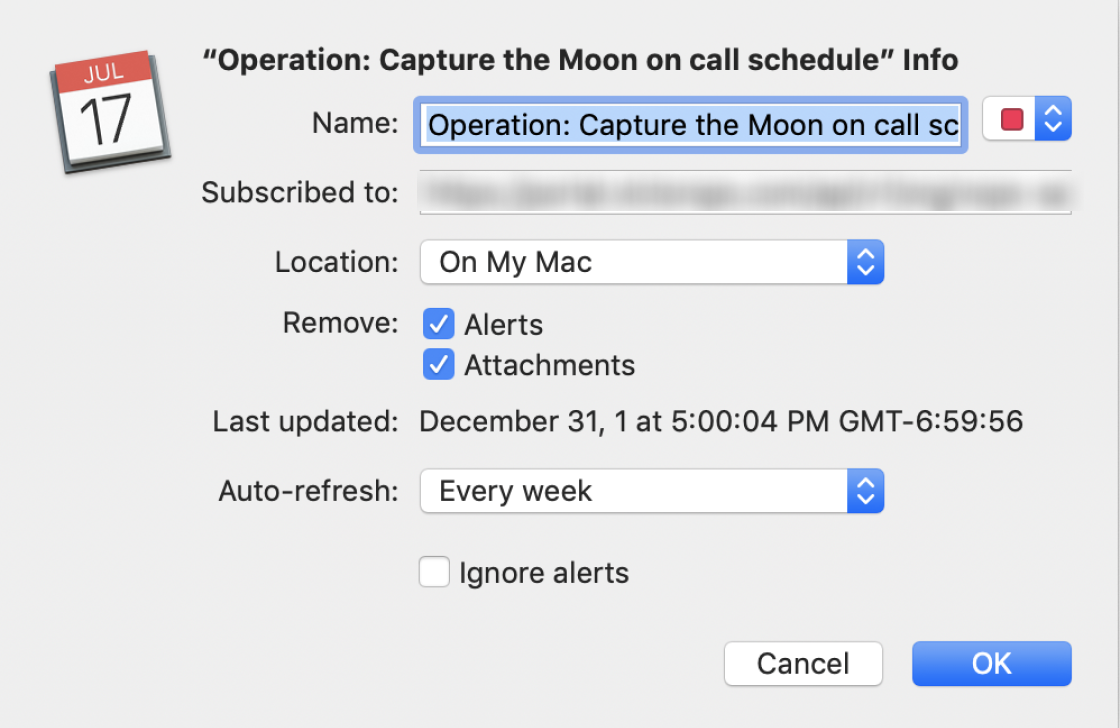
Location メニューを選択し、サブスクリプションのアカウントを選択します。iCloudアカウントを選択した場合、カレンダーはiCloudでセットアップされているすべてのコンピューターとデバイスで利用できます。On My Mac を選択した場合、カレンダーはコンピューターに保存されます。
カレンダーのイベント添付またはアラートを取得するには、該当するチェックボックスの選択を解除します。
Auto-refresh メニューを選択し、カレンダーの更新頻度を選択します。
このカレンダーのアラートを表示しないようにするには、Ignore alerts を選択します。
OK を選択します。後で変更するには、カレンダーの名前を選択し、Edit、Get Info の順に選択します。