ディテクターとアラート 🔗
Splunk Observability Cloudでは、ディテクターがテストやメトリクスに異常がないかを監視し、問題が発生するとアラートを生成します。アラートのしきい値、重大度、通知方法、受信者などをカスタマイズできます。
Splunk Observability Cloud の高度なアラートとディテクターの詳細については、Splunk Observability Cloudのアラートとディテクターの概要 を参照してください。Synthetics 固有の静的しきい値ディテクターの作成については、こちらをお読みください。
Syntheticsにおけるディテクターのタイプ 🔗
Syntheticsでは、ブラウザテストのテストレベル、ページレベル、合成トランザクションレベルのメトリクスに対してアラートを発するディテクターがあります。以下の表は、それらの各ディテクタータイプについて説明したものです:
ディテクタータイプ |
説明 |
|---|---|
テストレベルディテクター |
テストレベルのディテクターは、テスト全体に該当するメトリクスに対してアラートを送信します。
例:runの失敗数、アップタイムの割合(%)、またはテスト全体の時間が所定の閾値を超えた場合にアラートを送信する。
|
ページレベルディテクター |
ページレベルのディテクターは、ブラウザテスト内の単一ページに該当するメトリクスに対してアラートを送信します。
例:特定のページ上でのDOM読み込み時間、LCP(最大コンテンツの描画)、または合計画像サイズが所定の閾値を超えた場合にアラートを送信する。
ページレベルのメトリクスに対してアラートをページ レベルにスコープしない場合、ディテクターはページ全体の平均メトリクス値を監視します。詳細については、Set up reminders for alerts を参照してください。
|
トランザクションレベルディテクター |
合成トランザクションレベルのディテクターは、ブラウザテスト内のある合成トランザクションに該当するメトリクスに対してアラートを送信します。
例:Splunk Synthetic Monitoringが取得する3つのトランザクションレベルのメトリクス(期間、リクエスト、サイズ)に対してアラートを送信する。詳細は ブラウザテスト用のトランザクションレベルディテクターを作成します。 を参照してください。
|
合成テストが失敗する場合のアラート送信のベストプラクティス 🔗
ディテクターのセットアップは、最初にテストを作成する際、または編集する際、あるいは特定のテストの結果ビューから実行できます。ディテクターは1つまたは複数の合成テストを追跡できます。
ディテクターを設定するには、以下のいずれかを行ってください:
テストの作成または編集の際に、Create detector を選択してディテクターダイアログボックスを開く。
特定のテストの Test results ページから、Create detector を選択してディテクターダイアログボックスを開く。
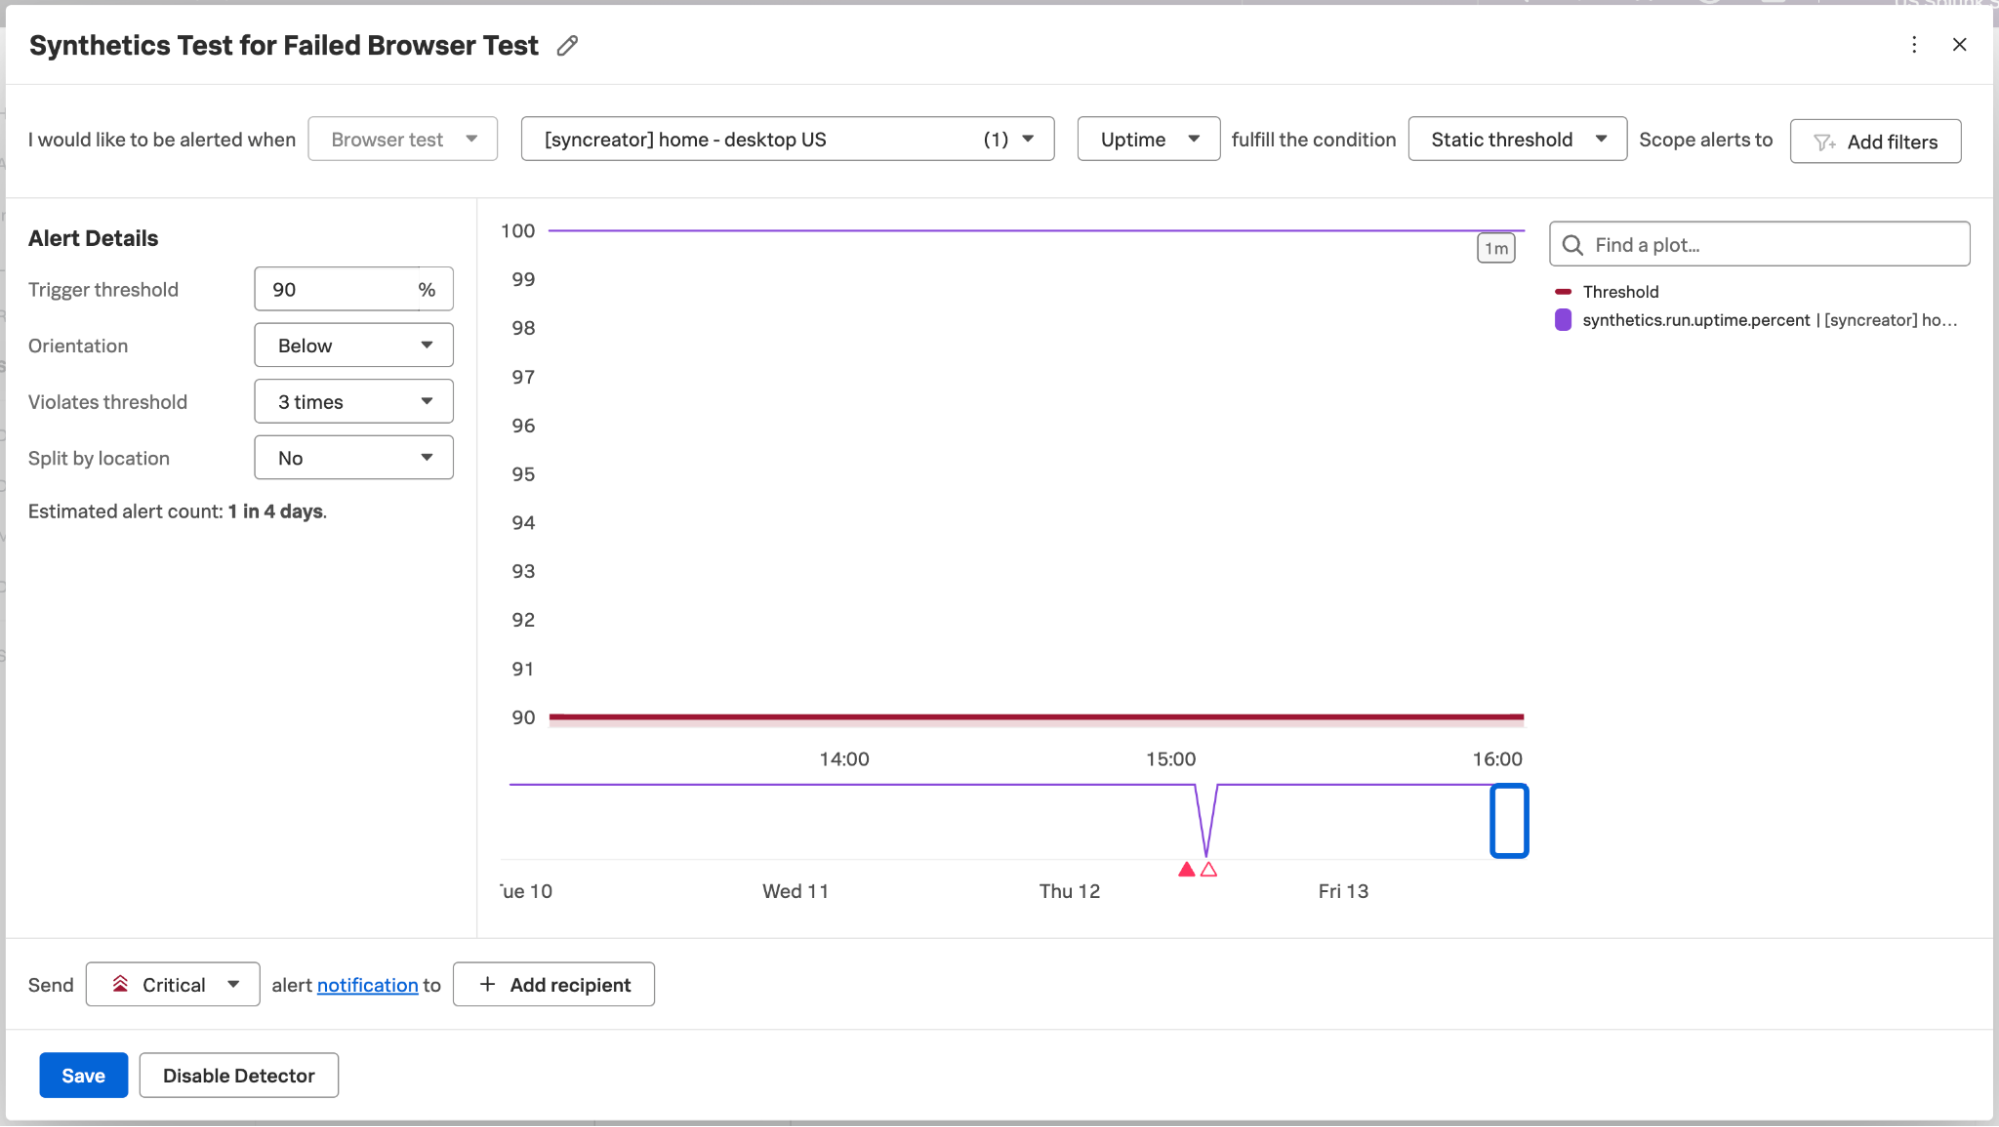
ディテクターダイアログボックスで、以下のフィールドに入力します:
テスト名リストで、ディテクターに含めるテストを選択します。ベストプラクティスは、runの長さが類似するテストを選択することです。
メトリクスリストで、アップタイム(稼働時間) を選択します。テストが失敗した場合、稼働時間メトリクスは0になります。
+ フィルターの追加 で、failed または success のフィルターを追加しないでください。これらのフィルターを含めないことによって、ディテクターがそのテストrunのすべてのデータポイントを監視することを保証します。
Alert details セクションで、次を入力します:
Trigger threshold: アラートをトリガーするしきい値。
Orientation: アラートをトリガーするためにメトリクスが閾値より下または上になる必要があるかどうか。
Violates threshold:アラートをトリガーするためにメトリクスがしきい値に違反する必要がある回数。
Split by location: テストのロケーションによってディテクターを分割するかどうか。ロケーションによる分割を行わない場合、ディテクターはすべてのロケーションの平均値を監視します。
重大度セレクターを使用して、アラートの重大度を設定します。
受信者を追加します。
Activate を選択します。

これで、ディテクターは失敗したテストrunについて毎分チェックを実行し、Alert details の設定に基づいてアラートを送信するように設定されました。
Splunk Synthetic Monitoring テスト用のディテクターを設定する 🔗
ディテクターの設定は、最初にテストを作成または編集する際、または特定のテストの結果ビューから行うことができます。ディテクターは、1 つの外形監視または同じタイプの複数の外形監視を追跡できます。
ディテクターを設定するには、以下のいずれかを行ってください:
テストの作成または編集中に、Create detector を選択します。ディテクターダイアログボックスが開きます。
特定の検査の Test results ページから、Create detector を選択します。ディテクターダイアログボックスが開きます。
ディテクターダイアログボックスで、以下のフィールドに入力します:
テスト名リストで、ディテクターに含めるテストを選択します。リストに表示されているすべてのテストを含める場合は、すべてのテスト チェックボックスをオンにします。
注釈
すべてのテスト オプションは、プログラムテキストでワイルドカード(*)を使用し、常に同じタイプのすべてのテストをカバーします。
メトリクス リストで、アラートを受信するメトリクスを選択します。デフォルトでは、ディテクターは Uptime メトリクスを追跡します。
デフォルトの Static threshold アラート条件は変更できません。
ディメンション別にアラートの範囲を設定するには、+ フィルターを追加する を選択します。ブラウザ テストの場合、このセレクターを使用して、テスト全体、テスト内の特定のページ、またはテスト内の特定の合成トランザクションにディテクターをスコープできます。詳細については、以下のセクションを参照してください:
Alert details セクションで、次を入力します:
Trigger threshold: アラートをトリガーするしきい値。
Orientation: uptime メトリクスでのみ使用可能です。アラートをトリガーするために、メトリクスがしきい値を下回らなければならないか、しきい値を超えなければならないかを指定します。
Violates threshold:アラートをトリガーするためにメトリクスがしきい値に違反する必要がある回数。
Split by location: 検査場所でディテクターを分割するかどうかを選択します。場所によるフィルタリングを行わない場合、ディテクターはすべての場所全体の平均値を監視します。
Auto-clear alerts: Select the check box and a time duration from the list if you want active alerts to automatically clear after the metric hasn’t reported new data for the specified period. To learn more, see アラートの自動解除.
重大度セレクターを使用して、アラートの重大度を選択します。
受信者を追加します。
Activate を選択します。
Set up reminders for alerts 🔗
To receive reminders for alerts triggered by your detectors, do the following while creating your detector:
Select the alert severity that will trigger a notification and the channel used to receive the reminder notification. For example, select Email to receive email notifications.
Scope alerts to と書かれた + ボタンを選択します。
Find a key で、
page_positionディメンションを選択します。
ブラウザテスト用のページレベルディテクターを作成する 🔗
ページレベルディテクターを作成するには、ディテクターを作成する際に以下の手順を実行します:
ディテクターがアラートを発するメトリクスを選択する場合は、ページ レベルに適用されるメトリクスを選択します。Run Duration や Run count のような、テスト内の特定のページではなく、ブラウザ テストの実行全体に適用されるメトリクスは使用しないでください。
Scope alerts to と書かれた + ボタンを選択します。
Find a key で、
page_positionディメンションを選択します。Find a value で、監視したいページに対応する番号を選択します。ページの位置 0 は、ブラウザテストが最初に接するページで、位置 1 はテストの 2 番目のページです。
ディテクターのセットアップを終了します。上記の Splunk Synthetic Monitoring テスト用のディテクターを設定する を参照してください。
注釈
ページレベルのメトリクスに対して特定のページにアラートをスコープしない場合、ディテクターはテスト内のすべてのページにわたるメトリクスの平均値を追跡します。
複数のページを選択した場合、ディテクターは選択した複数のページの集約メトリクス値を監視します。
テスト内の各ページのメトリクス値を監視するディテクターが必要な場合は、監視したいページごとに別のディテクターを作成してください。
ブラウザテスト用のトランザクションレベルディテクターを作成します。 🔗
トランザクションレベルのディテクターを作成するには、ディテクターを作成する際に以下の操作を行ってください:
アラートを発するディテクターのメトリクスを選択する際に、次のトランザクションレベルのメトリクスのいずれかを選択します:
期間
リクエスト
サイズ
Scope alerts to と書かれた + ボタンを選択します。
Find a key で、
transactionまたはtransaction_positionディメンションを選択します。transactionディメンションを使用すると、トランザクションを数値位置ではなく名前で識別できます。Find a value で、監視したい合成トランザクションを選択します。
ディテクターのセットアップを終了します。上記の Splunk Synthetic Monitoring テスト用のディテクターを設定する を参照してください。
注釈
トランザクション レベルのメトリクスに対して特定のトランザクションにアラートをスコープしない場合、ディテクターはテスト内のすべてのトランザクションの平均メトリクス値を追跡します。
複数のトランザクションを選択した場合、ディテクターは選択した複数のトランザクションの集約メトリクス値を監視します。
テスト内の各トランザクションのメトリクス値を監視するディテクターが必要な場合は、監視するトランザクションごとに別のディテクターを作成してください。
こちらも参照してください 🔗
ブラウザテストにおける合成トランザクションの詳細については、ブラウザテストに合成トランザクションを追加する を参照してください。