パート 2:Collectorの設定を編集して、ログをフィルタリングしSplunk Cloud Platformに送信する 🔗
このチュートリアルでは、これまでに、ローカルのKubernetesクラスターにSplunk Distribution of OpenTelemetry Collectorをインストールしました。チュートリアルの概要については チュートリアル:Kubernetes上でのSplunk Distribution of OpenTelemetry Collectorの設定 を参照してください。
次は、さまざまなコンポーネントを追加したり、既存の設定を編集したりすることによって、デフォルトの設定を編集してCollectorの機能を変更または拡張します。
以下のステップでは、YAMLファイルとHelmを使用してCollectorの設定を編集します。このチュートリアルを完了すると、以下のタスクを実行できるようになります:
FilelogレシーバーとOpenTelemetryプロトコル(OTLP)を使用してログ収集を有効化する。
フィルタープロセッサーを使用してログをフィルタリングする。
フィルタリングしたログをSplunk Cloud Platformにエクスポートする。
デフォルトのvalues.yamlファイルをダウンロードして調査する。 🔗
デフォルトでは、Splunk Distribution of OpenTelemetry CollectorのHelmチャートは、事前定義済みの設定でCollectorをデプロイします。可能な設定はすべて values.yamlファイルに記述されています。設定を変更するには、YAMLファイルまたはコマンドラインの引数を使用して、既存の設定を上書きするか、新しい設定を追加します。
デフォルトの values.yaml ファイルをGitHubからダウンロードし、後で参照できるディレクトリに保存します。お好みのコードエディターまたはテキストエディターを使用してファイルを開きます。
values.yamlファイルに目を通して、その構造を確認してください。各セクションが、Splunk Observability CloudやSplunk Cloud Platformなどの異なるターゲット用にCollectorをどのように設定しているかに注目してください。ファイル内のコメントには、使用できる値とその効果に関する有益な情報が含まれています。
Splunk HECのエンドポイントおよびトークンを設定する 🔗
Splunk OpenTelemetry Collector for Kubernetesは、デフォルトでログを収集します。このログをSplunk Cloud Platformに送信するには、Splunk HTTP Event Collector(HEC)のエンドポイントとトークンを設定に追加する必要があります。Splunk HEC トークンとエンドポイント を参照してください。
新しいYAMLファイルを作成します。例としてhec.yamlとします。
このhec.yamlファイルを、コードエディターまたはテキストエディターで開きます。
このファイル内に、以下のスニペットを貼り付けます:
splunkPlatform:
  endpoint: "<your_hec_endpoint>"
  token: "<your_hec_token>"
ログの場合、
mainインデックスがデフォルトです。このチュートリアルで別のインデックスを使用している場合は、使用しているインデックスに一致するインデックスを設定してください:splunkPlatform: endpoint: "<your_hec_endpoint>" token: "<your_hec_token>" index: "<your_index>"
ファイルを保存します。
この設定ファイルを使用して、Splunk Cloud Platformにログを送信する機能的なCollectorをデプロイすることができます。
フィルタープロセッサーの設定ファイルを作成する 🔗
前のステップで作成したhec.yamlファイルと同じディレクトリに、filter.yamlという新しいファイルを作成します。
このファイルをコードエディターまたはテキストエディターで開き、以下のスニペットを追加します:
agent:
  config:
    processors:
      filter/exclude_logs_from_pod:
        logs:
          exclude:
            match_type: regexp
            resource_attributes:
              - key: k8s.pod.name
                value: '^(podNameX)$'
      filter/exclude_logs_from_node:
        logs:
          exclude:
            match_type: regexp
            resource_attributes:
              - key: k8s.node.name
                value: '^(nodeNameX)$'
    service:
      pipelines:
        logs:
          processors:
            - memory_limiter
            - k8sattributes
            - filter/logs
            - batch
            - resourcedetection
            - resource
            - resource/logs
            - filter/exclude_logs_from_pod
            - filter/exclude_logs_from_node
前のスニペットは、エージェント設定にフィルタープロセッサー設定を追加し、デフォルトプロセッサーと一緒にログパイプラインに追加するようHelmに指示します。このフィルターは、指定した正規表現に一致するポッドとノードからのログを除外します。
filter.yaml設定ファイルを保存し、次のステップに進みます。
新しい設定を適用する 🔗
ご利用のKubernetesクラスター上で動作しているCollectorに設定を適用するには、YAMLファイルを含むディレクトリから以下のコマンドを実行します:
helm upgrade --reuse-values -f ./filter.yaml -f ./hec.yaml splunk-otel-collector-1709226095 splunk-otel-collector-chart/splunk-otel-collector --set="splunkPlatform.insecureSkipVerify=true"
Tabキーを使用して、ファイル名、リリース、およびこのチュートリアルのパート1でインストールしたチャートをオートコンプリートします。
コマンドの以下の部分に注目してください:
--reuse-valuesは、あなたが指定した設定のみをCollectorが更新することを保証します。--setは、コマンドラインを通して設定を定義します。YAMLファイルを渡す代わりにこの方法を使用することができます。splunkPlatform.insecureSkipVerify=trueは、SSLをオフにします。Splunk Cloud Platformの無料トライアルではSSLをサポートしていないためです。
注意
データのセキュリティを損なう可能性があるため、本番環境では insecureSkipVerify を true に設定しないでください。このチュートリアルでは、Splunk Cloud Platformのトライアル版はSSLをサポートしていないため、SSLをオフにする必要があります。
設定のアップグレード後、Helmは次の例のようなメッセージを表示します:
Release "splunk-otel-collector-1709226095" has been upgraded. Happy Helming!
NAME: splunk-otel-collector-1709226095
LAST DEPLOYED: Thu Mar  7 19:23:30 2024
NAMESPACE: default
STATUS: deployed
NOTES:
Splunk OpenTelemetry Collector is installed and configured to send data to Splunk Platform endpoint "https://<your-splunk-cloud-trial-stack>.splunkcloud.com:8088/services/collector".

Splunk OpenTelemetry Collector is installed and configured to send data to Splunk Observability realm us0.
Splunk Cloud Platformでログが受信されていることを確認する 🔗
Splunk Cloud Platformにログインし、Search & Reporting アプリに移動します。
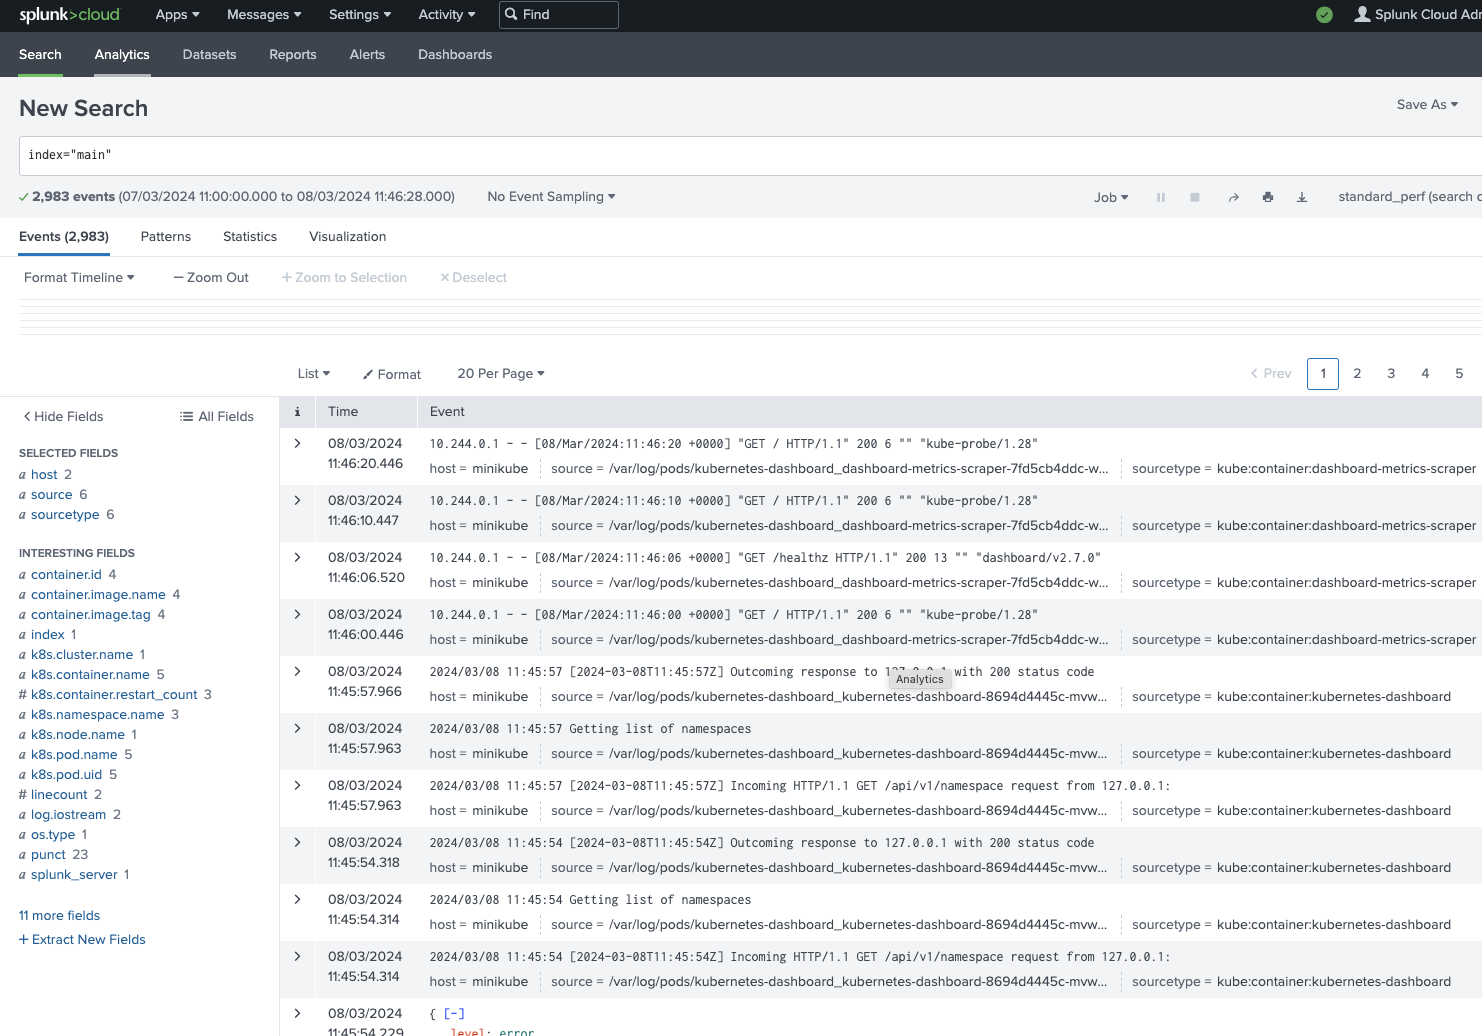
検索バーに、index=」<your_index>」 と入力すると、ローカルのKubernetesクラスターから送られているログが表示されます:

検索結果にイベントが表示される場合は、KubernetesクラスターからのログがSplunk Cloud Platformに届いています。
さらに詳しく 🔗
これでチュートリアルは終了です。ローカルのKubernetesクラスターを作成し、設定し、ログをSplunk Cloud Platformに送信しました。よくできました!続いて、Helmチャートのさまざまな設定の探究に進むことができます。
Collectorのインストールとコンポーネントの詳細については、以下のリソースを参照してください: