Splunk On-CallのカスタムアウトバウンドWebhook 🔗
カスタムアウトバウンドWebhookを使用して、Splunk On-Callをお好みのツールに接続できます。Splunk On-Callsの送信Webhookは、インシデントやチャットなど、さまざまなSplunk On-Callのアクションにサブスクライブできます。WebhookのURL、メソッド、コンテンツタイプ、ペイロードはすべて設定可能です。ペイロードの一部としてSplunk On-Calls変数を使用できるため、サードパーティシステムに送信される情報は動的です。以下のセクションでは、最初のアウトバウンドWebhookの設定について説明します。
要件 🔗
このインテグレーションは以下のバージョンのSplunk On-Callと互換性があります:
エンタープライズ
Webhookを表示および変更するには、管理者認証情報( )が必要です。
はじめに 🔗
Splunk On-Callタイムラインから Integrations に移動し、次に Outgoing Webhooks に移動します。Add Webhook を選択します。
イベントの種類 🔗
異なるイベントの種類を表に示します:
サブスクリプション名 |
サブスクリプションの説明 |
|---|---|
All-Chats |
Webhookは、チャットがメインタイムラインに配置されるといつでも起動します。これにはすべてのインシデントチャットとサードパーティのチャットインテグレーションから入力されたチャットが含まれます。 |
Any-Incident |
Webhookは、インシデントが作成され、確認され、解決されるたびに発行されます。 |
Any-On-Call |
Webhookは、オンコールとオフコールの両方で、オンコールの変更があればいつでも起動します。 |
Any-Paging |
Webhookは、どのユーザーでもページングを開始または停止するたびに起動します。 |
Incident-Acknowledged |
Webhookは、ユーザーまたはシステムがインシデントを認識するたびに起動します。 |
Incident-Chats |
Webhookは、チャットが特定のインシデントに入力されると、いつでも起動します。 |
Incident-Resolved |
Webhookは、ユーザーまたはシステムがインシデントを解決するたびに起動します。 |
Incident-Triggered |
Webhookは、任意のユーザーまたはシステムがインシデントをトリガーするたびに起動します。 |
Off-Call |
Webhookは、任意のユーザーが通話を切断するたびに起動します。 |
On-Call |
Webhookは、ユーザーがオンコールになるたびに起動します。 |
Paging-Start |
Webhookは、任意のユーザーがページングされ始めるたびに起動します。 |
Paging-Stop |
Webhookは、ページングされなくなったユーザーがいるたびに起動します。 |
推奨される変数 🔗
各イベントの変数例が画面の右側に表示されます。
注釈
変数は利用可能なものとしてリストアップされていますが、それらは提案に過ぎず、ニーズに合わせてカスタマイズすることができます。
カスタムヘッダー 🔗
カスタムヘッダーをWebhookに追加するには、新しいWebhook内で + Add Custom Header を選択してください。
その後、Webhookの残りの部分を設定し、Webhookを保存します。キャッシュが 「クリア 「されるまで、最大10分かかることがあります。
リクエストタイプ 🔗
次に、Webhookに適した方法を選択します。利用可能なオプションは以下の通りです:
GET
POST
PUT
DELETE
PATCH
Webhookに適切なコンテンツタイプを入力してください(例:application/json)。
これらの通知を受け取りたいエンドポイントURLを To フィールドに入力してください。
Splunk On-CallはすべてのURLを解析して基本認証を行うのでエンドポイントがベーシック認証を必要とする場合はURLに追加することができます:
http://username:password@example.com/
または
http://username:api_key@example.com/
最後のステップは、ペイロードを作成することです。ペイロードの一部として利用可能な変数を使用する場合は、必ず${{variable_name}}で囲んでください。たとえば、インシデントのアラート数を含める場合、次の変数を追加できます:${{STATE.ALERT_COUNT}}。
インシデントに固有の他のフィールドも使用できます。たとえば、${{ALERT.field_name}}などです。
最後に、Save を選択します。
条件付きでWebhookを起動する 🔗
発信Webhookとアラートルールエンジンのパワーを組み合わせることで、希望する条件が満たされた場合にのみWebhookが起動するようにルールを設定することができます。
まず、Settings、Alert Rules Engine の下にある「アラートルールエンジン」に移動します。
ここから、+ Add a Rule を選択し、ルールの特定のマッチング条件(Webhookを起動させたい条件)を定義します。マッチング条件の詳細については、ルールエンジンのマッチング条件 を参照してください。この例では、state_messageのどこかに」escalate to dev」というフレーズが含まれているときに条件が発生します。
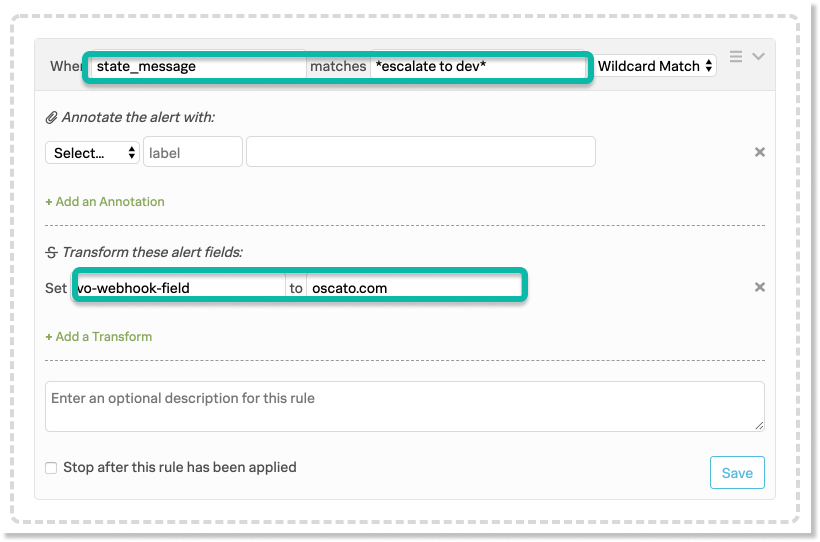
“Transform these alert fields」の部分で、」vo-webhook-field」という新しいフィールドを作成し、そこにWebhookの送信先URLの一部を入力します。
この例では、送信先の完全なURLは“https://dev.oscato.com/2tn6xfh”なので、vo-webhook-fieldの値として“oscato.com”を指定します。
次に、Integrations の下にある発信Webhookに移動し、次に Outgoing Webhooks を選択します。Add Webhook を選択します。
ここでは、希望するメソッドとコンテンツタイプに加えて、Webhookを起動するイベントを選択します。
「To:」フィールドに、ルールエンジンルールで貼り付けた部分を${{ALERT.vo-webhook-field}}に置き換えながら、宛先URLを貼り付けます。
この例では、Webhookの完全な宛先URLは」 https://dev.oscato.com/2tn6xfh 「であり、ルールエンジンのルールに」 oscato.com 「と記述するため、完全な」To: 「URLは」 https://dev.${ALERT.vo-webhook-field}/2tn6xfh 「となります。
これによって、」vo-webhook-field 「が存在するときのみ、URLの入力が完了する(したがって、Webhookが正常に起動する)ようになり、このフィールドは、ルールエンジンのマッチング条件が満たされたときにのみ存在するようになります。
Webhookに含ませたいフィールドをペイロード情報に入力し、オプションで説明を追加すれば、条件付きでWebhookを起動する準備は完了です。