複数のエスカレーションポリシーのベストプラクティス 🔗
複数のエスカレーションポリシーを持つことは、1つのチーム内で異なるアラートのタイプや重大度に対して独自のエスカレーションパスを可能にするため、非常に有用です。
ここでは、複数のエスカレーションポリシーでアカウントとワークフローを最適化するのに役立ついくつかの提案を紹介します。
組織内のチーム数を減らす 🔗
同じユーザーを持つ複数のチームがある場合、エスカレーションポリシーとルーティングキーが異なる1つのチームに集約し、アラートを分離することができます。このような高度な組織化により、誰がオンコール中であるかを迅速に見つけることができ、スケジューリングの頭痛の種を減らすことができます。
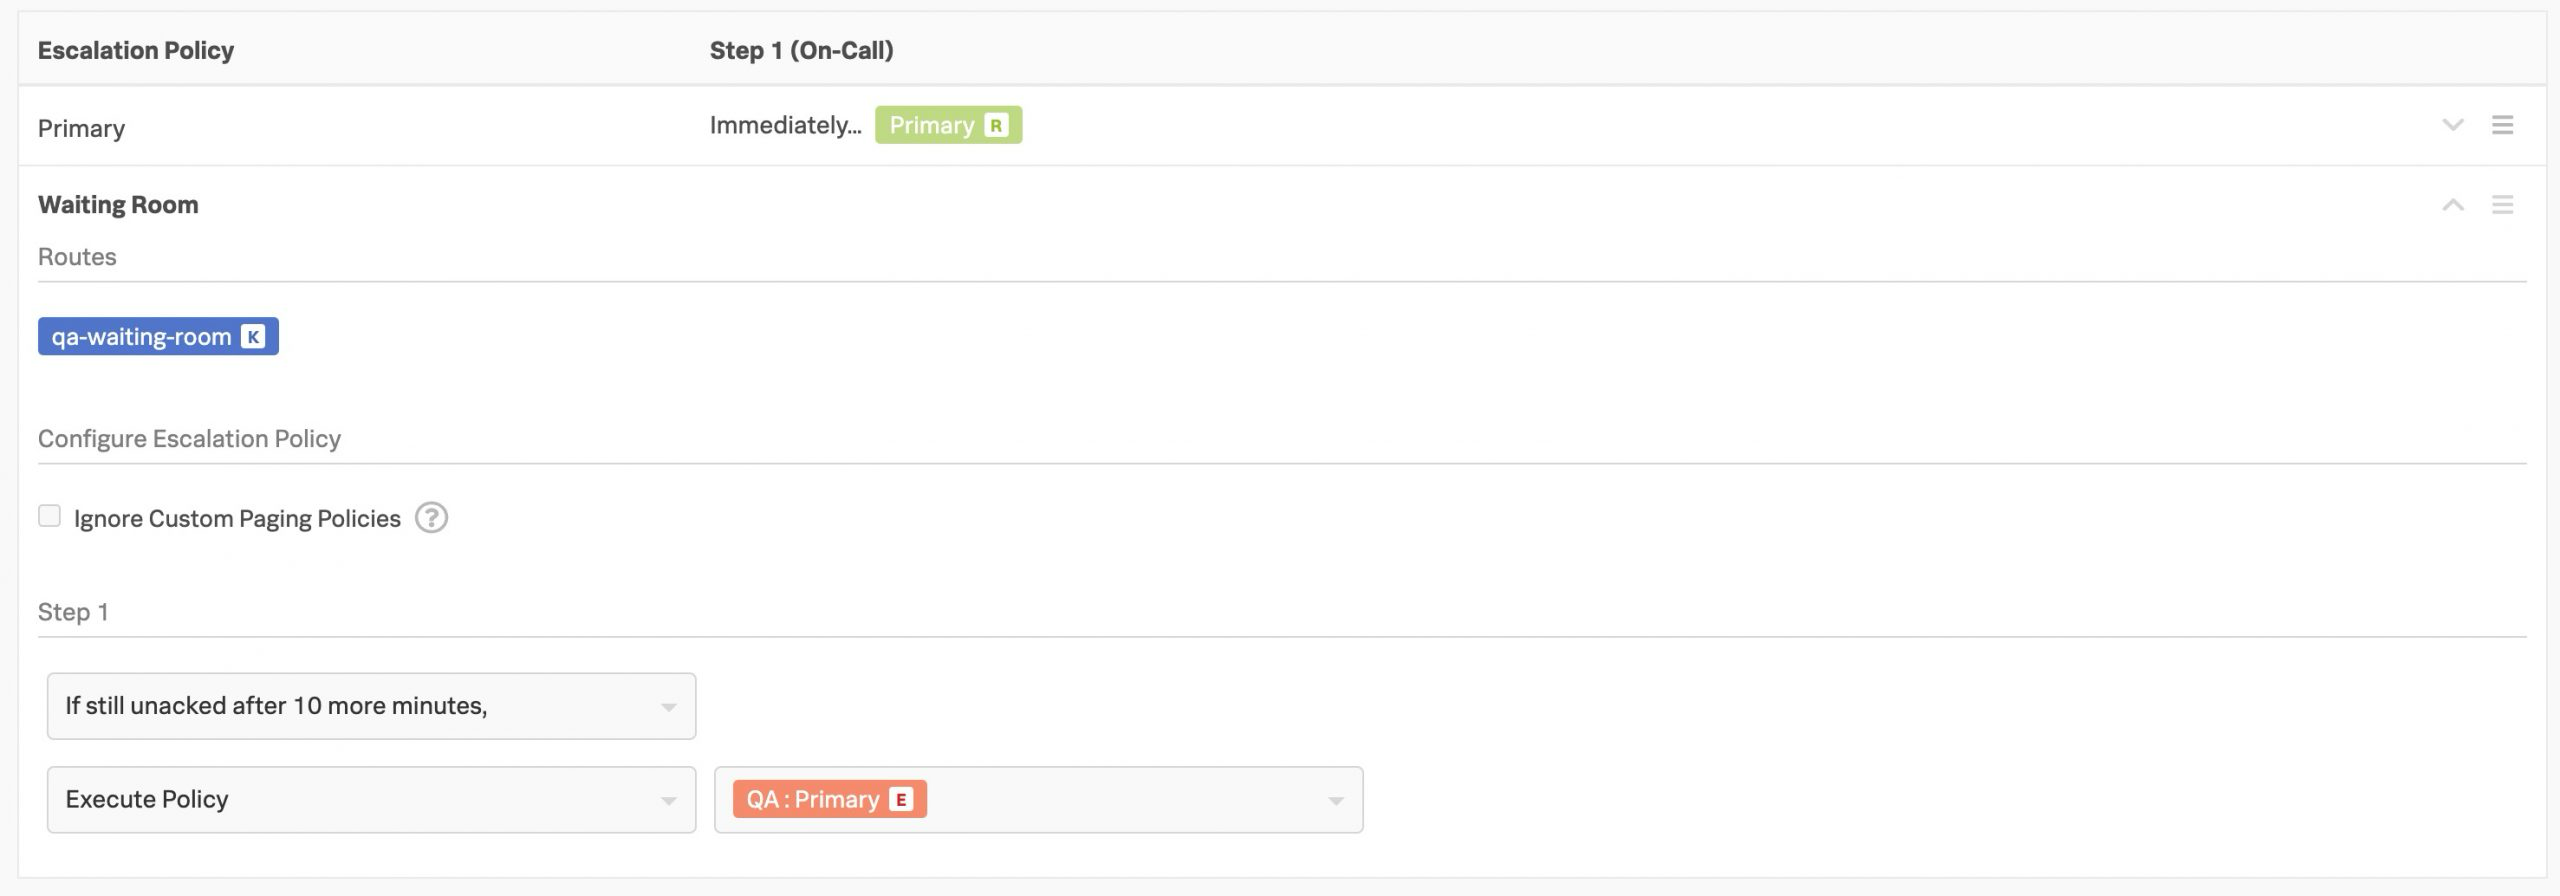
自動解決することが分かっているインシデントからの夜中のアラートを排除するために、Waiting Roomを作成します。 🔗
当社の顧客の多くは、数分以内に自動解決されるアラートを持っていますので、午前2時に起きる必要はありません。このような場合、インシデントが一定時間経っても解決しない場合にのみ、Splunk On-Callがページングします。
これを解決する方法を次に示します:
チーム内にWaiting Roomという2つ目のエスカレーションポリシーを作成します。ルーティングキー(Waiting Roomへのアラート送信に使用)を作成し、ポリシーに追加します。
次に、人間を呼び出す前に、アラートが存在しても問題ないと思われる時間を指定します(例えば、10分)-この時間をWaiting Roomのポリシーの最初のステップとして設定します。
最後に、その時間が経過したら、アラートをプライマリポリシーに再ルーティングします。これは、Execute Policy をアクションとして選択し、再ルーティングのためにプライマリポリシーを指定することで実現できます。
Waiting Room ポリシーにルーティングされたアラートは、最初のステップで指定された時間ページングを遅延させ、相手を目覚めさせる前に自動解決する時間を確保します。
オンコールカレンダーにセカンダリオンコール・スケジュールを表示する 🔗
エスカレーションポリシーの2番目のステップはオンコールカレンダーに表示されず、これらのシフトにオーバーライドをスケジュールすることもできません。セカンダリオンコールを「オンコール」として扱っている場合、Splunk On-Callがセカンダリオンコールをオンコールカレンダーに表示し、これらの責任に対してスケジュールされたオーバーライドを有効にするためのヒントがあります。
バックアップ(つまり、2番目のステップのオンコール)を行うユーザーのために、セカンダリエスカレーションポリシーをチーム内に作成します。このポリシーでは、バックアップユーザー用に指定したローテーションに、1つのステップを直ちに通知します。
プライマリポリシーの2番目のステップで、Execute Policy アクションを選択し、セカンダリポリシーを参照します。
単一のエスカレーションポリシーに対してオーバーライドをスケジュールする 🔗
スケジュールされたオーバーライドはエスカレーションポリシー単位で行われ、1つのポリシーに対してカバレッジをリクエストすることができます。オーバーライドをスケジュールすると、Splunk On-Callは直接ページが届くようなすべてのポリシーを一元化して表示します。特定のポリシーに対するカバーが不要な場合は、その特定のポリシーをカバーするユーザーを割り当てないか、自分自身 (オリジナルユーザー)に割り当てると、Splunk On-Callは引き続きアラートを発します。