Splunk On-CallのJira webhook、サービスデスク、URLインテグレーション 🔗
Splunk On-CallとJiraのインテグレーションは、Splunk On-Callでインシデント情報を一元管理しながら、プロジェクトやチケットのトラッキングを支援します。Jiraの使用方法に応じて、インシデントはソフトウェアのバグ、プロジェクトタスク、ヘルプデスクチケット、休暇申請フォームなどを表すことができます。
Splunk On-CallとJiraインテグレーションは次の2つの方法で機能します。
Jiraとのインテグレーションにより、Splunk On-Callで発生したインシデントに対して新しいJiraチケットを作成できます。
Jiraチケットに新しい問題が追加されるたびにSplunk On-Callインシデントを作成できます。
このインテグレーションは、カスタマイズ可能な幅広い設定オプションを提供します。このガイドでは、ワークフローに合わせてこのインテグレーションをセットアップするために必要なすべてのツールを提供することを目的としています。
要件 🔗
このインテグレーションは以下のバージョンのSplunk On-Callと互換性があります:
Starter
Growth
エンタープライズ
Jira Webhookインテグレーションガイド 🔗
Splunk On-Call Webポータルから Integrations、3rd Party Integrations、Jira (webhook) に移動し、Enable Integration を選択します。今後の手順で使用するため、Service API Endpoint をクリップボードにコピーします。$routing_key を使用するルーティングキーに置き換えます。
Jiraの設定 🔗
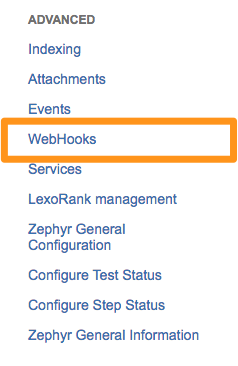
メインのWebインターフェイスから、右上隅の歯車を選択し、次に System. を選択します

左サイドバーの」Advanced」で WebHooks を選択します。
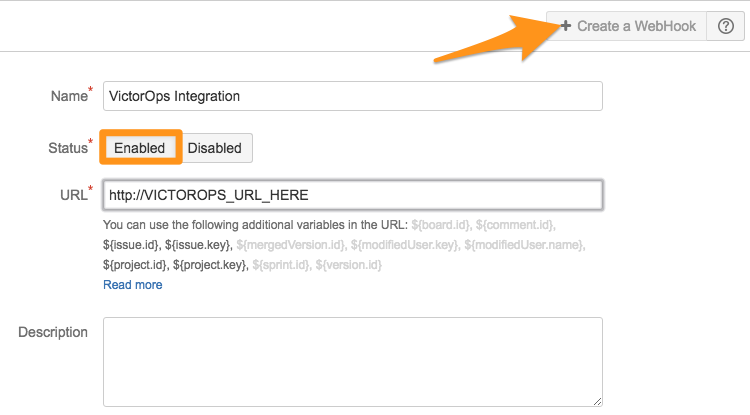
+ Create a Webhook を選択します。WebHookに名前を付け、ステータスを Enabled に設定し、Splunk On-Call Jira URLを貼り付けます。
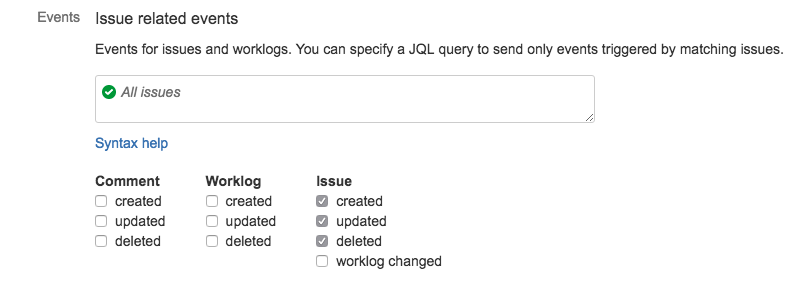
特定のJQLクエリを使用して、特定の問題のみを送信するオプションがあります。
次に、Splunk On-Callに送信するイベントを選択します。この例では、問題が作成、更新、削除されるたびにWebhookを送信します。
JiraがJSONを送信するように Exclude body の選択を解除し、Create を選択します。
Jiraで問題が作成されると、Splunk On-Callで CRITICAL のインシデントが作成され、コメントが追加されたときの情報メッセージなど、そのインシデントに関連するアラートとしてタイムラインに更新が送信されます。Jiraで問題が解決または削除されると、Splunk On-Callでインシデントが解決されます。
Splunk On-Callの設定 🔗
JiraからWebhookが送信されるようになったので、それらをさまざまなタイプのアラートに操作し、Splunk On-Callでのアクションに基づいてJiraの問題を更新することができます。ルールエンジンを使って簡単なルールを作成することから始めましょう。
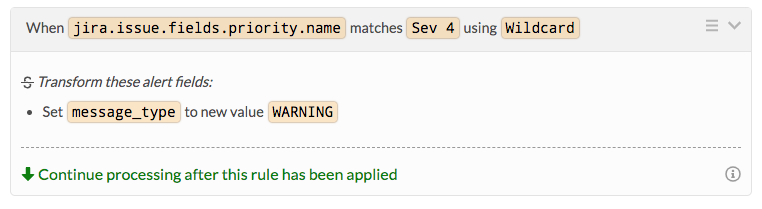
たとえば、Jiraで設定された優先度や Jira.issue.fields.priority.name に基づいてアラートの重大度レベルを調整したい場合があります。Splunk On-Callで WARNING アラートを作成するために、優先度がSev 4のすべてのJiraの問題について、ルールは次のようになります:
Splunk On-Callでのアクションに基づく情報を Jiraに送り返すには、アウトバウンドWebhookを設定する必要があります。Splunk On-Callでインシデントが確認されたときにチケットのステータスを更新したり、Jiraチケットにコメントや担当者を追加したりすることができます。次の例では、Splunk On-Callで関連するインシデントタイムラインに誰かが書き込んだときに、Jiraチケットにコメントを追加する方法を説明します。
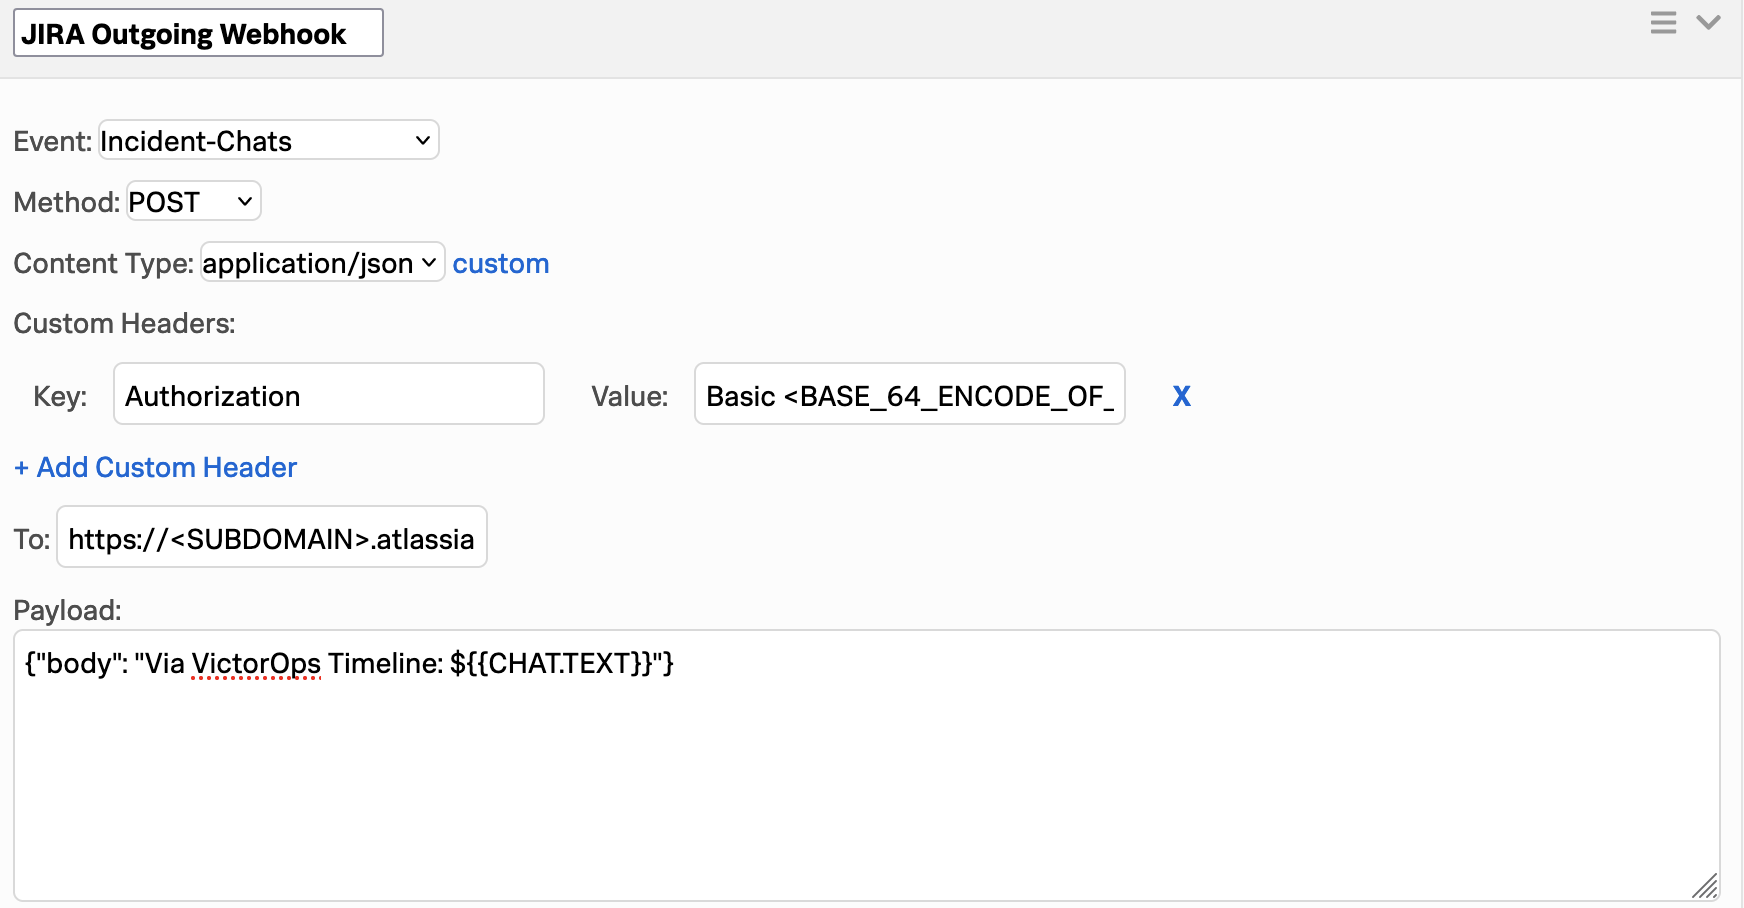
Splunk On-Call Webポータルから、Integrations、Outgoing Webhooks に移動し、Add Webhook を選択します。
Event を Incident-Chats に、Method を POST に、Content Type を application/json に設定します。次に、Add a Customer Header を選択して認証ヘッダーを設定します。このように、ユーザー名とAPIトークンキーをまとめて、Jira_USERNAME:Jira_API_TOKEN のようにBase64エンコードする必要があります。
その値をエンコードしたら、1つ目のボックスに Authorization、2つ目のボックスにエンコードしたキーを、その前に語句 Basic を追加します。例:
Authorization: Basic
<Encoded_String>
To フィールドを問題コメント用のJira RESTエンドポイントに設定します。インシデントタイムラインからチャットテキストを含むようにペイロードを設定します。ペイロードは以下のようになります:
{"body": "Via Splunk On-Call Timeline: ${{CHAT.TEXT}}"}
最終的な結果は次のようになります:
チャットがタイムラインに入力されるたびに、Jiraの問題にコメントが追加されるようになりました。
ルールエンジンとアウトバウンドWebhookの両方の重要なJiraフィールドは以下のとおりです:
Jira.issue.fields.status.id Jira.issue.fields.status.nameJira.issue.fields.priority.id Jira.issue.fields.priority.nameJira.issue.id Jira.issue.key
Jiraサービスデスクインテグレーション 🔗
Jira Softwareはソフトウェアチームに柔軟な問題追跡とプロジェクト追跡を提供します。Splunk On-CallはJira Service Deskと2つのインテグレーション機能を持っています。1つ目のインテグレーションでは、Splunk On-Callに発生したインシデントに対して新しい Jiraチケットを作成できます。もう1つは、プロジェクトに新しい問題が追加されるたびにSplunk On-Callインシデントを作成するのに役立ちます。
Splunk On-CallからJira (メールエンドポイント) 🔗
このインテグレーションには、問題を作成および更新するJiraメールをセットアップする必要があります。これはJira Service Deskでのみ利用可能です。
Jiraの設定 🔗
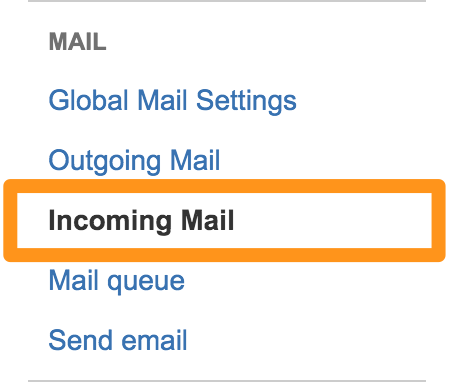
Splunk On-Callからの問題を受信するプロジェクトの受信メールハンドラを設定します。これを行うには、Settings (歯車のアイコン)を選択し、System を選択します。

サイドバーで Incoming Mail を選択します。
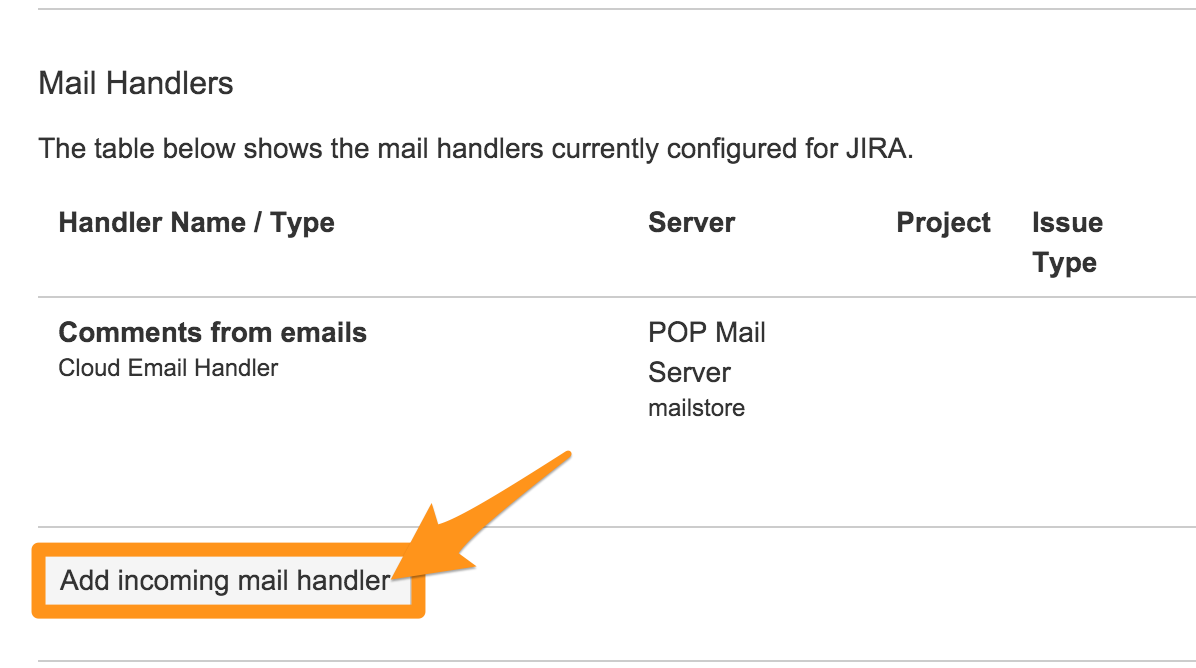
Add Incoming mail handler を選択します。
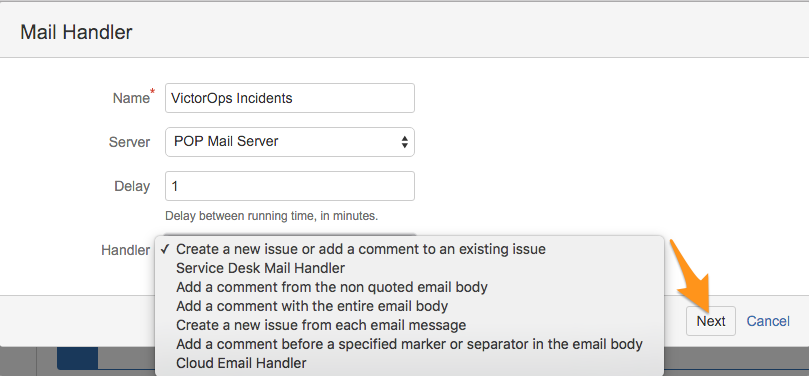
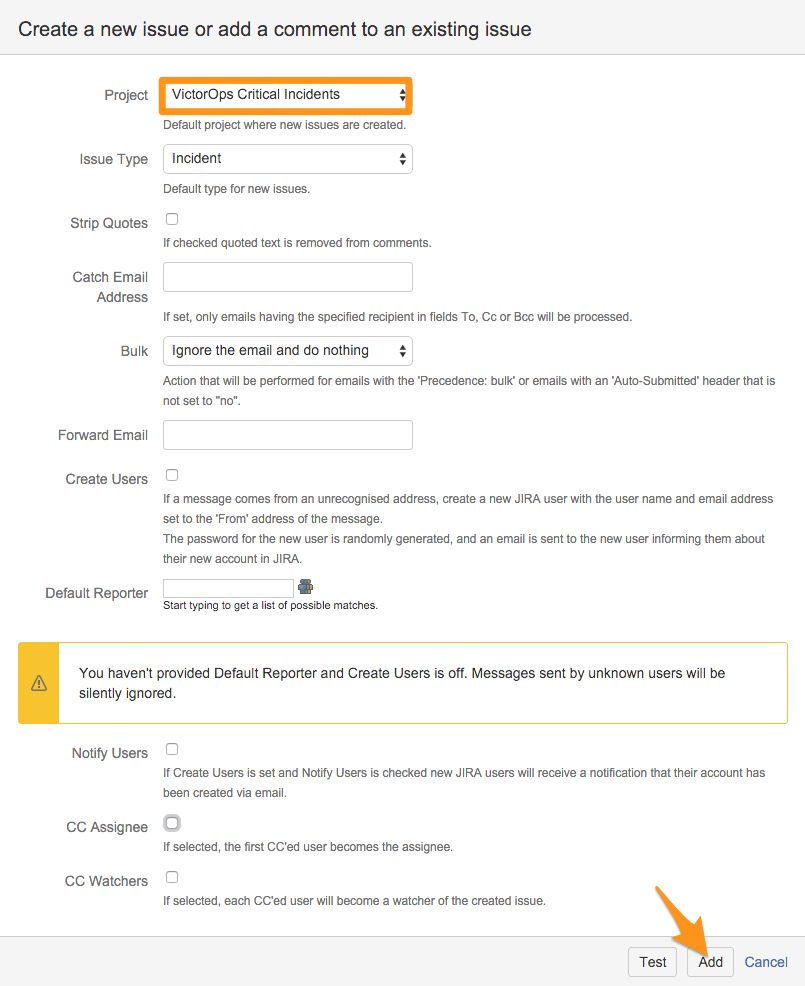
名前を付け、Create a new issue or add a comment to an existing issue のように、このインテグレーションに使用する適切なハンドラを選択します。次に Next を選択します。
このインテグレーションを関連付けたいプロジェクトを選択し、Add を選択します。この例では、Splunk On-Call Critical Incidents を選択します。
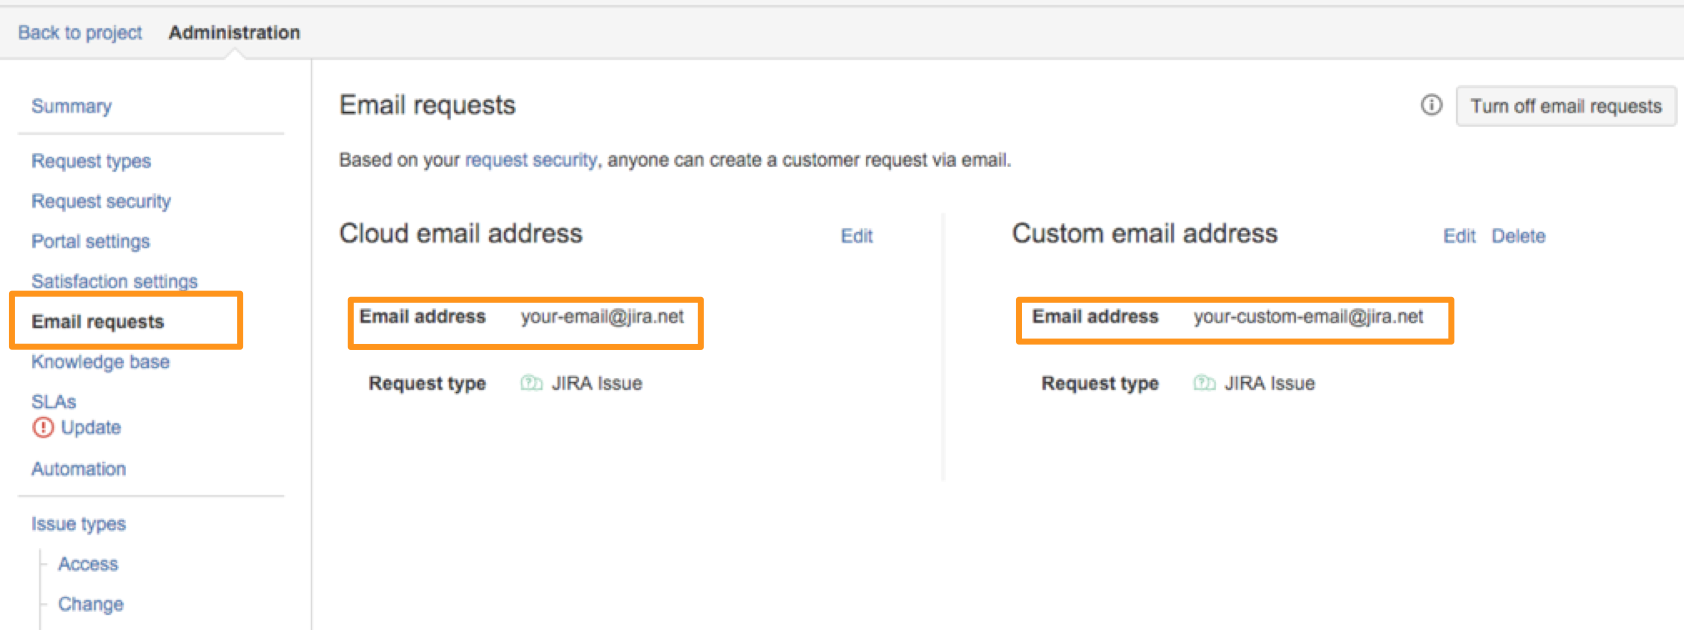
プロジェクトに関連付けられているメールアドレスを取得します。これを行うには、プロジェクトの管理ページにアクセスし、Email requests を選択します。使用したいメールアドレスをクリップボードにコピーします。
Splunk On-Callの設定 🔗
チームのエスカレーションポリシーの一部としてJiraメールアドレスを使用し、アラートがそのチームにルーティングされるとチケットが作成されるようにします。これには2つのオプションがあります:
インシデントを「新規Jiraチケット」チームに再ルーティングすることで、特定のSplunk On-CallインシデントからJiraの問題を作成し、Jiraメールアドレスにメールを送信する単一のエスカレーションステップを持ちます。
チームのエスカレーションポリシーの最初のステップにJiraメールアドレスを追加することで、チームに送られたすべてのSplunk On-CallインシデントからJiraの問題を作成します。
最初のオプションについては、以下の手順に従ってください:
Splunk On-Call Webポータルで Teams に移動し、Add Team を選択します。このチームのエスカレーションポリシーの最初のステップにJiraメールアドレスを追加します。
Splunk On-CallインシデントからJiraの問題を作成する場合は、そのインシデントを「新規Jiraチケット」チームに再ルーティングします。
Splunk On-CallからJira (カスタムURL) 🔗
このインテグレーション方法では、カスタムURLとSplunk On-Callルールエンジンを使用して、アラートの情報が自動的に追加されたJiraチケットを生成します。
Splunk On-Callの設定 🔗
Webポータルから Settings、Alert Rules、Engine を選択し、Add a Rule を選択します。
Jiraチケットを作成したいアラートに一致するようにルールを設定します。次に、注釈を追加し、URLタイプを選択します。名前を付けて、Atlassianのドキュメントを使用してJiraチケットを作成するカスタムを構築します:
チケットの情報を動的に取り込む方法でURLを構築するために、ルールエンジン内で変数展開を使用できます。必要なURLの正確なフォーマットは、特定のJira環境に基づいて大きく変化します。以下は説明、サマリー、ラベルフィールドを設定した例です。
https://YOUR_DOMAIN_HERE.atlassian.net/secure/CreateIssueDetails!init.jspa?pid=10506&issuetype=1&description=${{state_message}}&summary=${{entity_id}}&labels=${{labels}}
https://YOUR_DOMAIN_HERE.atlassian.net/secure/CreateIssueDetails!init.jspa?pid=10000&issuetype=10000&description=${{state_message}}&summary=${{entity_id}}&labels=${{labels}}
Splunk On-Callインシデント内で、このルールはクリック可能な注釈を作成します。このルールがアラートにマッチするたびに、ワンタッチでSplunk On-Callアラートから直接情報を取り込んだ Jiraチケットを作成できます。