Splunk On-CallのZabbixインテグレーション 🔗
Zabbixはネットワークとアプリケーションのためのエンタープライズクラスのオープンソース分散監視ソリューションです。
要件 🔗
このインテグレーションは以下のバージョンのSplunk On-Callと互換性があります:
Starter
Growth
エンタープライズ
インテグレーションにはZabbix 4.2以下、PHP 5.3.0以上、cURLが必要です。Zabbix 5.0と4.4はZabbix webhookを使用して統合することができます。
Splunk On-Callの設定 🔗
Splunk On-Callで、Integrations、Zabbix に移動し、Enable Integration を選択して、後で使用するために Service API Key をコピーします。
Webhookの使用によるZabbix5.0 🔗
プラグインは4.2までのバージョンしかサポートしていませんが、Webhookを使用してZabbix 5.0と統合することができます。動作やレイアウトはプラグインと同様です。
必要な基本コンポーネントは、」Splunk On-Call Alert」というユーザーが割り当てられたSplunk On-Call Usersグループ、」Notify Splunk On-Call」というアクション、」Splunk On-Call Webhook」というメディアタイプです。
Zabbixメディアタイプ5.0 🔗
まずは、GithubリポジトリからSplunk On-Call Media Typeをダウンロードしてください: https://github.com/victorops/monitoring_tool_releases/blob/master/Victorops-Zabbix5.0/victorops_media_type_zabbix_5.xml。
ダウンロードが完了したら、Zabbixに入り、メディアタイプに移動します。Import を選択します。
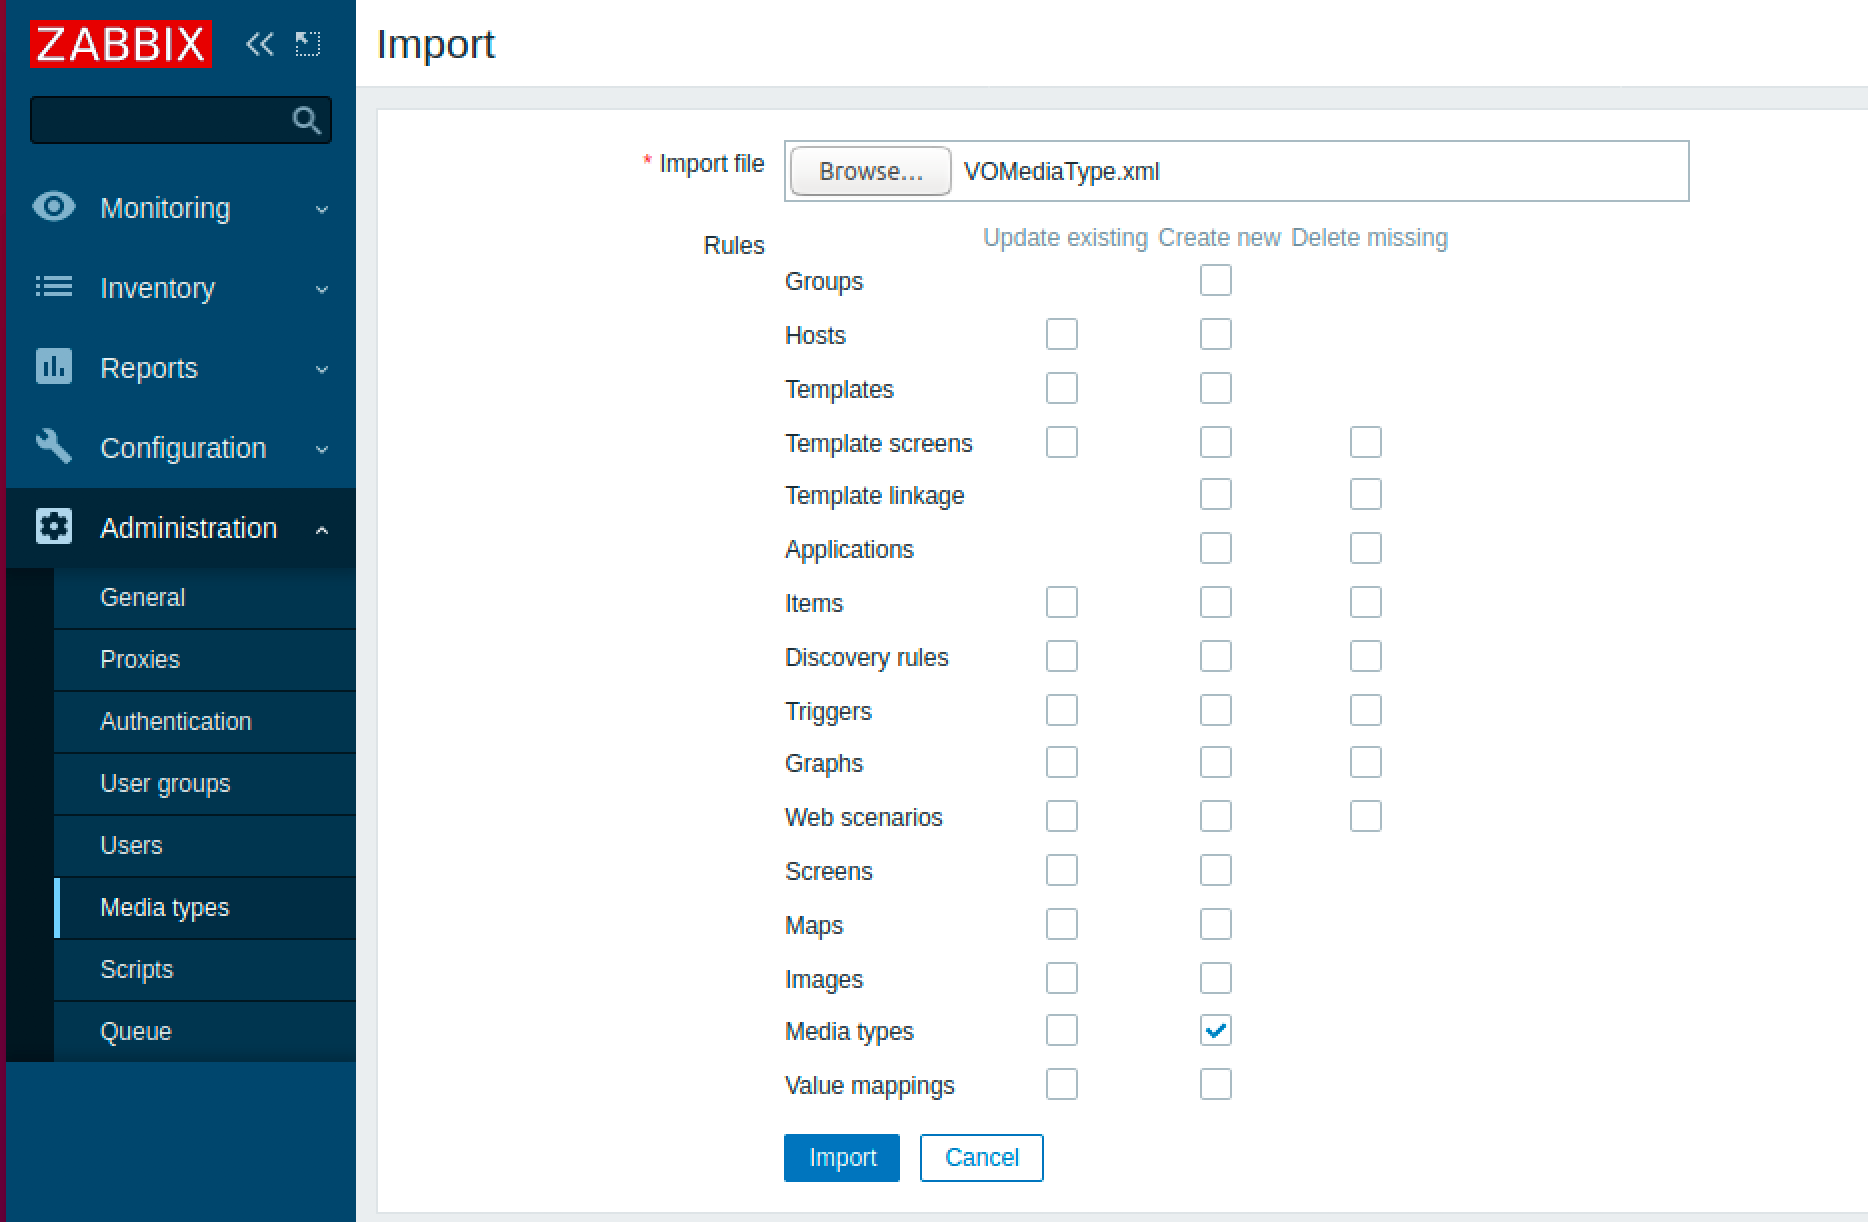
先ほどダウンロードしたXMLファイルを選択し、画面下部の Import を選択します。スクリーンショットに示すように、メディアタイプのインポートはデフォルト値のままにしてください。
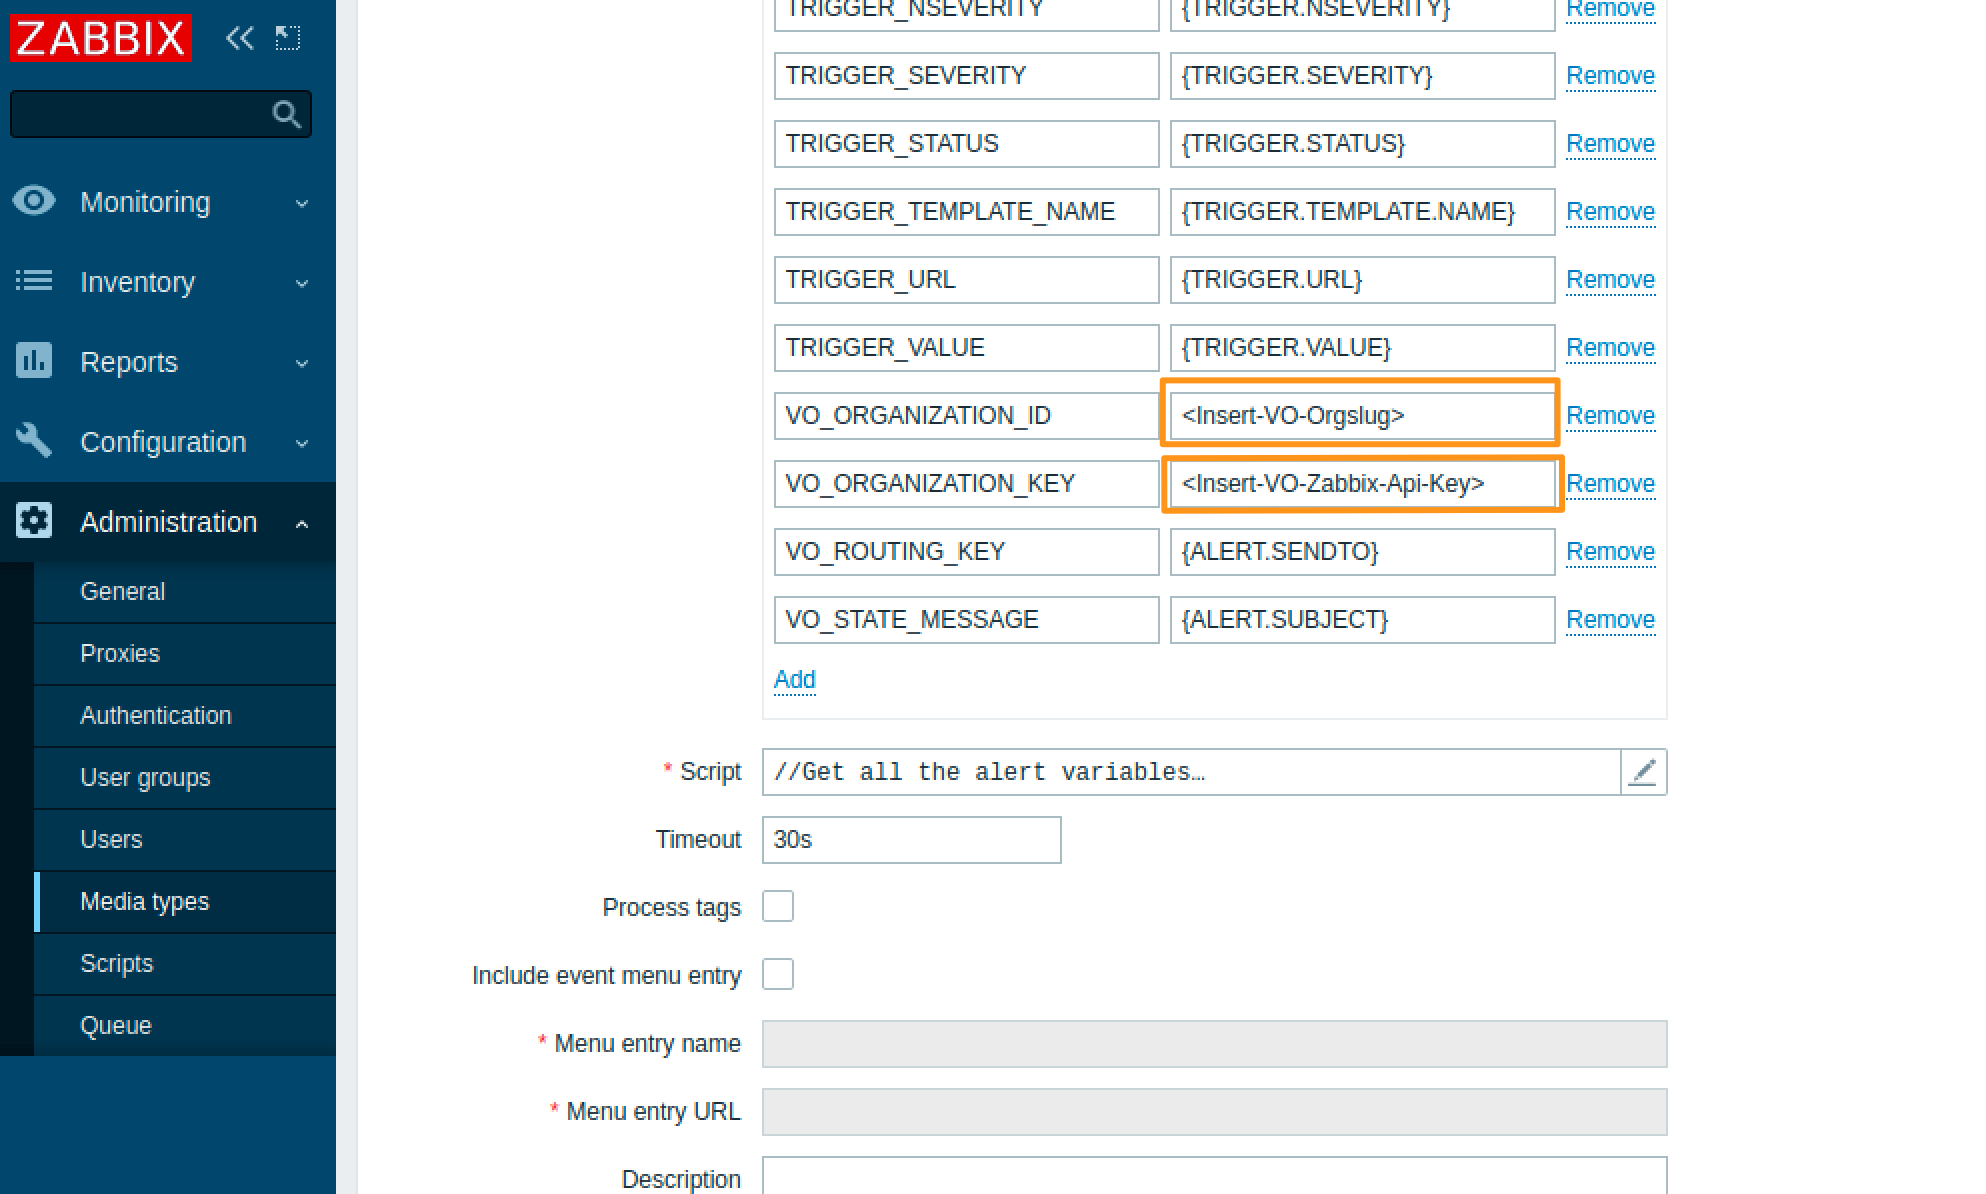
インポートが成功したら、メディアタイプに戻ります。「Splunk On-Call」というラベルの新しいメディアタイプが利用可能です。これを選択し、VO_ORGANIZATION_ID と VO_ORGANIZATION_KEY の値までスクロールダウンし、それぞれSplunk On-Call org slugとZabbix APIキーを入力します。org slugはSplunk On-CallインスタンスのURL(https://portal.victorops.com/client/)に記載されています。Zabbix APIキーはSplunk On-Call orgの Integrations、Zabbix にあります。
Update を選択してメディアタイプを更新してください。
メディアタイプ自体のテストは失敗する可能性があります。これはSplunk On-Call Media Typeが送信されるアラートから動的に情報を取り込むためです。実際のZabbixアラートでWebhookを完全に設定(以下の設定を含む)した後にテストしてください。
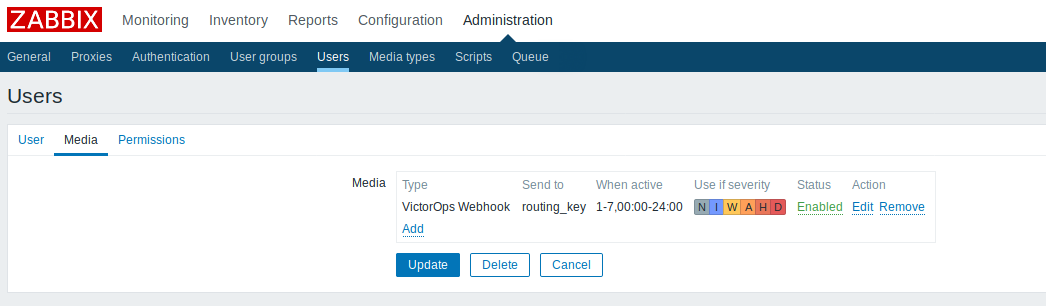
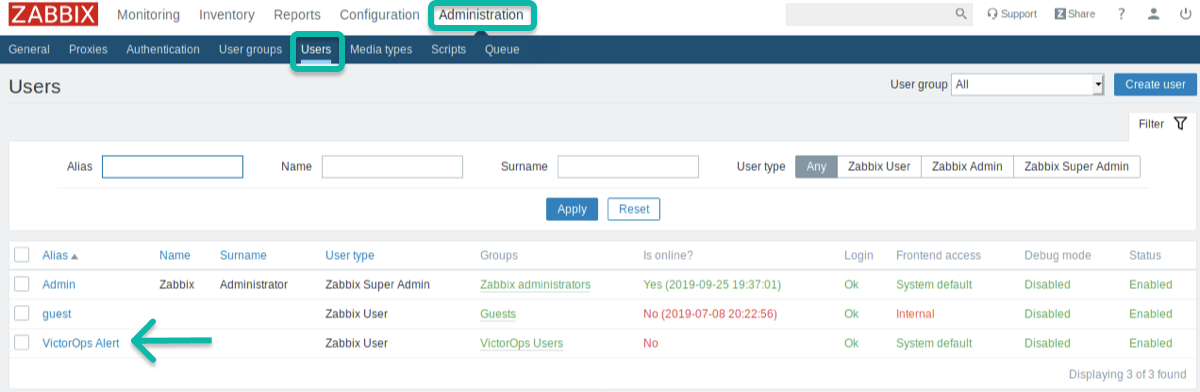
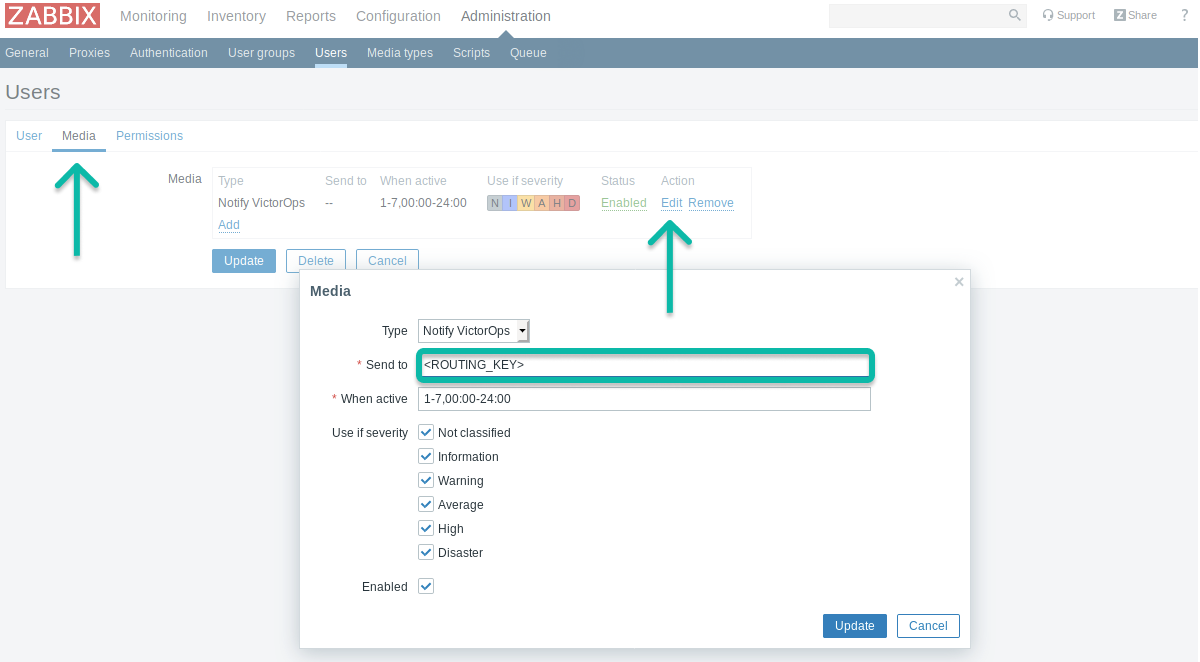
Zabbixユーザー5.0 🔗
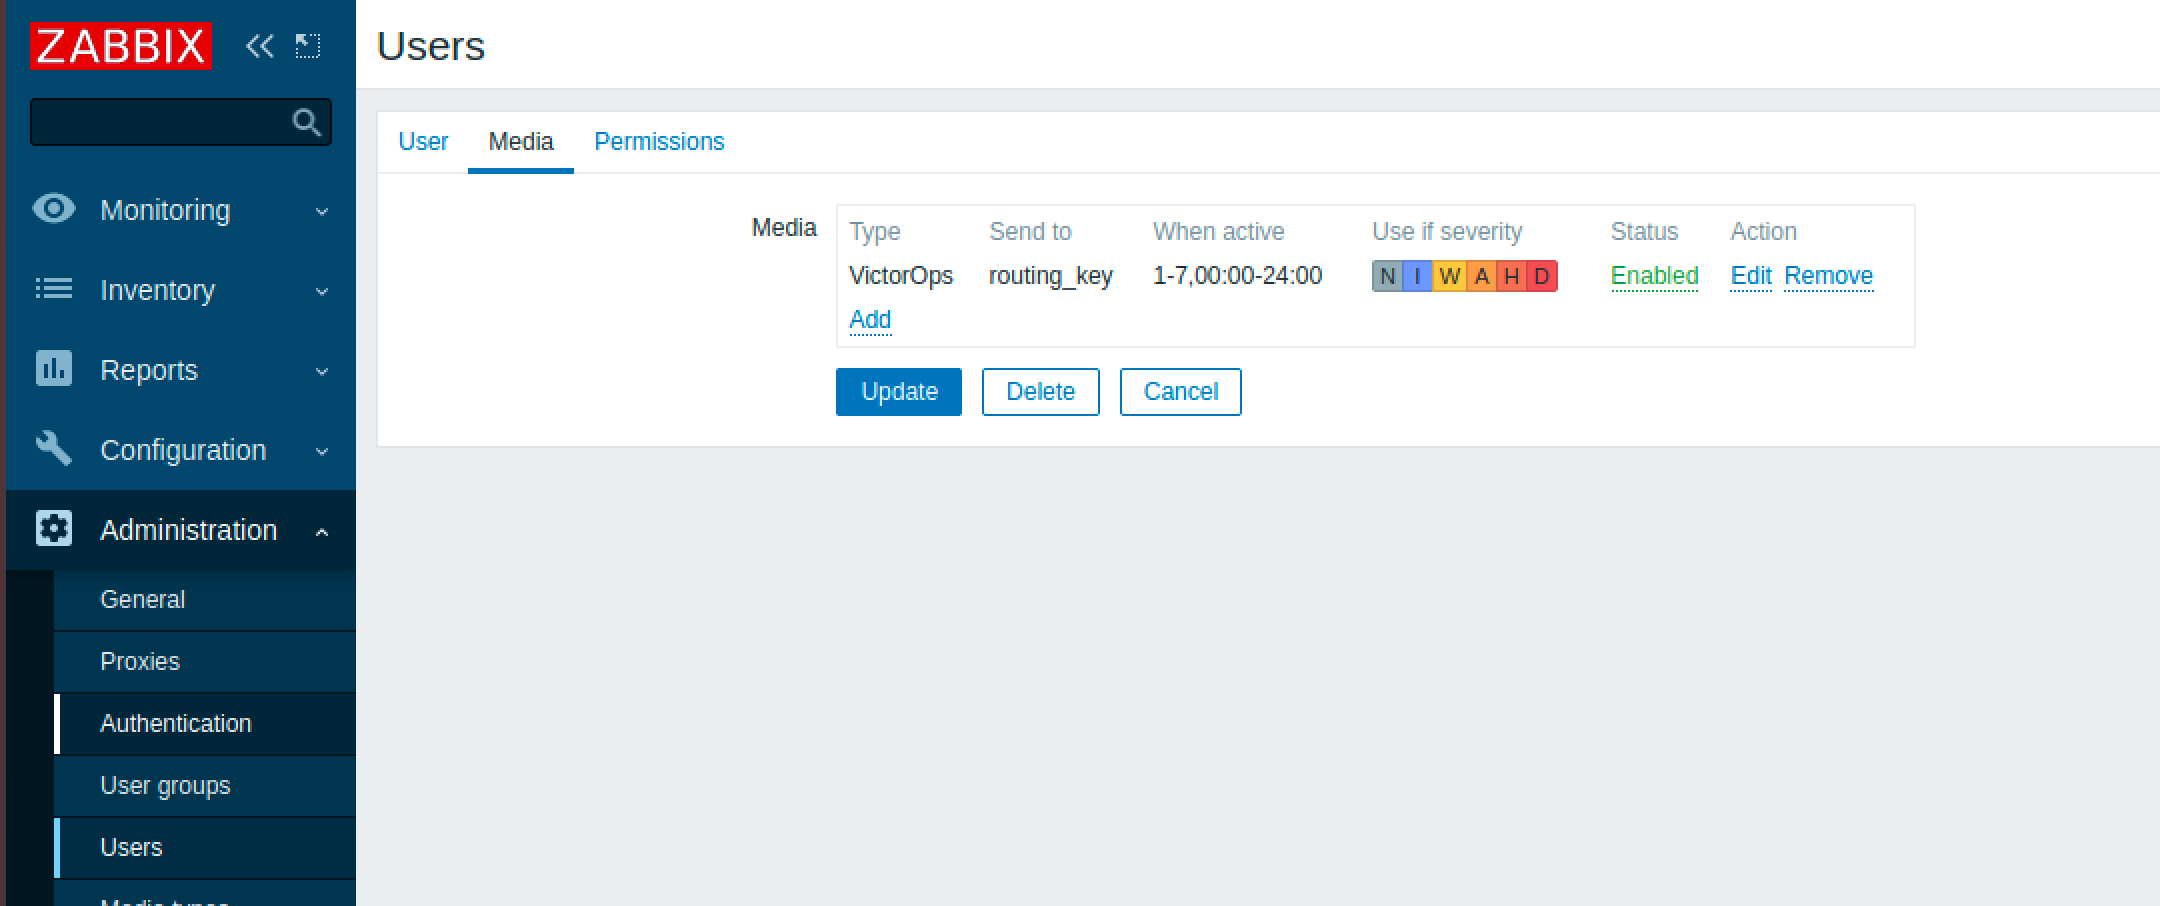
新しいユーザーを作成し、任意のグループに割り当てます。そしてそのユーザー(この場合は」Splunk On-Call Alert」)をメディアタイプに関連付けます。メディアタブの Send to セクションに、適切なSplunk On-Callルーティングキーを入力します。ここでSplunk On-Callに送信するアラートの重大度を指定することもできます。ユーザーには読み書きアクセス許可が必要なので、必要なアクセス許可レベルを割り当てます。
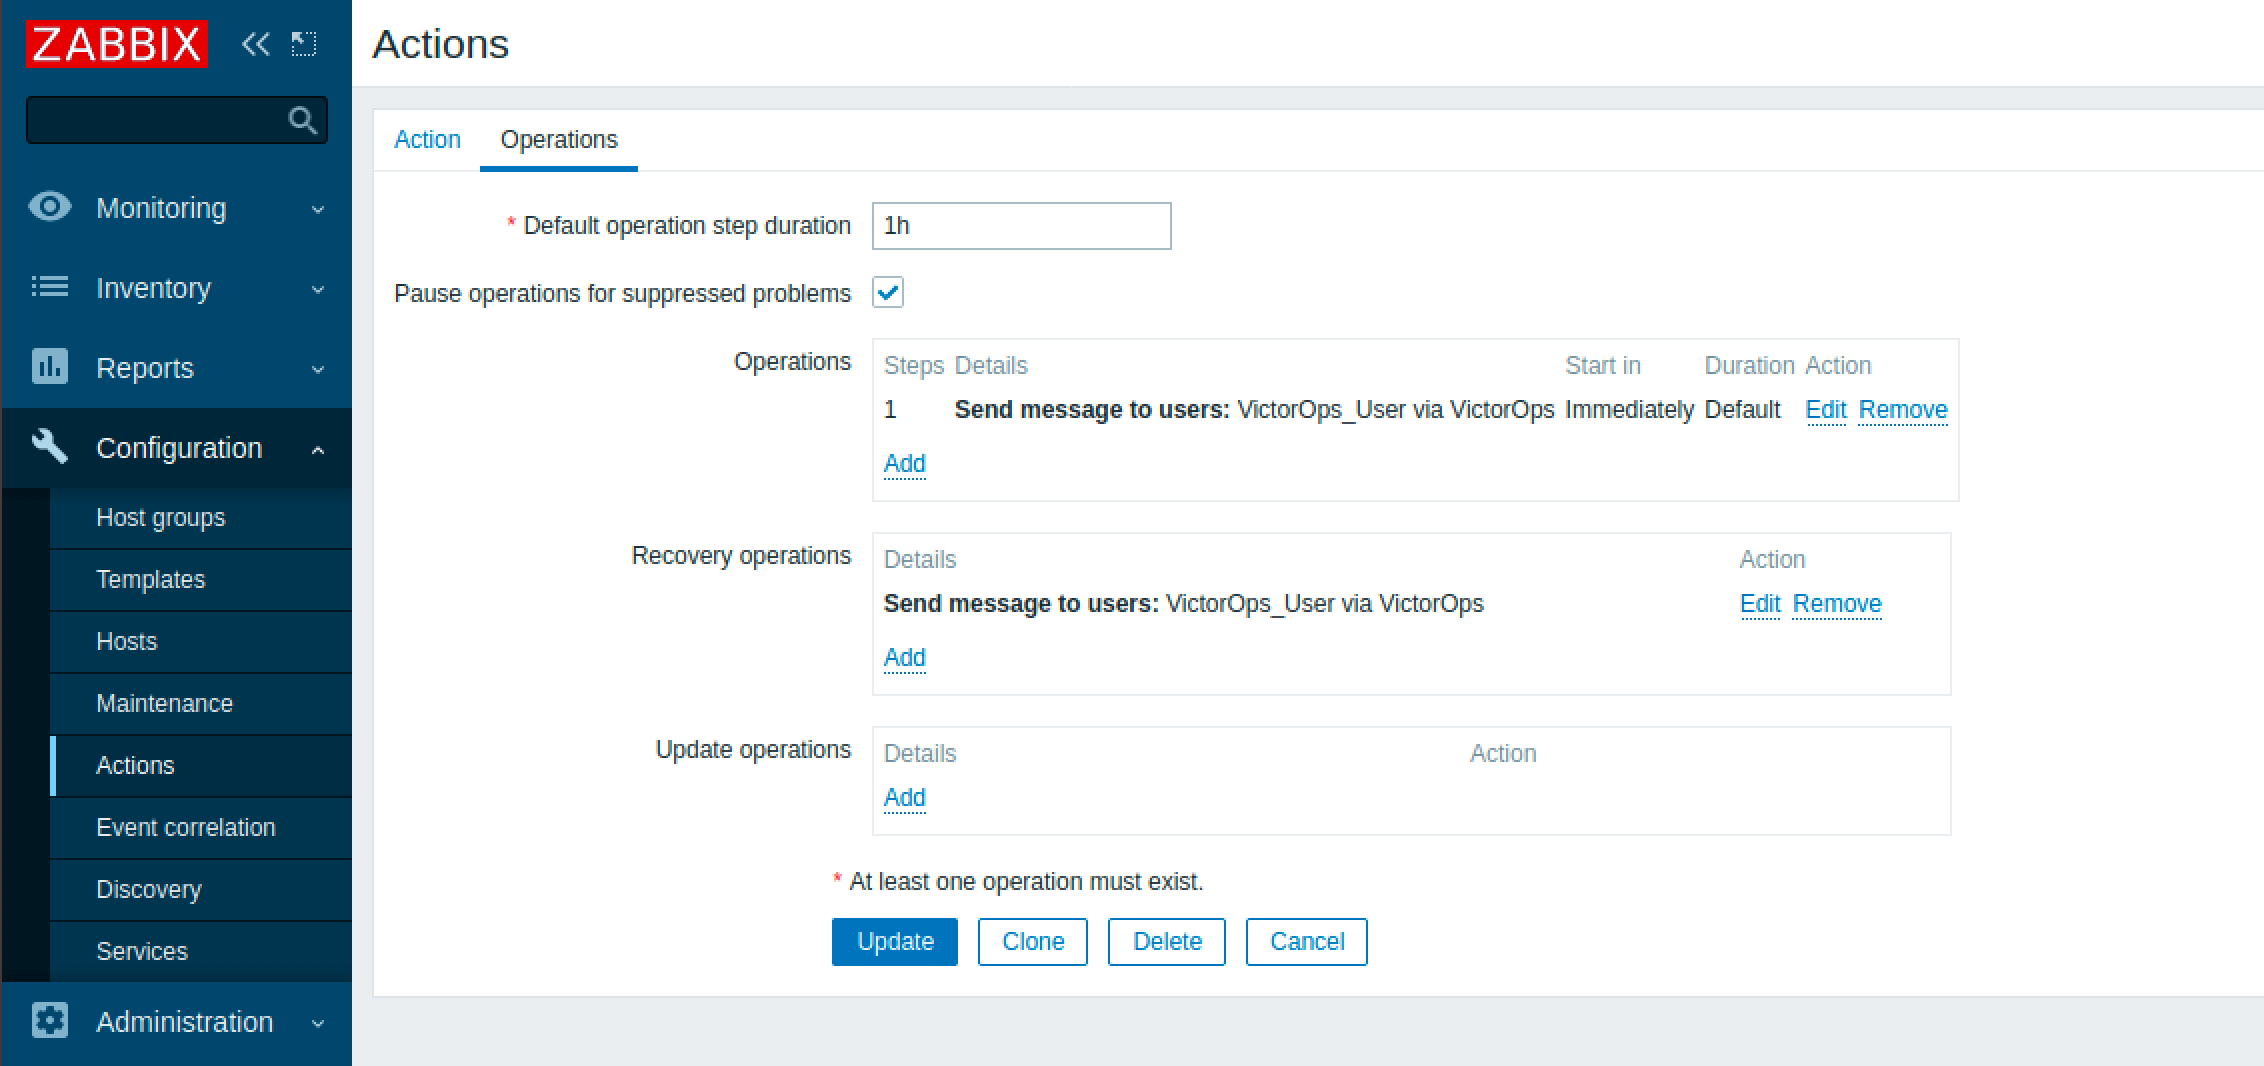
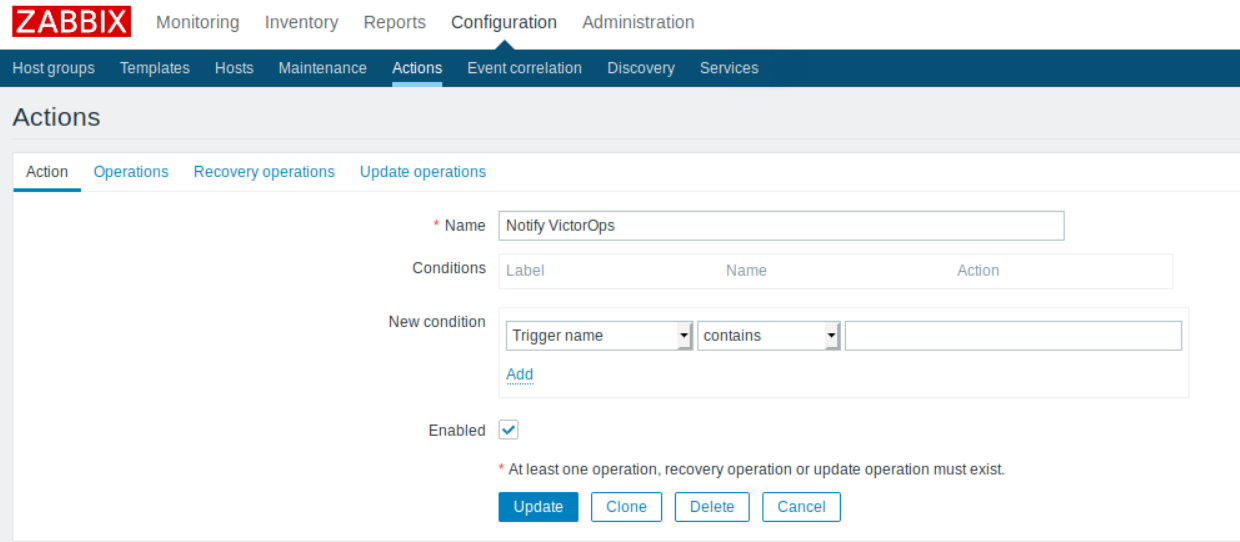
Zabbixアクション5.0 🔗
次のステップはアクションの作成です。アクションの条件を設定することで、アラート動作をカスタマイズできます。
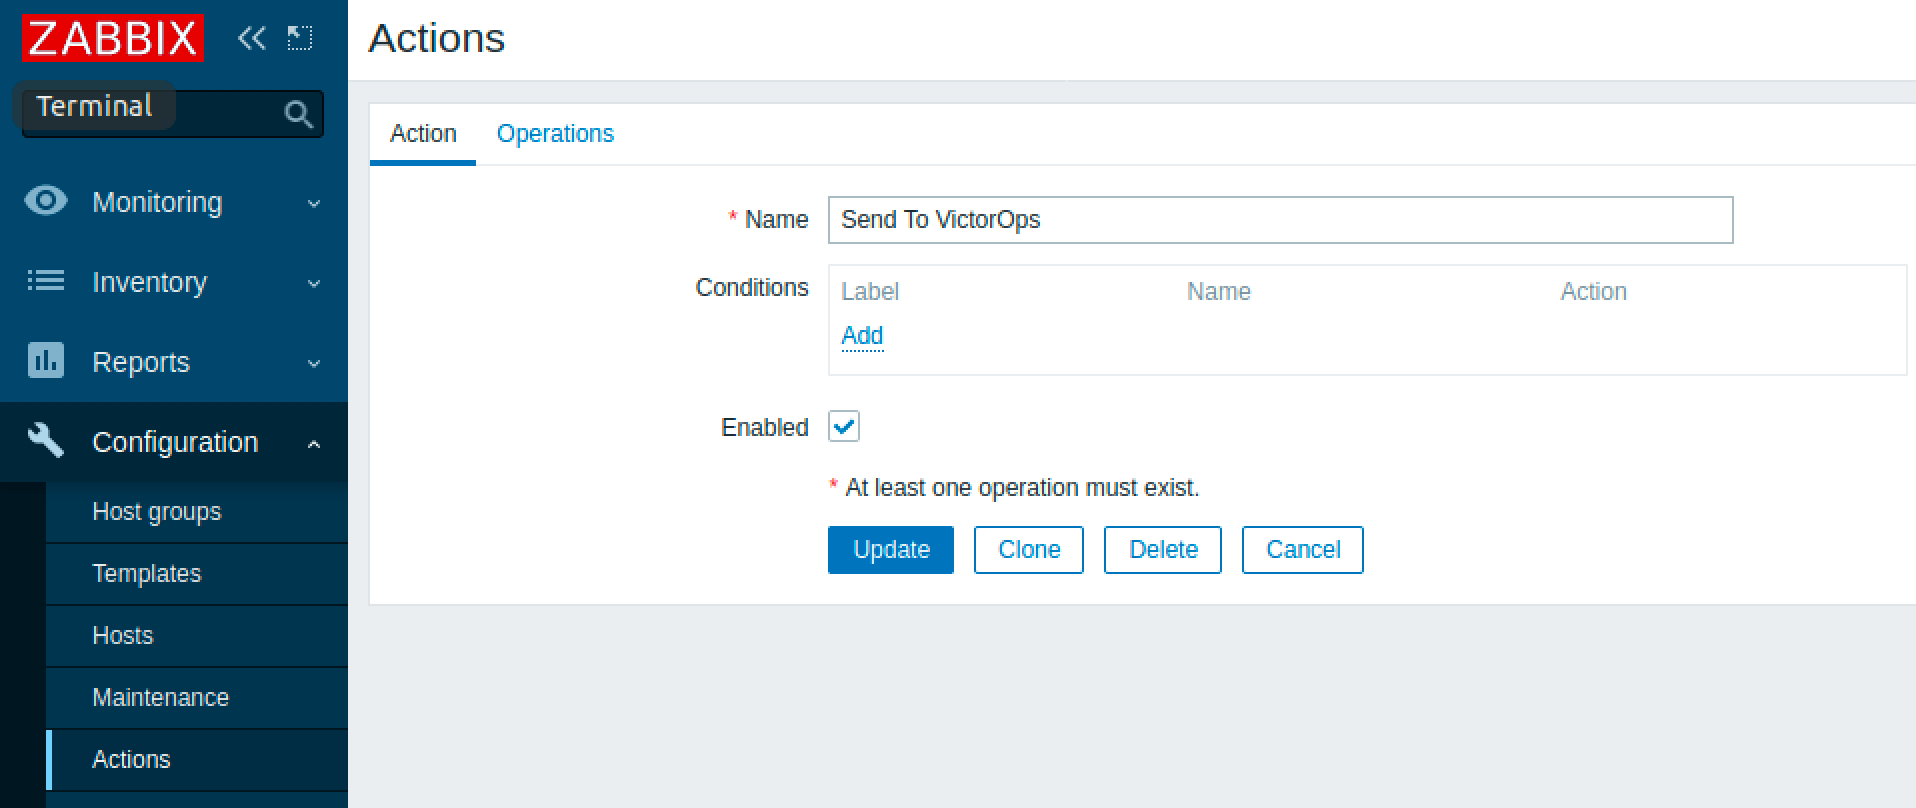
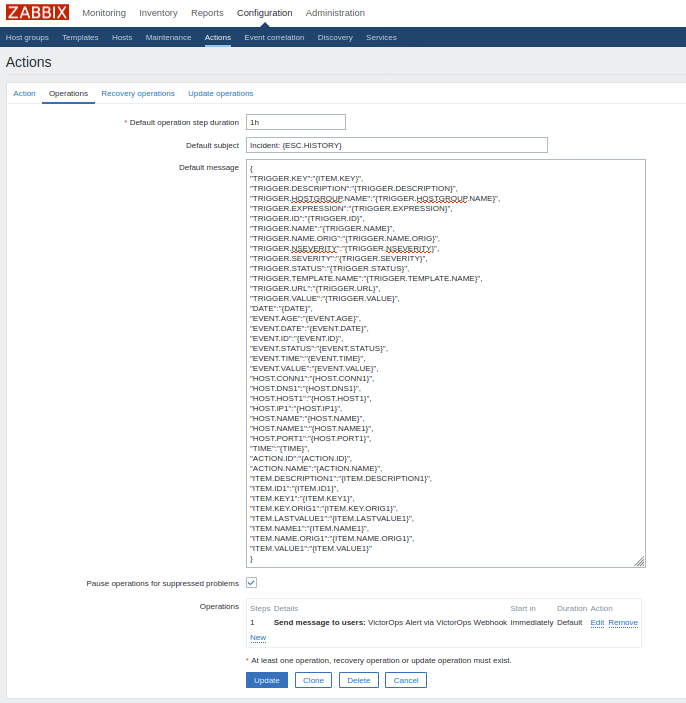
オペレーションタブに移動し、先ほど作成したSplunk On-Callメディアタイプを使用してSplunk On-Callユーザーにメッセージを送信するオペレーションとリカバリオペレーションを設定します。
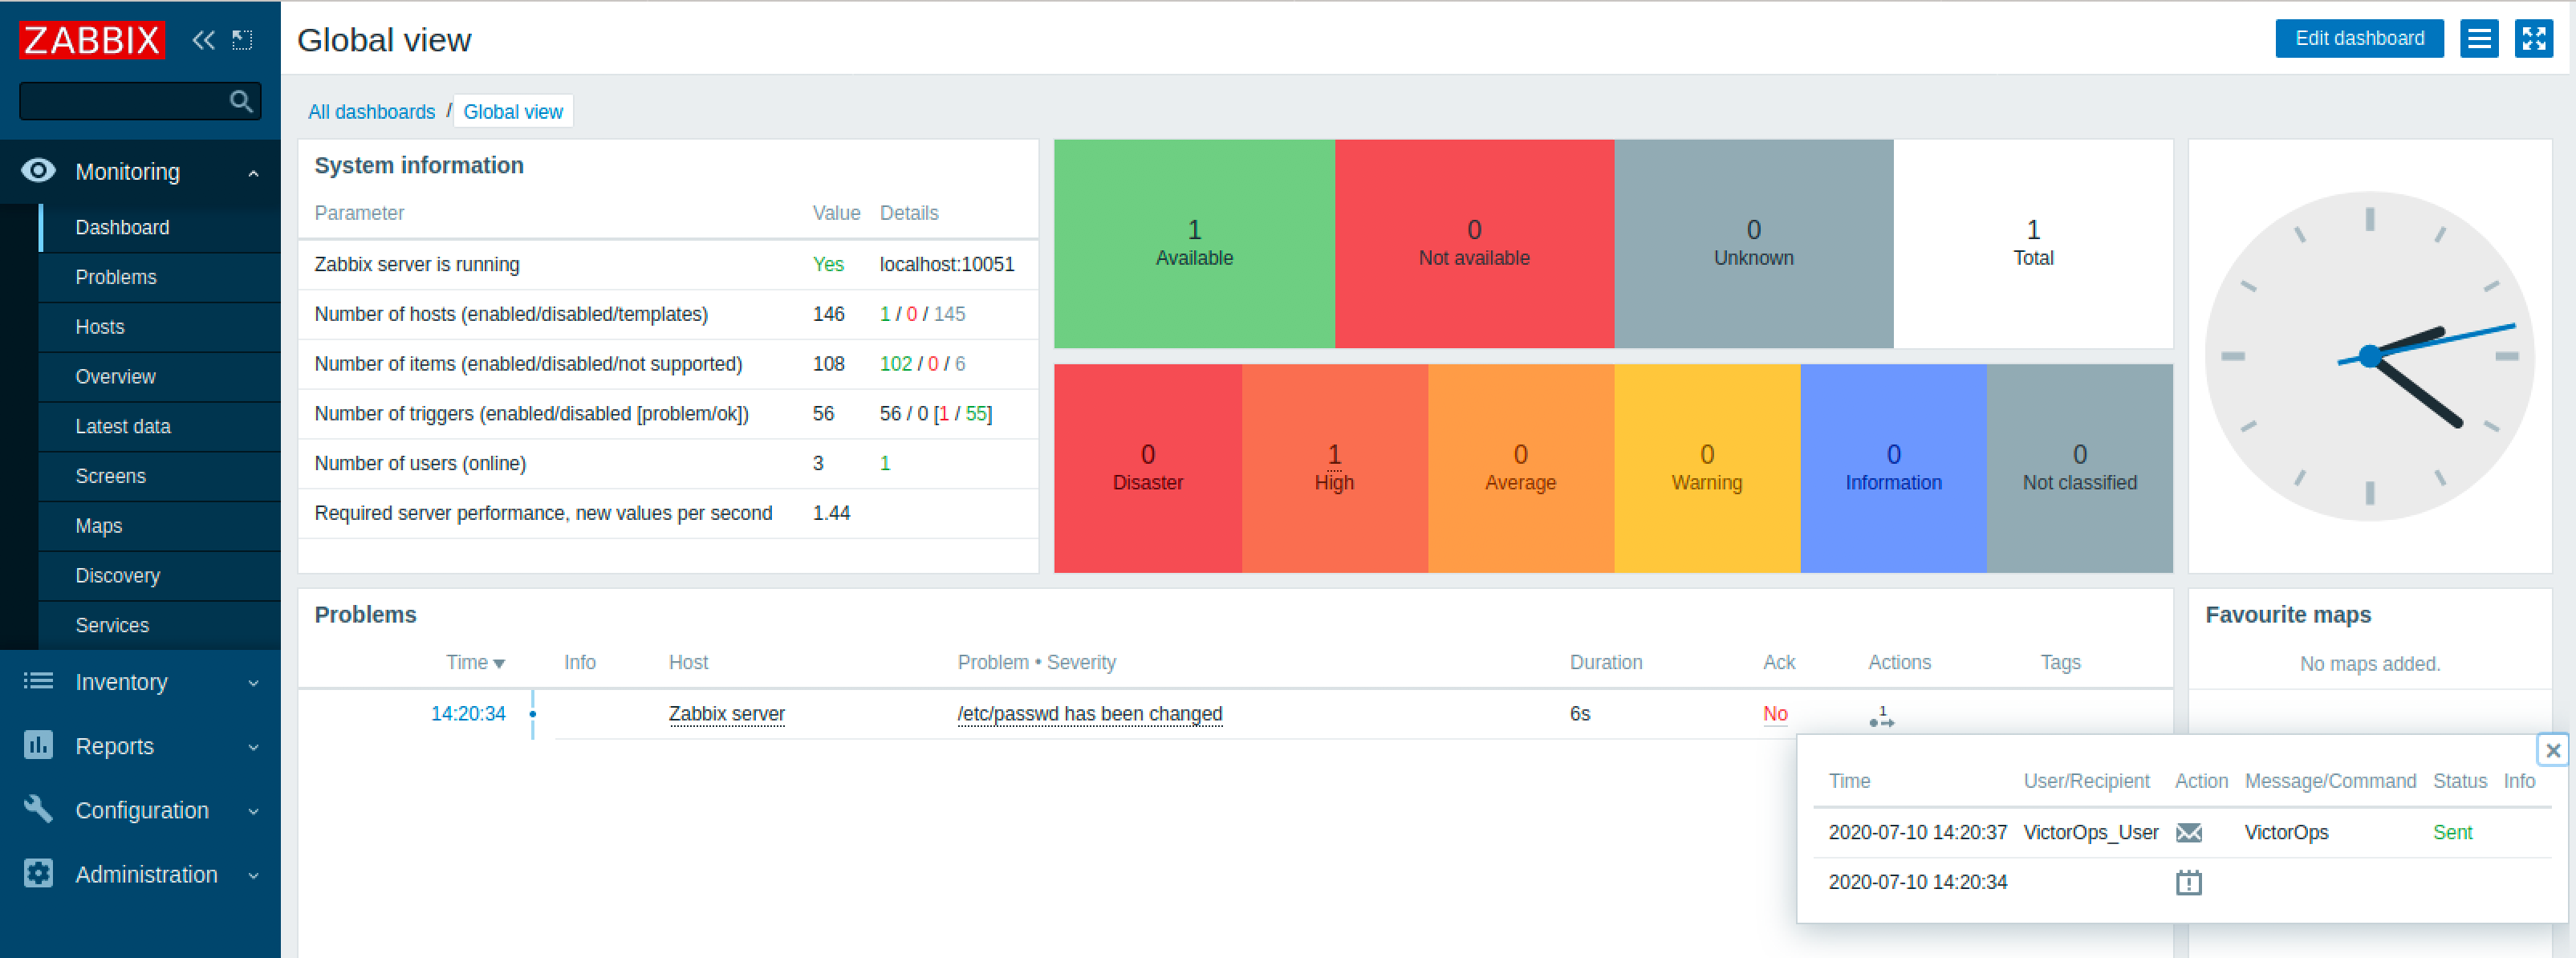
以上でZabbixインテグレーションは完了です。テストするには、Zabbixで新しいアラートを作成し、ダッシュボードのアクションセクションで成功したか確認してください。
Webhookの使用によるZabbix4.4 🔗
プラグインは4.2までのバージョンしかサポートしていませんが、Webhookを使用してZabbix 4.4と統合することができます。動作やレイアウトはプラグインと同様です。
必要な基本コンポーネントは、」Splunk On-Call Alert」というユーザーが割り当てられたSplunk On-Call Usersグループ、」Notify Splunk On-Call」というアクション、」Splunk On-Call Webhook」というメディアタイプです。
Zabbixメディアタイプ4.4 🔗
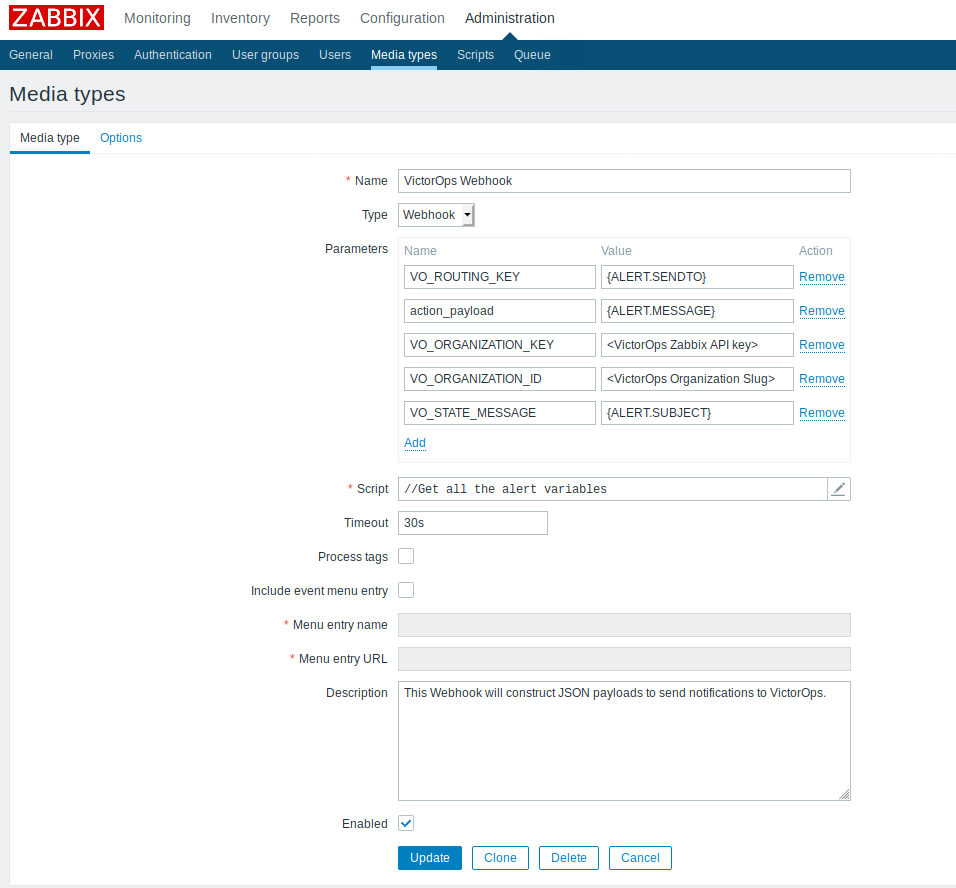
はじめに、Administration、Media Types から新しいメディアタイプを作成します。Type で、 を選択し、以下のスクリーンショットと一致するようにパラメータを設定します:
スクリプトセクションに、Splunk On-Callへのアラートを作成するために必要なJavascriptを入力します。
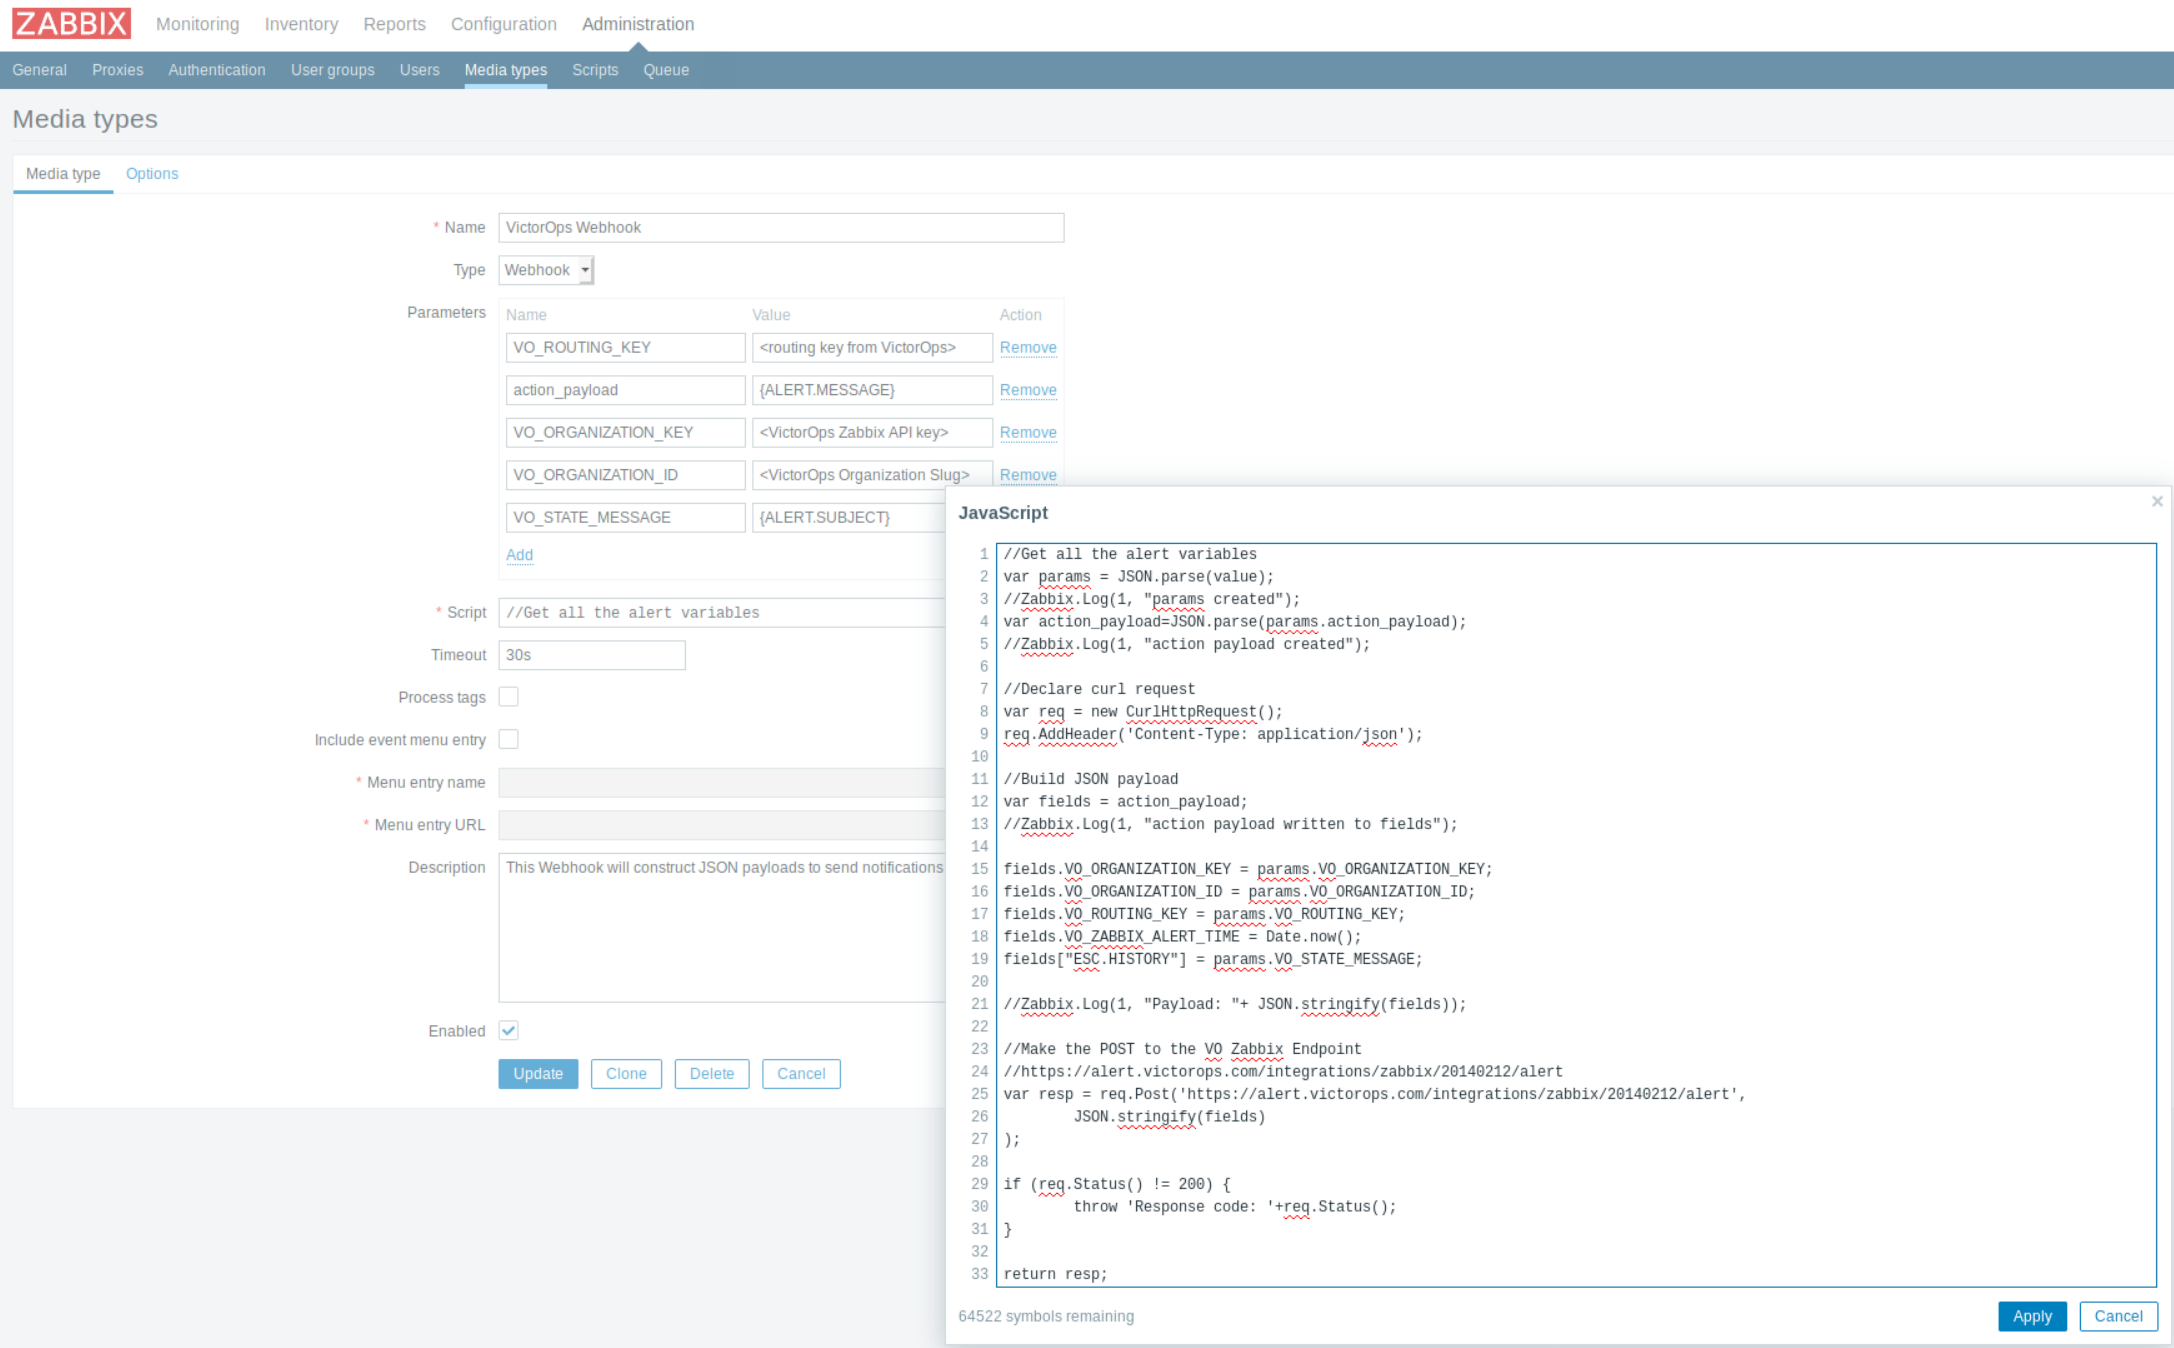
このjavascriptはGitHubのリポジトリ https://github.com/victorops/monitoring_tool_releases/blob/master/VictorOps-Zabbix4.4/victorops_zabbix_webhook.js にあります。
Zabbixユーザー4.4 🔗
新しいユーザーを作成し、任意のグループに割り当てます。そしてそのユーザー(この場合は」Splunk On-Call Alert」)をメディアタイプに関連付けます。Send to セクションに適切なSplunk On-Call ルーティングキーを入力します。ユーザーには読み書きアクセス許可が必要なので、必要なアクセス許可レベルを割り当てます。
Zabbixアクション4.4 🔗
次にアクションを作成します。アクションの条件を設定することで、アラート動作をカスタマイズできます。
次に、Operations と Recovery Operations タブを適切なJSONペイロードで更新します。
両方のタブの Default Message セクションに次のペイロードを配置します。次に、Default Subject を Operations タブの Incident: {ESC.HISTORY} に、Recovery Operations タブの Resolved: {ESC.HISTORY} に更新します。
Operations タブのJavascriptペイロードは、GitHubリポジトリの https://github.com/victorops/monitoring_tool_releases/blob/master/VictorOps-Zabbix4.4/action_trigger_operation.json にあります。
Recovery Operations タブのペイロードは、GitHubリポジトリの https://github.com/victorops/monitoring_tool_releases/blob/master/VictorOps-Zabbix4.4/action_recovery_operation.json にあります。
最後のステップとして、両方のタブの操作セクションを更新し、Splunk On-Call Webhookメディアタイプを通じてSplunk On-Callユーザーに通知を送信します。完了すると、両方のタブは以下のようになります:
Ack-Backセットアップ4.4-5.x 🔗
ack-back機能は「Splunk On-Call Command Poll」アイテムを作成するプラグインを通してインストールされます。これにより、Splunk On-Callの承認がZabbixの問題を」確認」状態に更新することができます。
debパッケージ 🔗
以下のコマンドを実行します:
wget
https://github.com/victorops/monitoring_tool_releases/releases/download/victorops-zabbix-0.18.3/victorops-zabbix_0.18.3-2_all.deb

sudo dpkg -i victorops-zabbix_0.18.3-2_all.deb
/opt/victorops/zabbix_plugin/binから次を実行します:
sudo ./install
rpmパッケージ 🔗
以下のコマンドを実行します:
wget
https://github.com/victorops/monitoring_tool_releases/releases/download/victorops-zabbix-0.18.3/victorops-zabbix-0.18.3-2.noarch.rpm

sudo rpm -i victorops-zabbix-0.18.3-2.noarch.rpm
/opt/victorops/zabbix_plugin/binから次を実行します:
sudo ./install
設定 🔗
ファイル名をlocal.zabbix.conf.exampleからlocal.zabbix.confに変更します:
mv /opt/victorops/zabbix_plugin/conf/local.zabbix.conf.example
/opt/victorops/zabbix_plugin/conf/local.zabbix.conf
次に、ファイルを編集し、管理者のユーザー名とパスワード、Zabbixの問題を更新するためのZabbixサーバーのURLを指定します。
sudo nano local.zabbix.conf
インストールしたら、スクリプトを実行してパッケージを設定できます。
sudo /opt/victorops/zabbix_plugin/bin/configure_ackback.sh
設定スクリプトはZabbixサーバーに接続します。使用するには、Zabbix管理者ユーザーIDとパスワードが必要です。スクリプトはこれらの入力を要求します。
さらに、configure_ackback.shスクリプトに組織の「スラグ」とZabbixアラートキーを指定する必要があります。これらはSplunk On-CallのZabbixインテグレーションページに記載されています。
最後に実行するスクリプトは:
sudo /opt/victorops/zabbix_plugin/bin/create_links.sh
スクリプトを実行すると、ZabbixサーバーにSplunk On-Call Command Pollという新しい項目が表示されます。ZabbixがSplunk On-Callから承認ステータスを取得するには、この項目をオンにします。
この項目をオンにすれば、設定は完了です。
プラグインを使用するZabbix 4.2以下 🔗
Splunk On-CallのZabbixプラグインは、トリガー通知をキューに入れ、処理のためにSplunk On-Callサーバーに転送するスクリプトのセットです。通知のキューイングはZabbixが通知スクリプトを実行するインバンドで行われ、転送は長時間実行プロセスによってアウトオブバンドで行われます。
転送プロセスは、通知の送信を再試行することができ、送信に何らかの理由で長時間(デフォルトでは1分間)失敗した場合、設定されたアドレスへのメール送信にフォールバックします。
レイアウト 🔗
メインパッケージファイルは/opt/victorops/zabbix_pluginにインストールされます。通知は/var/victorops/zabbix-alertsにキューイングされます。ログは/var/log/victoropsに書き込まれます。
シンボリックリンクはZabbixアラートスクリプトと外部スクリプトディレクトリに作成されます。
インストール 🔗
パッケージはGitHubからRPM、DEBまたはtarballとして入手できます: https://github.com/victorops/monitoring_tool_releases/releases/tag/victorops-zabbix-0.17.3 。
debパッケージ 🔗
以下のコマンドを実行します:
wget
https://github.com/victorops/monitoring_tool_releases/releases/download/victorops-zabbix-0.17.3/victorops-zabbix_0.17.3-2_all.deb

sudo dpkg -i victorops-zabbix_0.17.3-2_all.deb
/opt/victorops/zabbix_plugin/binから次を実行します:
sudo ./install
rpmパッケージ 🔗
以下のコマンドを実行します:
wget
https://github.com/victorops/monitoring_tool_releases/releases/download/victorops-zabbix-0.17.3/victorops-zabbix-0.17.3-2.noarch.rpm

sudo rpm -i victorops-zabbix-0.17.3-2.noarch.rpm
/opt/victorops/zabbix_plugin/binから次を実行します:
sudo ./install
設定 🔗
DEBまたはRPMパッケージからインストールする場合、インストーラはプラグインファイルを /opt/victorops/zabbix_pluginに配置します。さらに、通知キューとログ用にそれぞれ /var/victorops/zabbix-alertsと/var/log/victoropsの2つのディレクトリが作成されます。
インストール後は、以下のスクリプトを実行してパッケージの設定を行う必要があります:
/opt/victorops/zabbix_plugin/bin/configure.sh
設定スクリプトはZabbixサーバーに接続するため、使用するにはZabbix管理者ユーザーIDとパスワードが必要です。スクリプトはこれらの入力を要求します。
さらに、configure.shスクリプトに組織の「スラグ」とZabbixアラートキーを指定する必要があります。これらはSplunk On-CallのZabbixインテグレーションページに記載されています。また、Splunk On-Callへの通知送信に失敗した場合の予備連絡先としてメールアドレスを指定することもできます。
最後に実行するスクリプトは/opt/victorops/zabbix_plugin/bin/create_links.shです。
設定要素 🔗
設定スクリプトはZabbixサーバーに接続し、Zabbix APIを使用して、通知をSplunk On-Callに転送するために必要ないくつかの要素を追加します。これらは以下の通りです:
Zabbixユーザー」Splunk On-Call Alert」
Zabbixユーザーグループ」Splunk On-Call Users」
Zabbixメディアタイプ“Notify Splunk On-Call”
Zabbixアクション」Notify Splunk On-Call」。このアクションには処理に必要な特定のメッセージコンテンツが含まれ、リカバリ通知を含む問題ステータスのトリガーに対してZabbixから起動されます。
Splunk On-Callフォワーダープロセスのホスト「Zabbix Server」に対する Zabbixアイテム「Splunk On-Callフォワーダー」。このアイテムは「外部チェック」タイプです。Zabbixがこのアイテムのチェックを実行すると、必要に応じてフォワーダープロセスが開始されます。
Zabbixにack-backを設定する 🔗
Zabbixのack-back機能をオンにするには、以下の手順に従ってください:
/opt/victorops/zabbix_plugin/conf/local.zabbix.conf.exampleを/opt/victorops/zabbix_plugin/conf/local.zabbix.confにコピーします。
エディターで/opt/victorops/zabbix_plugin/conf/local.zabbix.confを開き、「acknowledge」アクセス許可でZabbixコンソールへのログインを許可するユーザーとパスワードを設定します:
ZABBIX_USER=admin ZABBIX_PASSWD=fooblyboo
ファイルの所有者をZabbixユーザーに変更し、アクセス許可を600に設定するとよいでしょう。
ZabbixコンソールでZabbixサーバーの「アイテム」リストに移動し、Splunk On-Call Command Poll アイテムをオンにします。
複数のZabbixサーバーを設定する 🔗
複数のZabbixサーバーでSplunk On-Callインテグレーションを使用する場合、Zabbixアクションを更新し、MONITOR_NAME フィールドを含める必要があります。デフォルトとリカバリの両方のメッセージボディにこのフィールドを追加する必要があります。
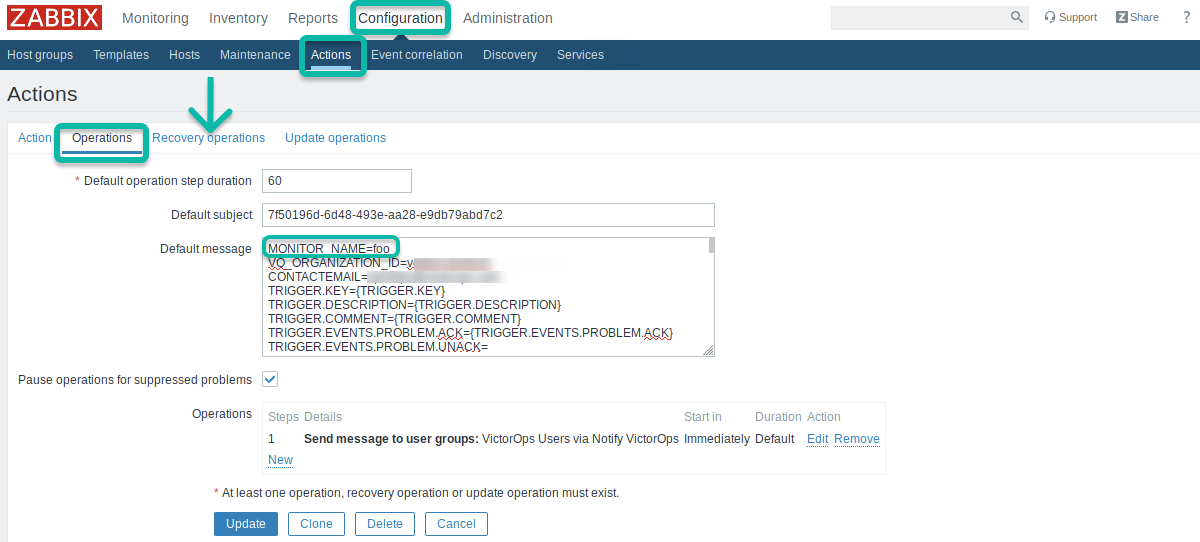
MONITOR_NAME フィールドは、プラグインをインストールしたZabbixサーバーごとに一意である必要があります。
MONITOR_NAME にマッチする値を/opt/victorops/zabbix_plugin/conf/local.zabbix.confにある設定ファイルに追加します。
.confファイルの構文は重要です。MONITOR_NAME の値を設定するときは、スペースや引用符を使わないでください。
注意
これらの設定を変更すると、Zabbix側のアイテムとSplunk On-Call側のアイテムが切断されます。つまり、Splunk On-Callで未解決のインシデントがある場合、手動で解決する必要があります。
ZabbixコンソールでZabbixサーバーの「アイテム」リストに移動し、Splunk On-Call Command Poll アイテムをオンにします。
Splunk On-Callでのインシデントのルーティング 🔗
Splunk On-Callに送信された通知によって作成されたインシデントは、デフォルトのルーティングルールで処理されます。Splunk On-Callで別のルーティングキーを使用したい場合は、Splunk On-Callアラートユーザーのメディアを変更し、Send to フィールドにSplunk On-Callルーティングキーを入力します。
Send To を使用したいルーティングキーに変更します:
複数のルーティングスキームや複雑なルーティングスキームを作成する場合、ルーティングキーに対応した新しいZabbixアクション、ユーザー、メディアタイプを作成する必要があります。
トラブルシューティング 🔗
以下の図のように、WebhookアクションでJSONエラーが表示される場合は、アイテム名やトリガー名、説明文に無効なJSON文字があることを意味します。

Splunk On-Callメディアタイプスクリプトの9、11、14、17 行目のコメントを解除して、引用符と改行文字を解析します。これで問題が解決しない場合は、他の無効な文字を正規表現で補強するか、Splunkサポートにお問い合わせください。
プロキシサポート(5.0以上) 🔗
Zabbix Webhookにプロキシを追加する場合は、38行目のコメントを外します。
通知処理 🔗
Splunk On-Callに通知するアクションは、通知の詳細をディスク上のファイルに保存します。数秒以内に、フォワーダープロセスが詳細をSplunk On-Callに送信し、そこで通常のアラート処理が実行されます。
詳細の転送が失敗した場合、詳細のタイムスタンプがチェックされ、詳細が古い場合(デフォルトでは1分)、代わりに設定時に指定したバックアップメールアドレスに詳細が送信されます。
ZabbixからSplunk On-Callに送信されるペイロード(デフォルトメッセージ)を短くしたい場合、以下の最小必須フィールドを残しておく必要があります:
VO_ORGANIZATION_ID= YOUR_ORG_SLUG_HERE CONTACTEMAIL= YOUR_EMAIL_HERE
ESC.HISTORY={ESC.HISTORY} EVENT.ACK.HISTORY={EVENT.ACK.HISTORY}
EVENT.ACK.STATUS={EVENT.ACK.STATUS} EVENT.DATE={EVENT.DATE}
EVENT.TIME={EVENT.TIME} HOSTNAME={HOSTNAME} HOST.NAME={HOST.NAME}
HOST.NAME1={HOST.NAME1} TRIGGER.KEY={TRIGGER.KEY} TIME={TIME}
TRIGGER.ID={TRIGGER.ID} TRIGGER.NAME={TRIGGER.NAME}
TRIGGER.NSEVERITY={TRIGGER.NSEVERITY}
TRIGGER.SEVERITY={TRIGGER.SEVERITY} TRIGGER.STATUS={TRIGGER.STATUS}